
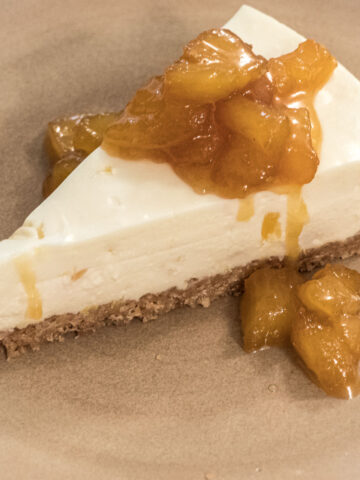
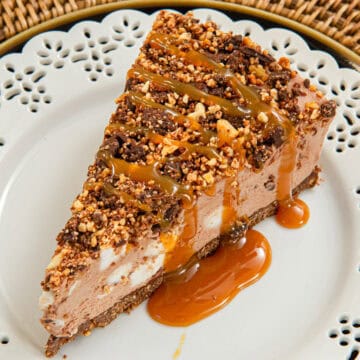
Ummmmm cheesecake! This very Easy No Bake Rocky Road Cheesecake will become everyone's favorite! Cheesecakes have an unwarranted reputation of being difficult to make. Do you use a water bath or not? How do you prevent it from cracking? What temperature is best to bake it? And on and on it goes. What if you could make a great cheesecake without any baking involved? Of course you would!
Well look no further because this Rocky Road Cheesecake is as easy as it gets.
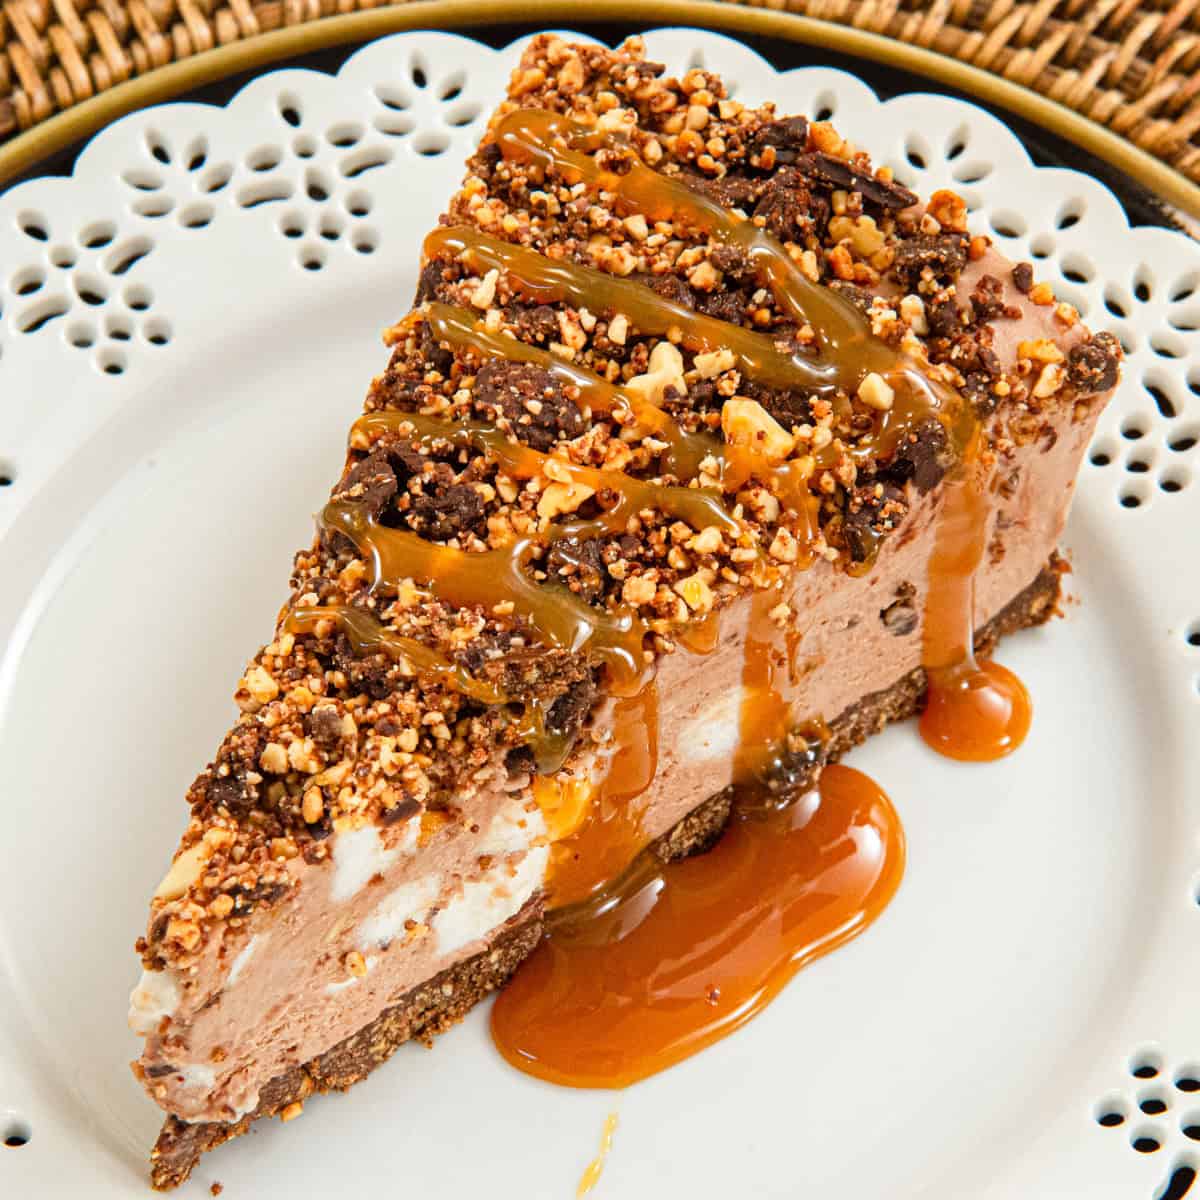
While it looks complex it is actually very easy. Peanuts, chocolate and mini- marshmallows are stirred into a chocolate cheese cake made with cream cheese, condensed milk and a bit of whipped cream - all in the processor. And as to the complements you get? Bask in their glory and share the recipe!
Other summer desserts include: Roasted Peaches with Amaretti Crisp, Hello Dolly Cookies, Dutch Peach Pie, Almost No Bake Strawberry Pie, and the unusual dessert of Chilled Peach Soup. And for more great no-bake options, check out No Oven? No Problem!
Jump to:
The processor or mixer for mixing cheesecakes
Several years ago I found a better way to mix cheesecakes.....the processor. It was quite accidental. I was making them for the restaurant and I had something in the bowl of the mixer. The particular cheesecake I was making takes a long time to bake and cool in the oven so I made it in the processor. When the owner of the restaurant tasted the newly made cheesecakes he said, "I don't know what you did, they were always good but these are outstanding".
But why are they better? When mixed in a mixer, air is whipped into the cream cheese mixer even when using the paddle attachment. This makes for a fluffier cheesecake. For the ultimate smooth, creamy cheesecake using a processor which doesn't add air to the mixture is the answer. They are simply better this way whether they are baked or a no bake cheesecake. While some of my older posts still use the mixer (at least till I get to updating them) I make all my cheesecake in the processor now. See if you can't see a difference.
Cheesecake Pan or Springform Pans
When I had my bakery we used Cheesecake pans for cheesecakes as well as to assemble cakes with soft fillings that could slide before setting up.
A Cheesecake pan has a solid outer ring and a flat bottom that fits in it. On the other hand the springform pans have an outer ring that opens and closes with a spring. The bottom also usually has a lip on it to fit within the ring when it is closed. The problem with that is two fold. Over time or sooner depending upon how it is stored, the spring no longer closes tightly.
While the cheesecake in the cheesecake pan can be easily released by dropping the side and then using a metal spatula to go between the crust and the bottom plate it is easily released and moved to a serving plate or cake board. We did this thousands of times at the bakery.
With the springform pan the lip on the bottom makes it much more difficult to release cleanly as it is more difficult to get the spatula under the crust. The cheesecake pan is also a snap to wash and dry. Not so much the springform pan.
Why You'll Love this Recipe
- It's super easy to make using only the processor.
- The cheesecake uses simple ingredients easy to obtain.
- There is absolutely no baking involved.
- It freezes like a dream so can be made ahead.
- Let the kids stir in the peanuts and chocolate so they can say they made a cheesecake.
- This cheesecake requires absolutely no baking.
Recipe Ingredients
Chocolate Graham Cracker Crust
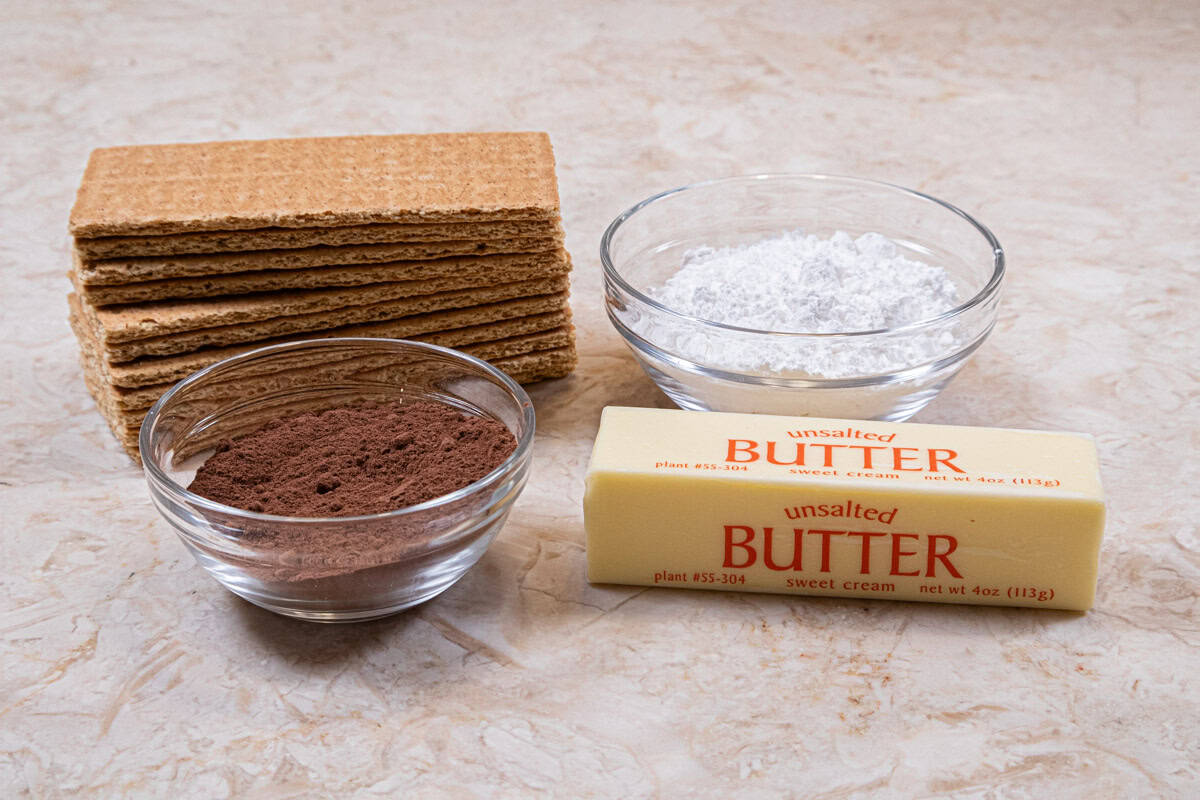
FRONT ROW: Cocoa powder, unsalted butter
BACK ROW: Graham Crackers, powdered sugar
Rocky Road Cheesecake
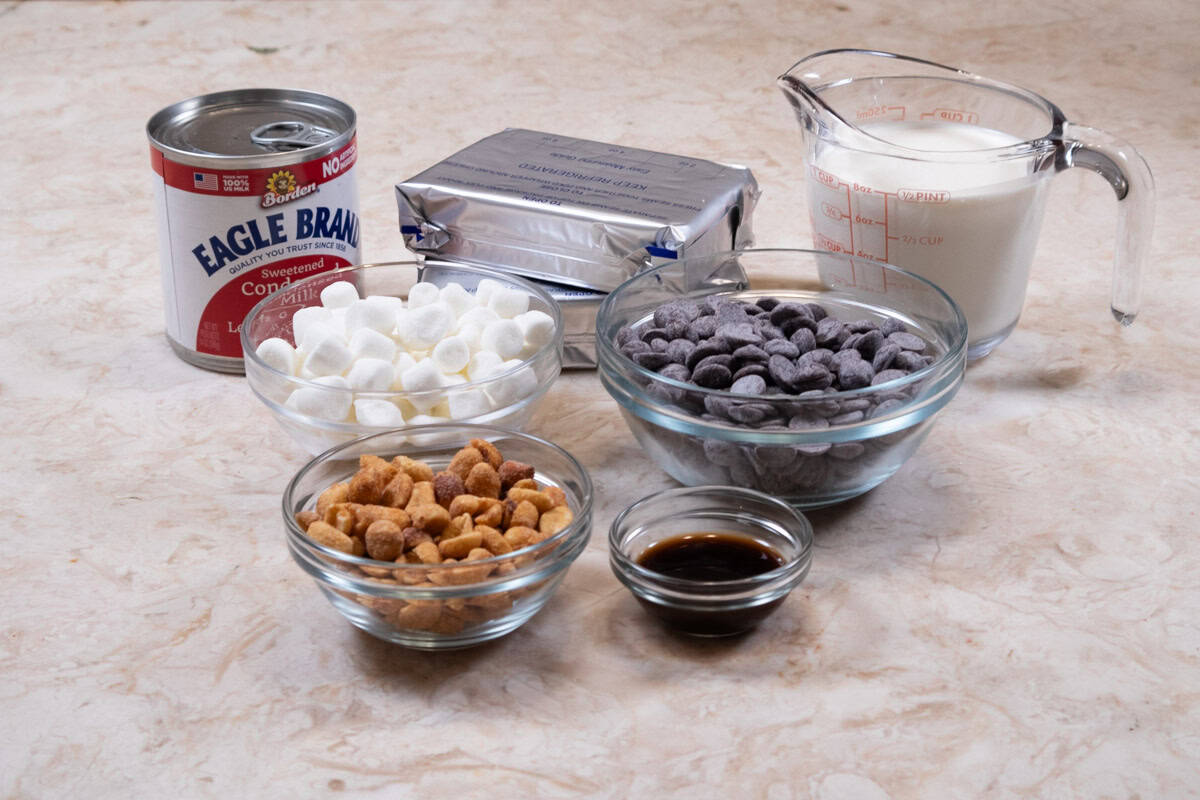
FRONT ROW: Roasted, salted peanuts, vanilla extract
MIDDLE ROW: Mini-marshmallows, semisweet chocolate
BACK ROW: Sweetened Condensed milk, cream cheese and heavy cream
Gravel Top (optional)
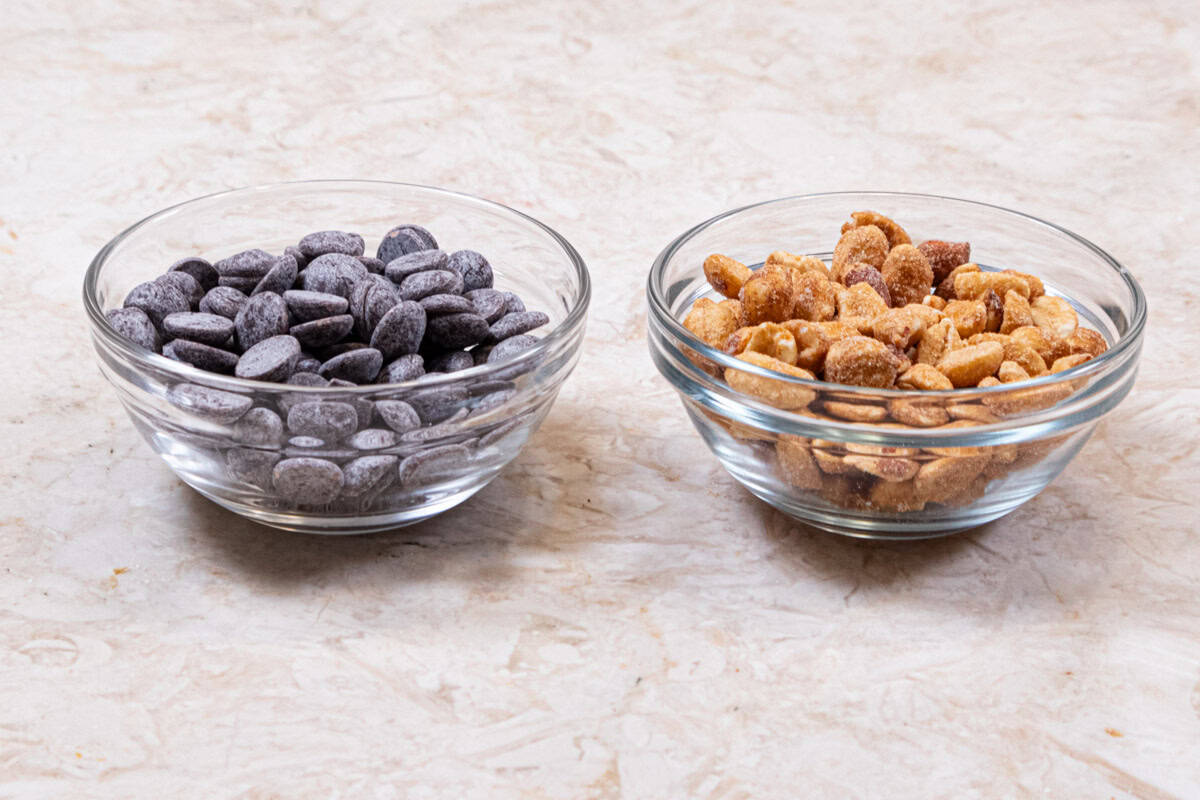
Semisweet chocoalte, dry roasted and salted peanuts. (Not shown homemade or purchased caramel Ice cream Sauce. )
Important Ingredients
- Different brands of Graham Crackers take differing amounts of melted butter because of their formulas. It is best to start with a given amount and then add another tablespoon or two to get the consistency of wet sand.
- Either Natural or Dutch cocoa powder can be used in this recipe because there is no leavening agent being used.
- Be sure to use sweetened condensed milk and not evaporated milk. They are two different products. Both milks are evaporated milks, using different techniques. All condensed milk is sweetened. Evaporated milk is not.
- Any dry roasted, salted peanuts can be used, even those with honey.
- While I used my go to pure chocolate Callebaut #811 callets, this recipe can even use chocolate chips if that is what you have on hand.
- Full fat or ⅓ less fat cream cheese can be used here. It should be softened before processing by leaving it at room temperature or microwaving it briefly. Do not melt it.
Be sure to see the recipe card below for the full ingredients & instructions.
Step by Step Instructions
Chocolate Graham Cracker Crust

Step 1. Combine the broken graham crackers, cocoa powder and powdered sugar in the bowl of a food processor. Process to make fine crumbs. Step 2. Transfer the crumbs to a bowl and add the melted butter. Step 3. Use a fork to mix the crumbs. The texture should be that of lightly wet sand. Step 4. Spray a cheesecake or springform pan with a non-stick baking release. Press the crumbs evenly into the bottom of the pan. Set aside.
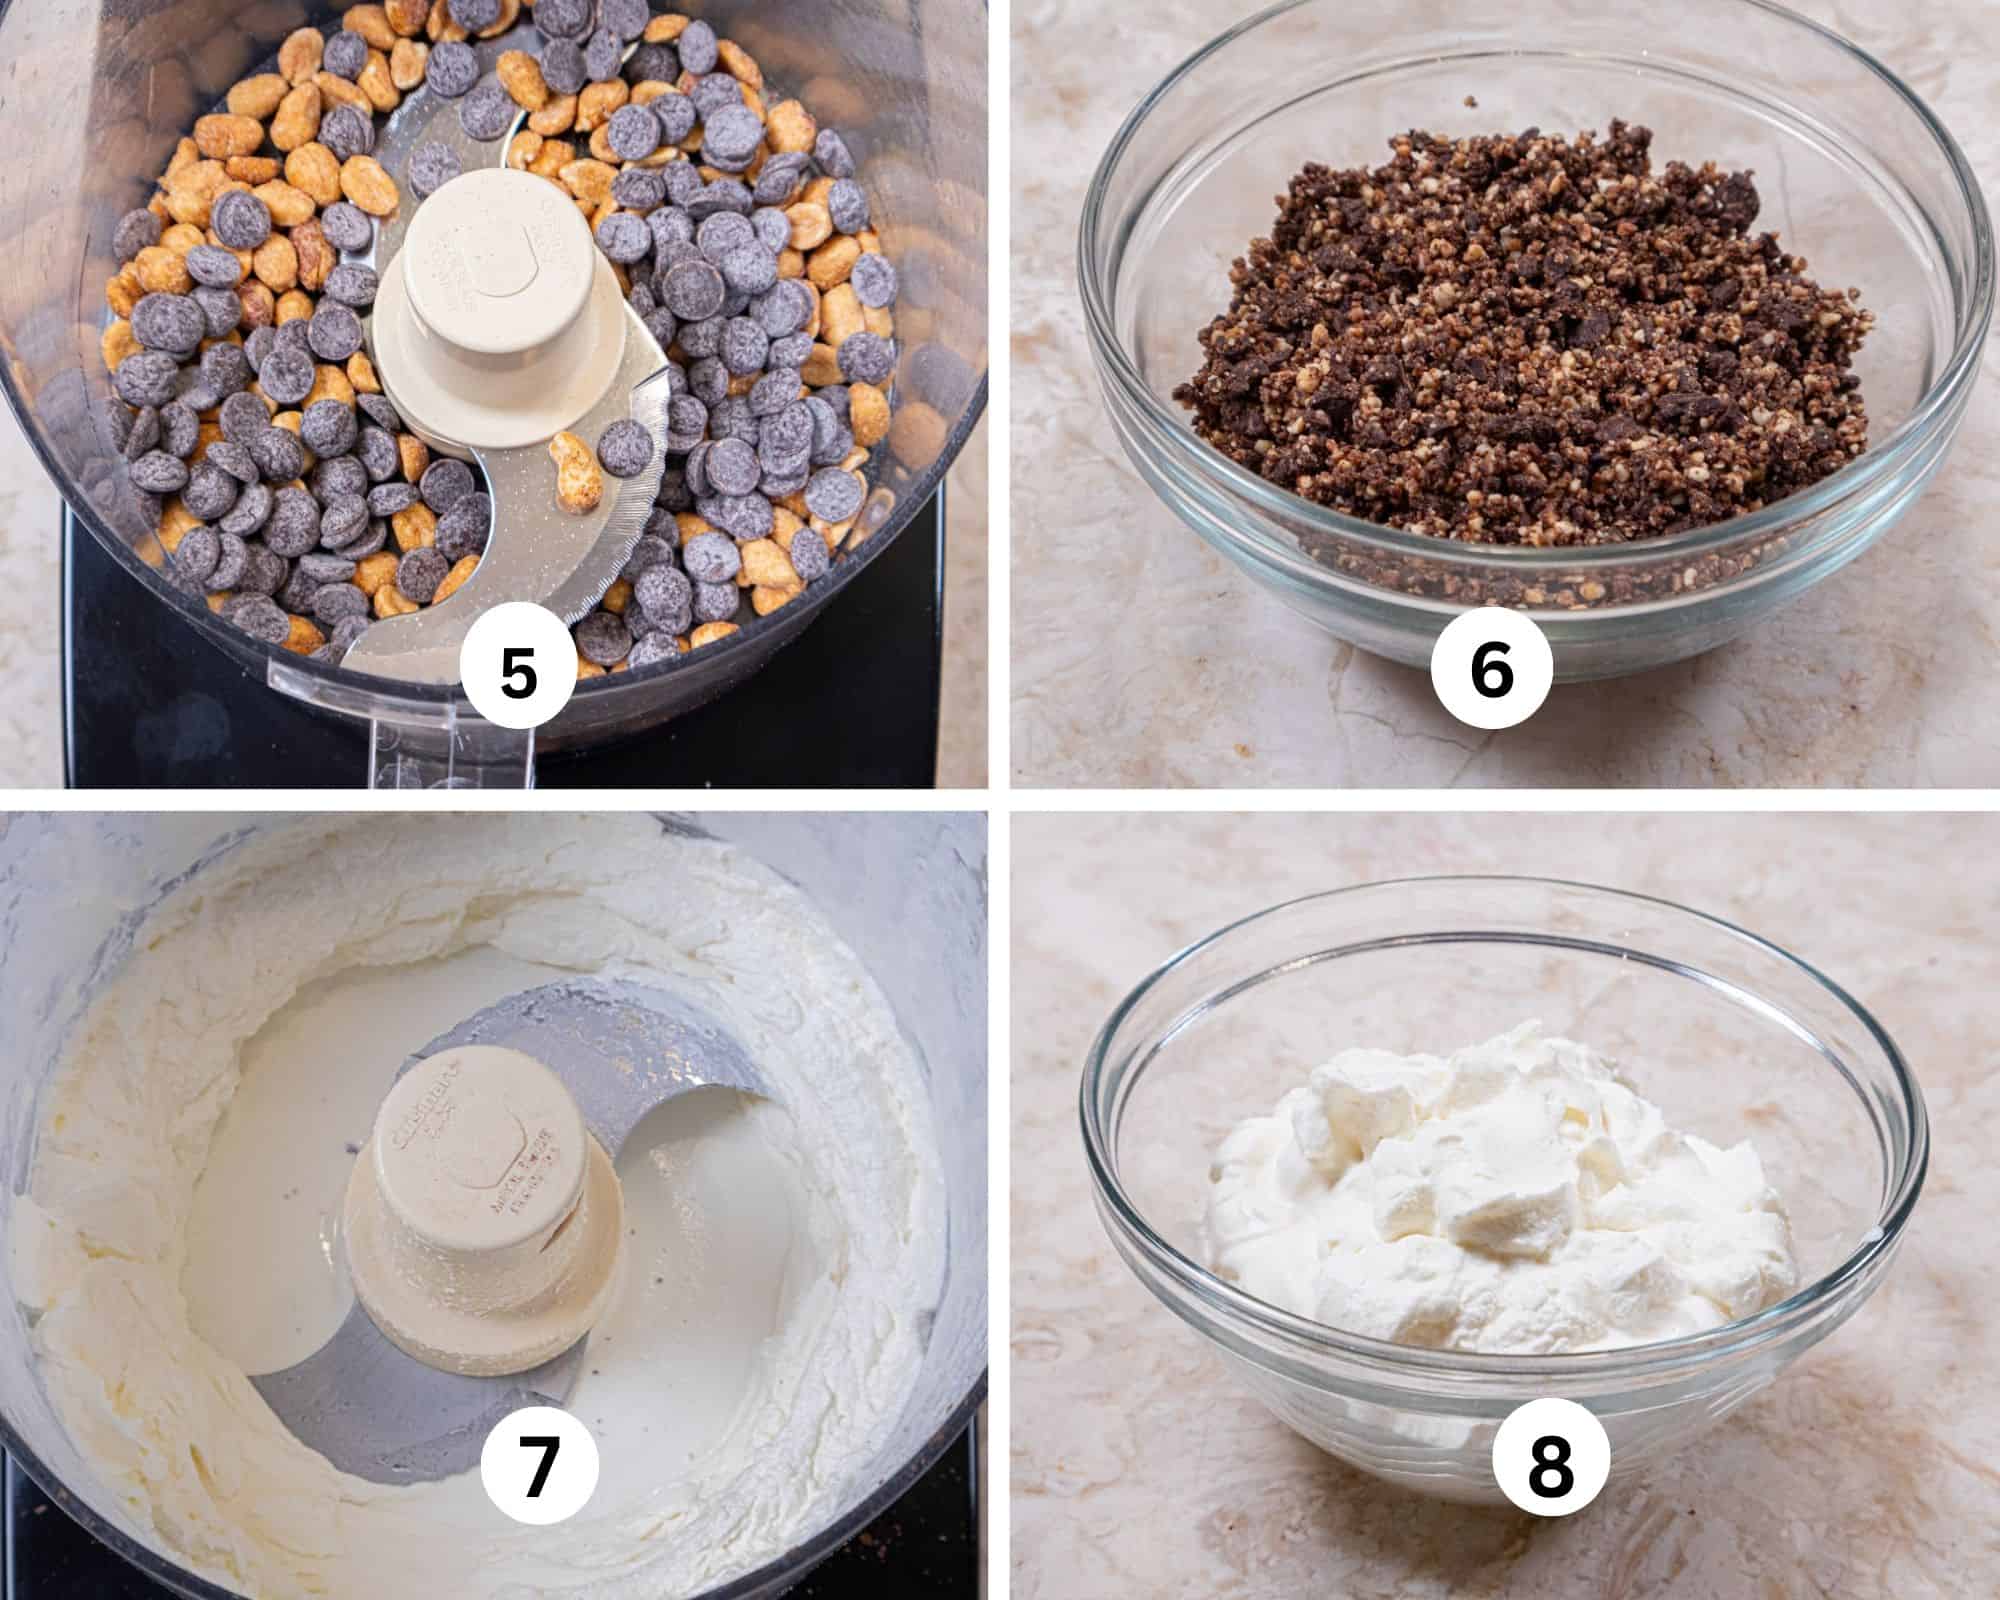
Step 5. To make the peanuts and chocolate for both the inside of the cheesecake and the gravel top this can be done in one step and divided or twice as desired. Place them in the bowl of the processor (no need to clean it). Step 6. Pulse the processor to make large crumbs. Step 7. Wipe out the processor bowl with a paper towel. Add the heavy cream and process until very stiff around the edge of the bowl. The cream in the middle will remain liquid. Step 8. Place in a bowl, along with the unwhipped cream and mix them together. This should result in a medium stiff cream. Set aside.
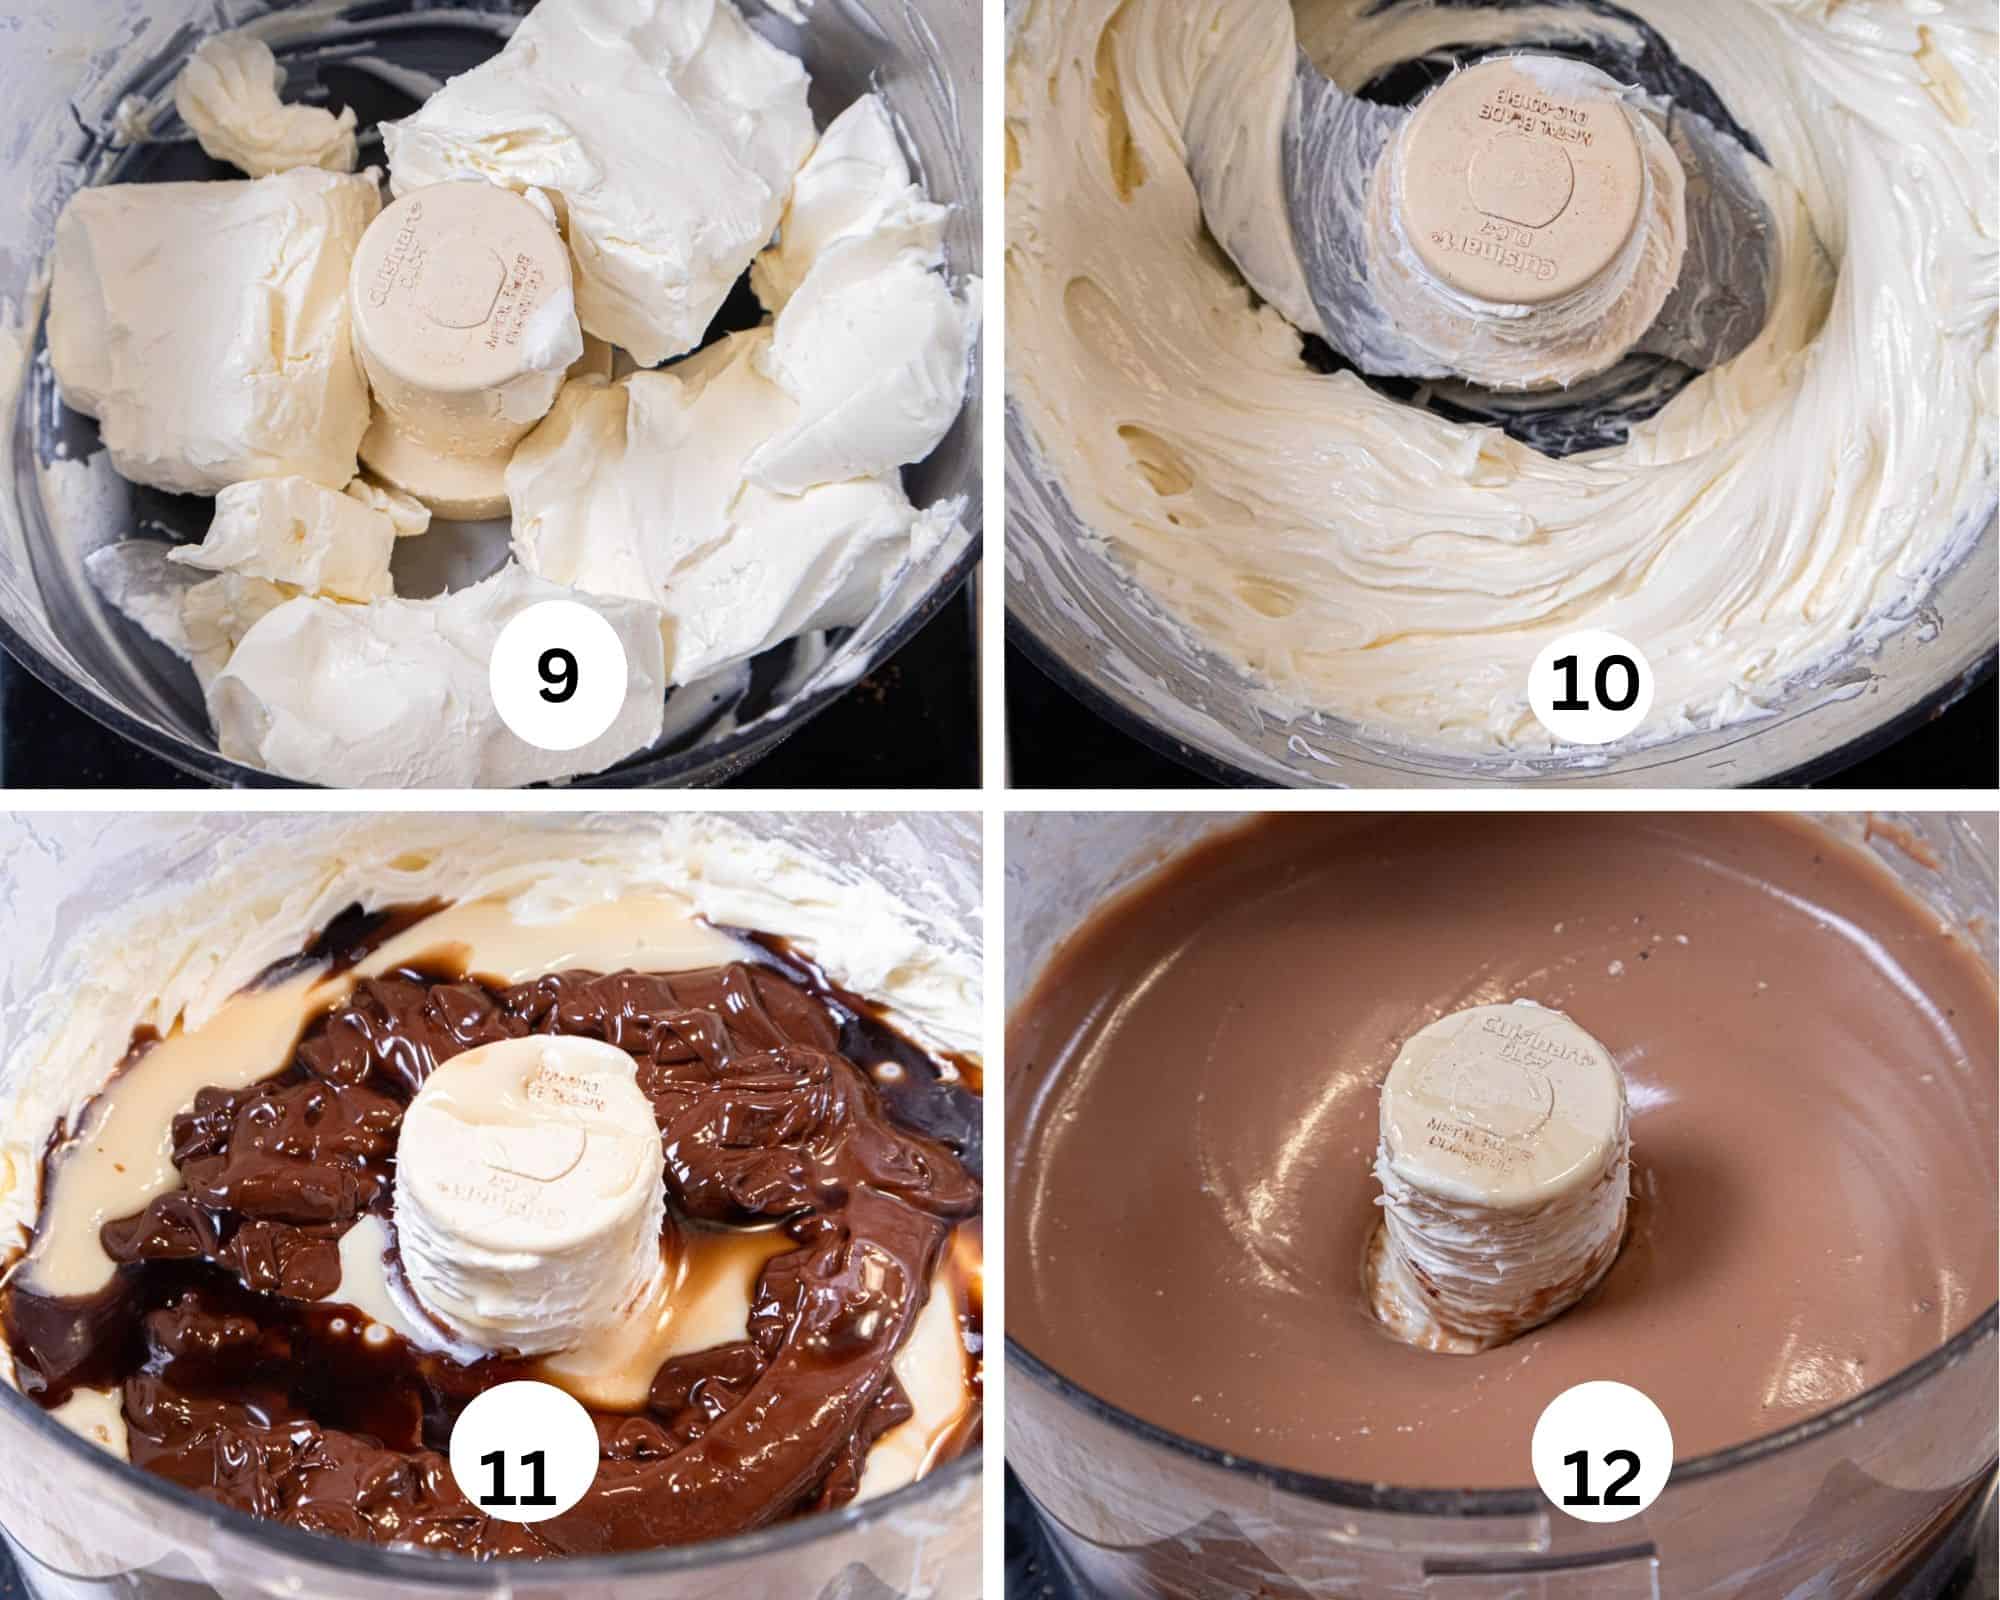
Step 9. Without cleaning the bowl, break up the softened cream cheese and add it to the bowl. Step 10. Process until it is creamy. Step 11. Add the condensed milk, melted chocolate and vanilla. Step 12. Process until completely combined, scraping the sides as necessary.
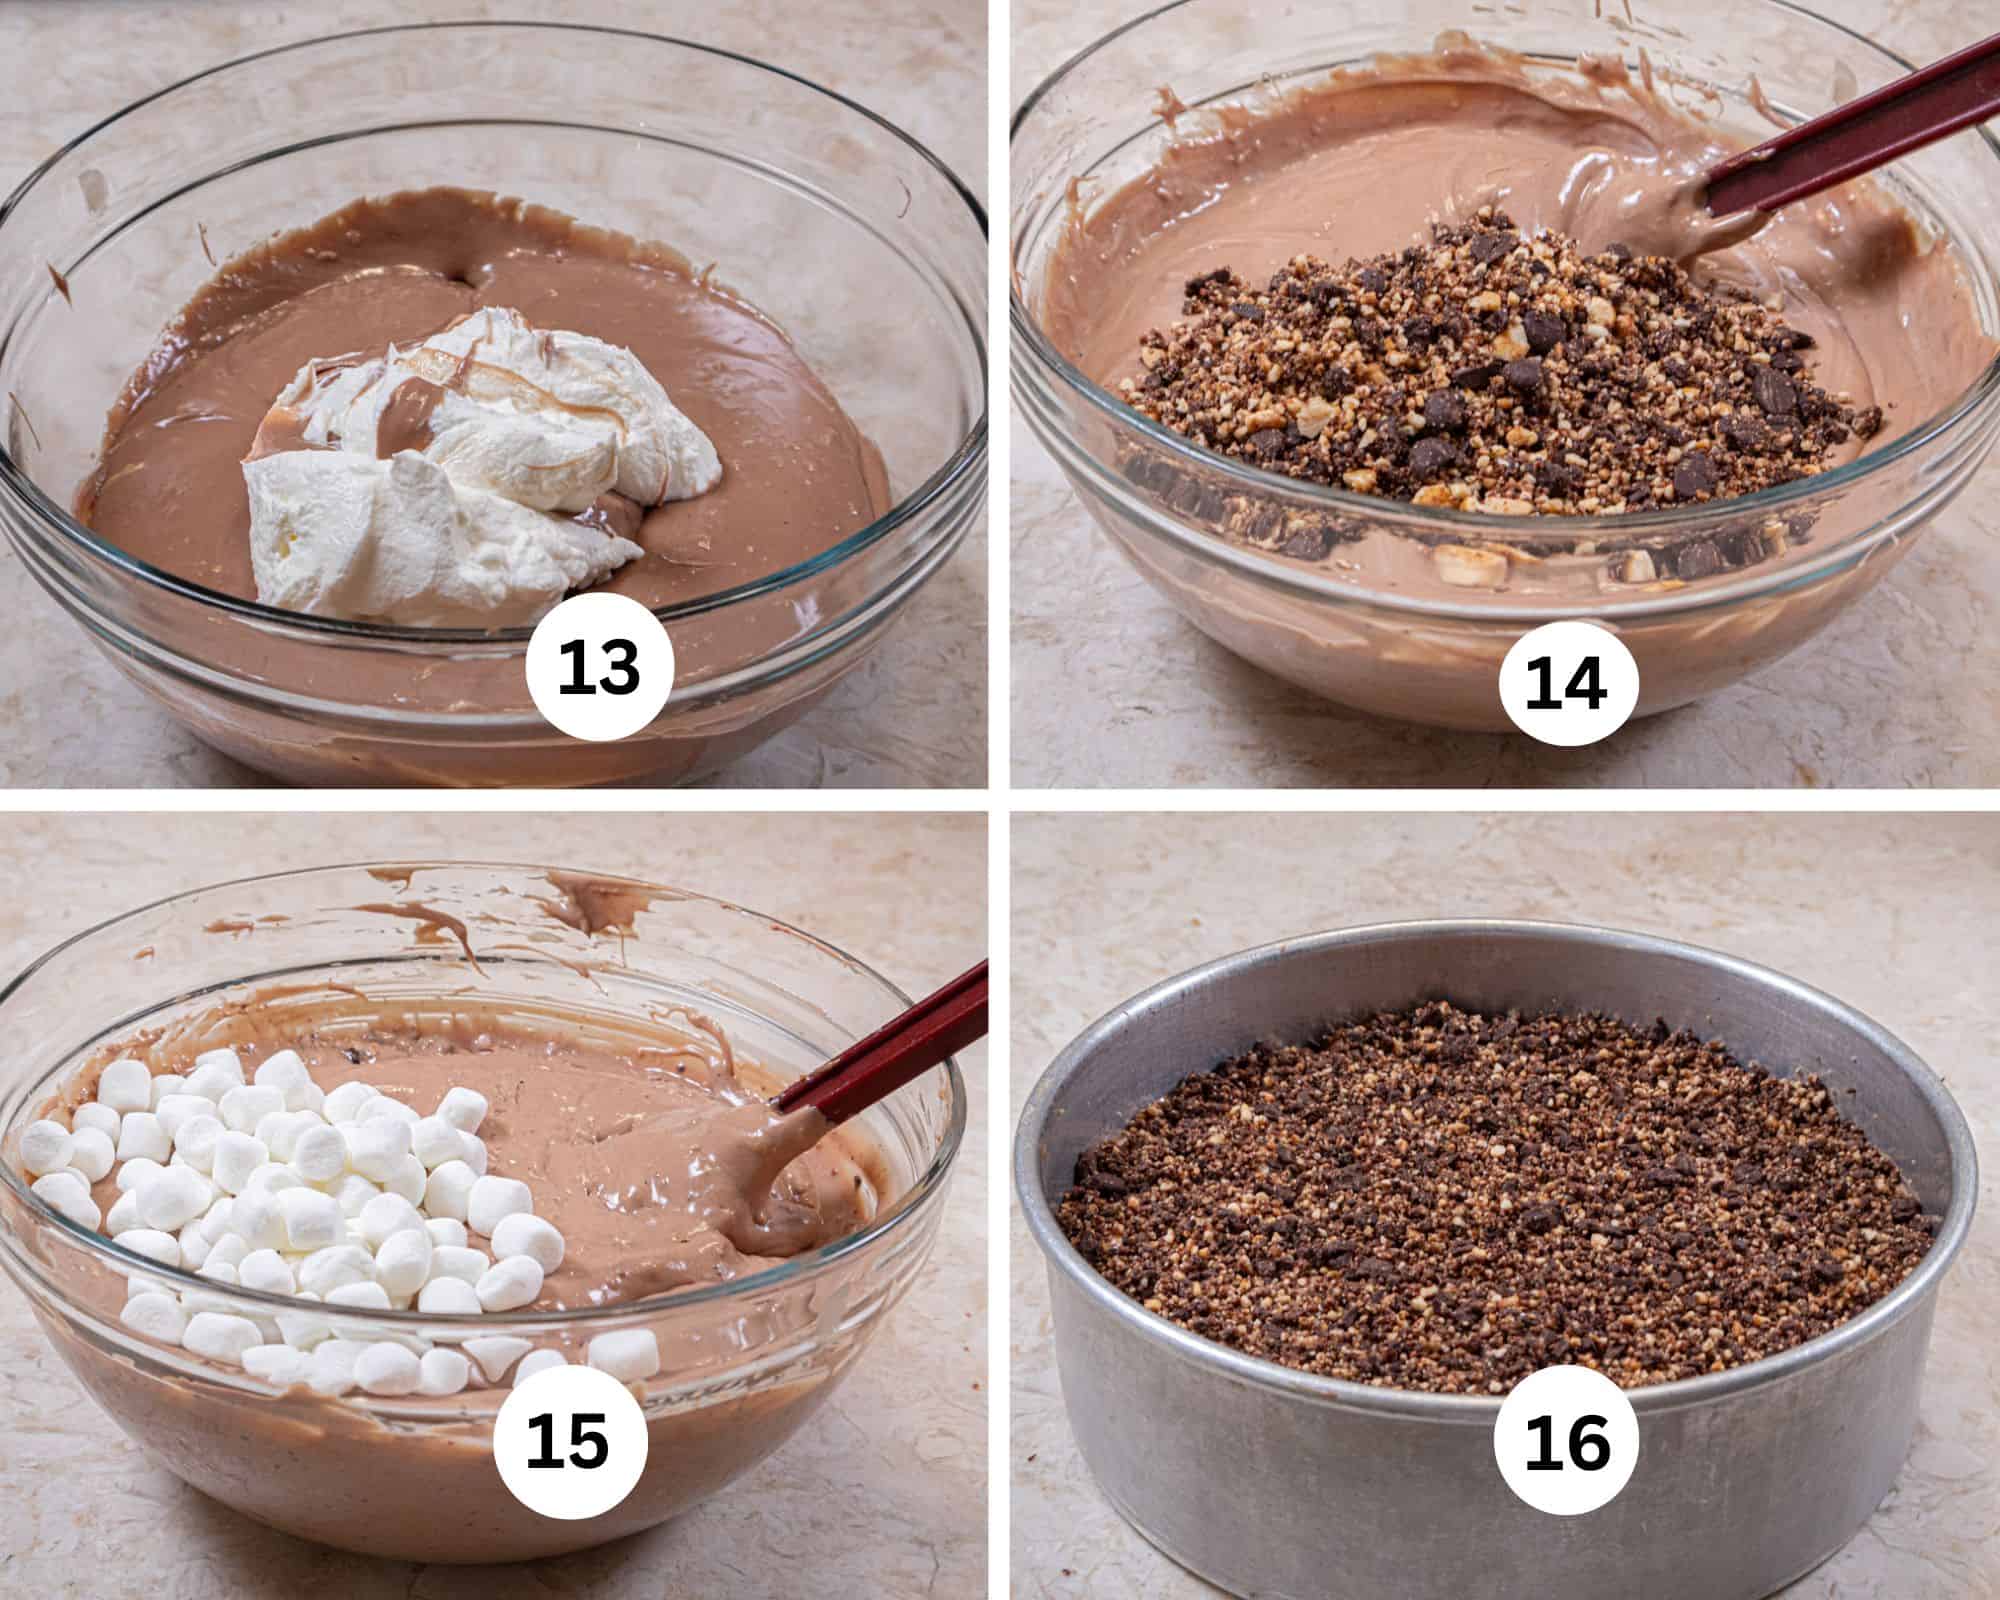
Step 13. Add the reserved whipped cream to the cheesecake mixture. Step 14. Stir in the peanuts and chocolate. Step 15. Stir in the marshmallows. Step 16. Pour the mixture into the prepared pan and top with the gravel. Freeze until hard. This can also be refrigerated overnight for a softer texture.
To release the cheesecake, go around the outside of the pan with a hair dryer on high. Place the cheesecake on a wide can such as a 28 ounce can of tomatoes. Slide down the side. Place a metal spatula between the crust and the base of the pan. Go around the bottom to loosen it. Using two pancake turners, transfer the cheesecake to serving plate or a 10" cake round.
Removing the last of the batter
One of the most frustrating things about the food processor is getting the last of the mixture out of the bowl. Here is the easy way to do it.

Step 17. In this photo, I got as much of the cheesecake out of the bowl as I could with the plastic spatula. Do not use a rubber spatula in this step and it can be easily cut by the blade. Step 18. Replace the top on the processor and pulse it 2 or 3 times. The cheesecake batter will be slung off the blade, essentially cleaning it. Step 19. Remove the blade. Step 20. Using a rubber spatula for this step, remove the remaining batter from the bowl.
Recipe FAQS
Somewhere in the 5th century BC, the Greeks on the island of Samos created the first known cheesecake. It wasn't the dessert it is today. The original cheesecakes were made with fresh cheese that was pounded smooth with flour and honey then baked and reportedly served to the athletes during the first Olympic Games in 776 BC.
According to multiple food history sites, the modern New York-style cheesecake, with its signature creamy texture, is largely credited to Arnold Reuben, a well-known restaurateur, who is said to have experimented with a classic cheesecake recipe by adding cream cheese turning it into one of the most popular desserts today.
Despite it being called a cake it is actually classified as a custard or pie, as it uses eggs and cream cheese to form a custard-like consistency. Some even argue that it’s closer to a tart because of its crust.
Expert Tips
- Different condensed milks are more or less thick. I generally use Eagle Brand as my go to for its consistency.
- Either natural or Dutch cocoa can be used in this recipe as there is no leavening agent used.
- Different graham cracker brands can take more or less butter to bind the crust. Start with the given amount and add more to achieve a lightly wet sand texture.
- Either full fat or ⅓ less cream cheese can be used.
- While I normally don't use chocolate chips, it is fine in this recipe.
Looking for More Cheesecakes?
A lot of work goes into each of my recipes and my only ask is that if you like the recipe or even the looks of it, please leave me a star rating to help me rank better. It’s important and I appreciate it.
Easy No Bake Rocky Road Cheesecake
Equipment
- 9x3 cheesecake or springform pan
Ingredients
Chocolate Graham Cracker Crust
- 1 ⅓ cups graham crackers or graham cracker crumbs (170 grams)
- ¼ cup cocoa (25 grams)
- ½ cup powdered sugar (65 grams)
- 8 to 10 tablespoons unsalted butter, melted (114 to 150 grams)
Rocky Road Cheesecake
- 1 cup semisweet chocolate or chocolate chips, divided (185 grams)
- ½ cup dry roasted and salted peanuts (58 grams)
- 1 cup heavy cream, cold
- 2 8 ounce cream cheese, sofened (454 grams)
- 1 14 ounce can sweetened condensed milk
- 2 teaspoons vanilla extract
- 1 cup mini-marshmallows (45 grams)
Gravel
- ½ cup semisweet chocolate or chocolate chips (90 grams)
- ½ cup dry roasted and salted peanuts (58 grams)
Instructions
Chocolate Graham Crumb Crust
- Spray a 9x3 cheesecake or springform pan with a non-stick baking release. Melt the butter and set aside.
- Break the graham crackers up and place them in the bowl of a processor along with the cocoa and powdered sugar. Process to form fine crumbs.
- Empty them into a medium size bowl. Pour 8 tablespoons (½ cup) of butter over the crumbs and toss them with a fork until all the crumbs are coated and the mixture looks like lightly wet sand. If it is still a bit dry, add the other 2 tablespoons, 1 tablespoon at a time.
- Pour the crumbs into the prepared pan and press them evenly and firmly into the bottom of the pan. Set aside.
Make the Gravel
- Place the peanuts and chocolate in the bowl of the processor (no need to clean it). Pulse to coarsely chop them up so they look like gravel. Set aside.
Rocky Road Cheesecake
- Melt ⅔ of the chocolate (125 grams) over a double boiler on in a microwave at half power until about a scant half is shiny and looks melty,. Stir to melt the rest. This may also be done in a double boiler. Set aside.
- Using the remaining chocolate and peanuts for the inside of the cheesecake, repeat as for making the gravel. Set aside.
- Wipe the bowl of the processor out with a paper towel. Add the heavy cream and process until it is very stiff around the edges of the bowl. There will be some cream in the middle that is not incorporated. Place all of the cream, including the unincorporated in a bowl and stir together. It should be medium firm after combining the two. Set side.
- Without wiping out the bowl, add the softened cream cheese. Process until smooth. Add the melted chocolate, condensed milk and vanilla. Process until completely smooth, scraping down as necessary. Transfer to a medium size bowl.
- To remove all of the mixture from the bowl, place it back on the processor with the blade.. Pulse it 2 or 3 times to sling the batter off the blade. Remove the blade and use a rubber spatula to clean the bowl.
- Fold in the reserved whipped cream.
- Stir in the coarsely chopped peanuts and chocolate followed by the marshmallows. Fold in Pour over the crust and smooth it out so it is even.
- Sprinkle the gravel over the top. Place in the freezer for about 8 hours or overnight.
- To release the cheesecake from the cheesecake pan, go around the outer rim of the pan with a hair dryer on high. Place the pan on a wide can such as a 28 ounce can of tomatoes. Pull down the sides. Place the cake flat on a table and run a metal spatula between the crust and the bottom of the pan. Using 2 pancake turners, lift the cake off the metal bottom and transfer it to a serving plate or a 10" cake round.
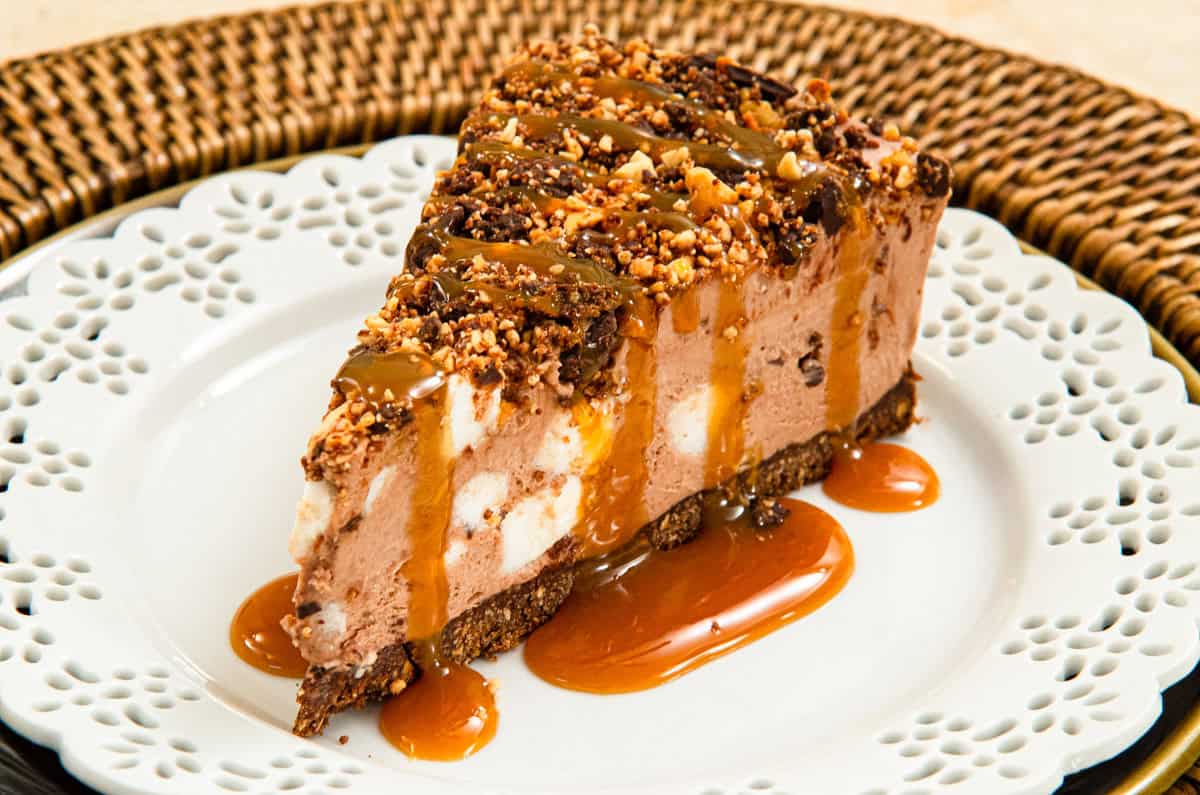
- Room temperature the cheesecake for about 20 to 30 minutes to make cutting it easier. Serve with homemade or purchased caramel sauce.
- This can also be refrigerated overnight for a softer texture. Refrigerate or freeze leftovers.
- In any case, the entire cake can be made, frozen and thawed in the refrigerator for serving.
Notes
Nutrition


Cari Clark says
I’m going to make this tomorrow. Just made you Pina Colada cheesecake and my mother said it was one of the best desserts she’s ever had:)
Just have a quick Q. Is the Rocky Road cheesecake better served as a frozen dessert, or frozen then thawed and served from refrigerator (just cold)?
Also I’ve subscribed twice and never gotten anything in my email inbox.🤷♀️
Thx, Cari
Helen S Fletcher says
Hi Cari - Freezing it makes it easier to release. Then thaw in the fridge. Just serve it cold.
Patricia says
This looks very good, I can’t wait to try it. Thank you so much for posting your recipes online!
Helen S Fletcher says
You're very welcome.
Nana2 says
Looks great. Can't wait to try it.
Audrey Barrios says
I made this a some weeks ago and it was just delicious!! It's just my husband and me, so I divided the cheesecake into thirds, wrapped them well and froze them. We just finished the last hunk and I'll definitely make this again!
I didn't have baby marshmallows (?!) when I wanted to make this so I cut up regular marshmallows, it was a labor of love but it worked!
I loved the technique so I'll try different cakes.
I bought "The New Pastry Cook" and am excited to experiment 😆!
Helen S Fletcher says
Hi Audrey - Thank you for this lovely note. If you have any questions as you go through TNPC just reach out. I'm always here to help.
Derp says
This isn’t rocky road, rocky road has almonds. Sounds good either way.
Helen S Fletcher says
Sorry to disillusion you but out of the 5 recipes I quickly checked on the internet, 1 was almond, 1 was walnut and 3 were peanut. It honestly doesn't matter, just use what you like. Roasted,salted peanuts are all I have ever seen.
BILLY D. BOGGS says
I really appreciate a good cheese cake and this looks like a good recipe thank you
Helen S Fletcher says
Hi Billy - thank you for your kind words. It's hard to go wrong with peanuts, chocolate and cream cheese!
Gluten Free Man says
It looks amazing, is there a gluten free option available?
Helen S Fletcher says
Buy gluten free graham crackers. I don't know how much/little butter they will absorb. I'm sure different ones are just like non-gluten grahams. It will depend upon the brand. That is the only ingredient that isn't gf.
hddonna says
Can’t wait to try this! Note that recipe instructions say 8 ounces butter where it means tablespoons.
Helen S Fletcher says
Can you point out exactly where it says that? In the recipe the crust states 8 to 10 tablespoons (114 to 150 grams). Butter is only used in the crust.
Nikki P says
In the instructions for the crust it does say to pour 8 ounces of butter (1/2 Cup) over the crumbs.
Helen S Fletcher says
Thanks for this. However in the recipe card ingredients and the text of the post as well as the photo of the ingredients for the crust there is 1 stick of butter.
Nikki P says
Looks like I am using my processor this weekend.
As usual your detail is spot on, the photos are as well.
I also use a "cheesecake pan" , a cake pan with a removable bottom. When I make a cheesecake, ( I make no bake pies in them as well) I do line the bottom with parchment paper. I cut almost a circle but leave a long "tail" and wrap that under the bottom so it is held in place. When I remove the cake or pie I can pull on the paper tail and the item slides off the bottom much easier. And generally I can easily get the paper out from under the cake or pie.
Helen S Fletcher says
Hi Niki - always something to learn. Thanks.
david says
Very smart using a processor. We used to do six at a time and used a paddle. For the pans, we turned the bottom over and set it on a jar lid before snapping on the ring. Makes it a lot easier sliding the cheesecake off. Whoever designed that lip must not have been a baker.
Helen S Fletcher says
Hi David - I think there is more equipment not designed by bakers. I had a 20 quart mixer at the restaurant that was gated. The only problem is the chute for which you were supposed to add ingredients to the mixer while running it was 1" away from the bowl so everything landed on the floor. They fulfilled the technical specs but did nothing for the baker!