
Lemon Pesto Focaccia combines lemon pepper pesto and a zippy garlic oil baked right into the bread....no need to dip into a flavored oil. It's one of the easiest breads to make with the pesto and zippy garlic oil made ahead of time.
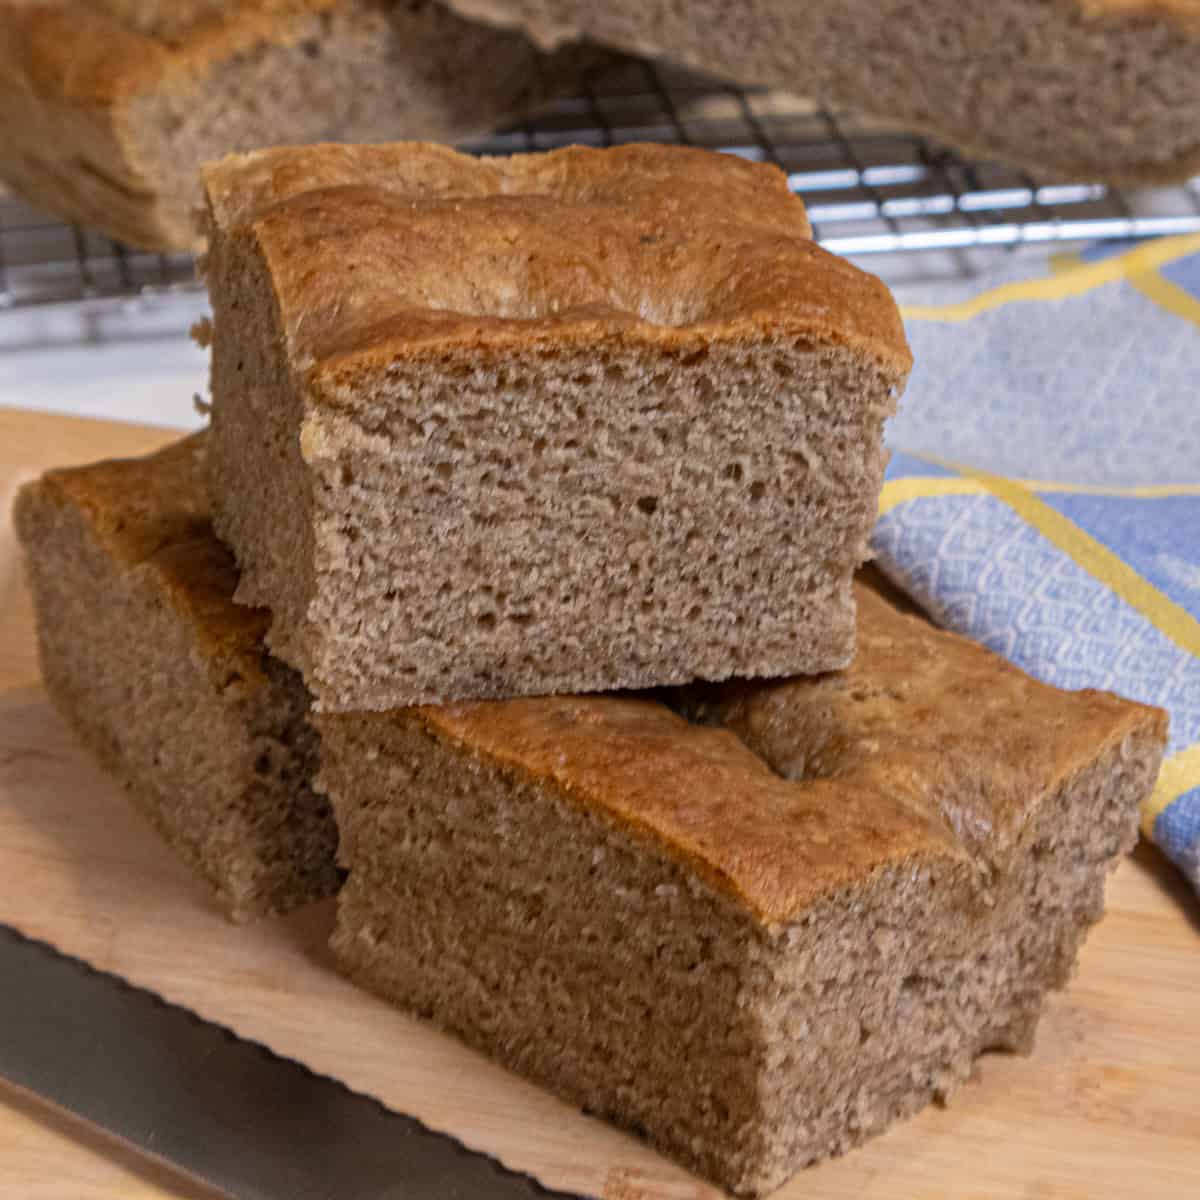
This bread is ideal to snack on, great as an accompaniment to a meal or soup and perfect for sandwiches when sliced.
Be sure to check out these recipes for more scrumptious breads: Stuffed Focaccia, Rye Raisin Bread with Bakery Style Flavor, Outback Steakhouse Bread, Homemade Pizza Dough, and The Story of No Knead Bread and Me.
Jump to:
- Why You'll Want To Make This Bread
- Recipe Ingredients
- key ingredients
- Why Overnight Yeast Doughs
- What is a Lean or rich dough
- How to Make an oven proofer
- an Important note about the garlic
- Step by Step instructions
- Lemon Pesto Focaccia
- Recipe FAQ'S
- Make ahead, STorage and Freezing
- Expert Tips
- Special Breads you'll want to make
- Lemon Pesto Focaccia
Why You'll Want To Make This Bread
- Although this takes 3 component parts, 2 can be made a week ahead. In fact they should be made before making the bread.
- The Lemon Pepper Focaccia takes literally minutes to mix.
- It's a fast riser - no long waits.
- It can be shaped immediately but is better if it is refrigerated overnight.
- It's one of the more unusual breads you'll make.
- Easy, delicious and different - let's get started!
Recipe Ingredients
Lemon Pepper Pesto
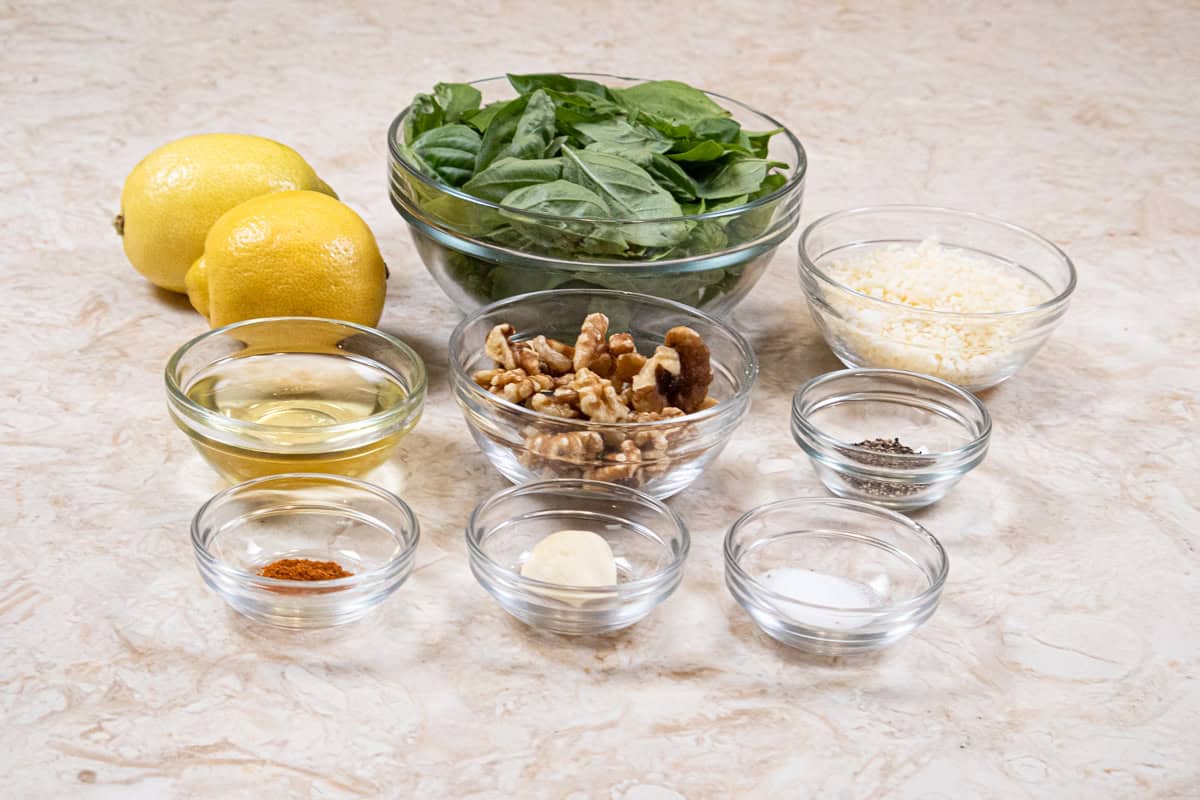
FRONT ROW: Cayenne pepper, garlic, salt
MIDDLE ROW: Canola oil, walnuts, black pepper
BACK ROW: Lemon zest, fresh basil, parmesan cheese
Zippy Garlic Oil
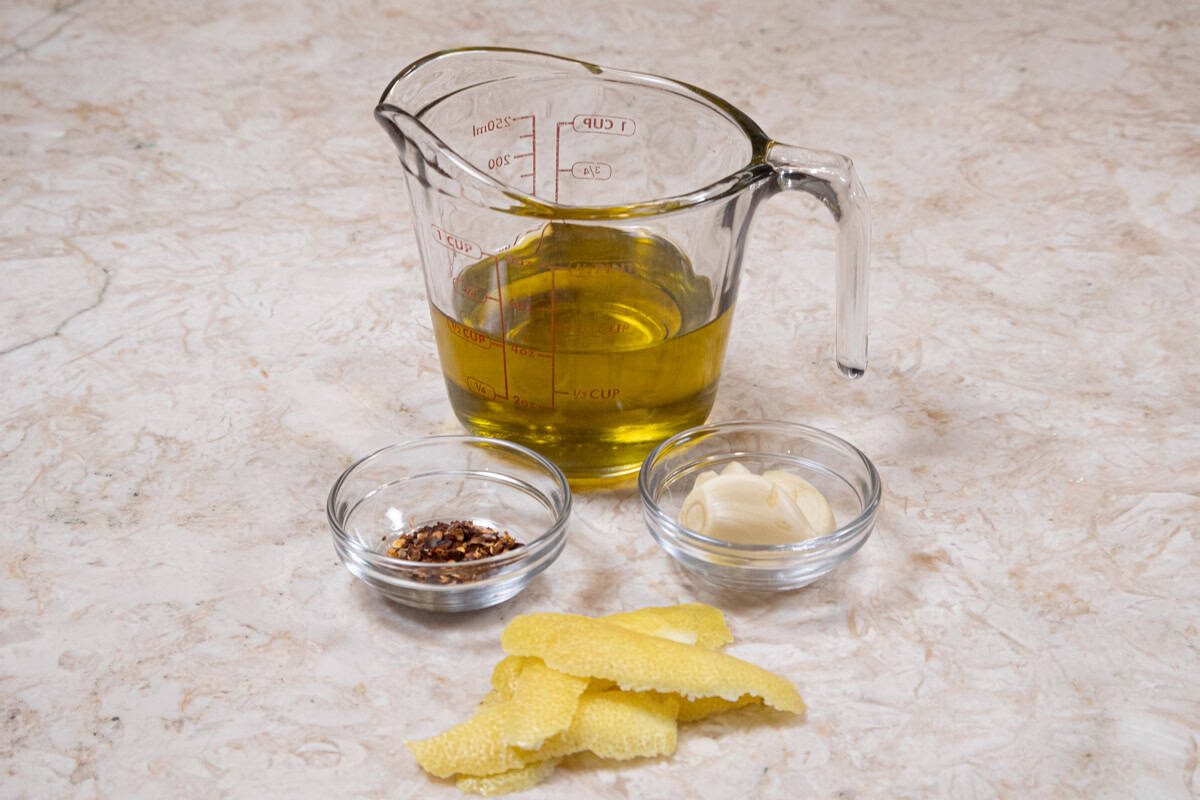
FRONT ROW: Lemon peel
MIDDLE ROW: Red pepper flakes, garlic cloves
BACK ROW: Olive oil
Lemon pesto Focaccia
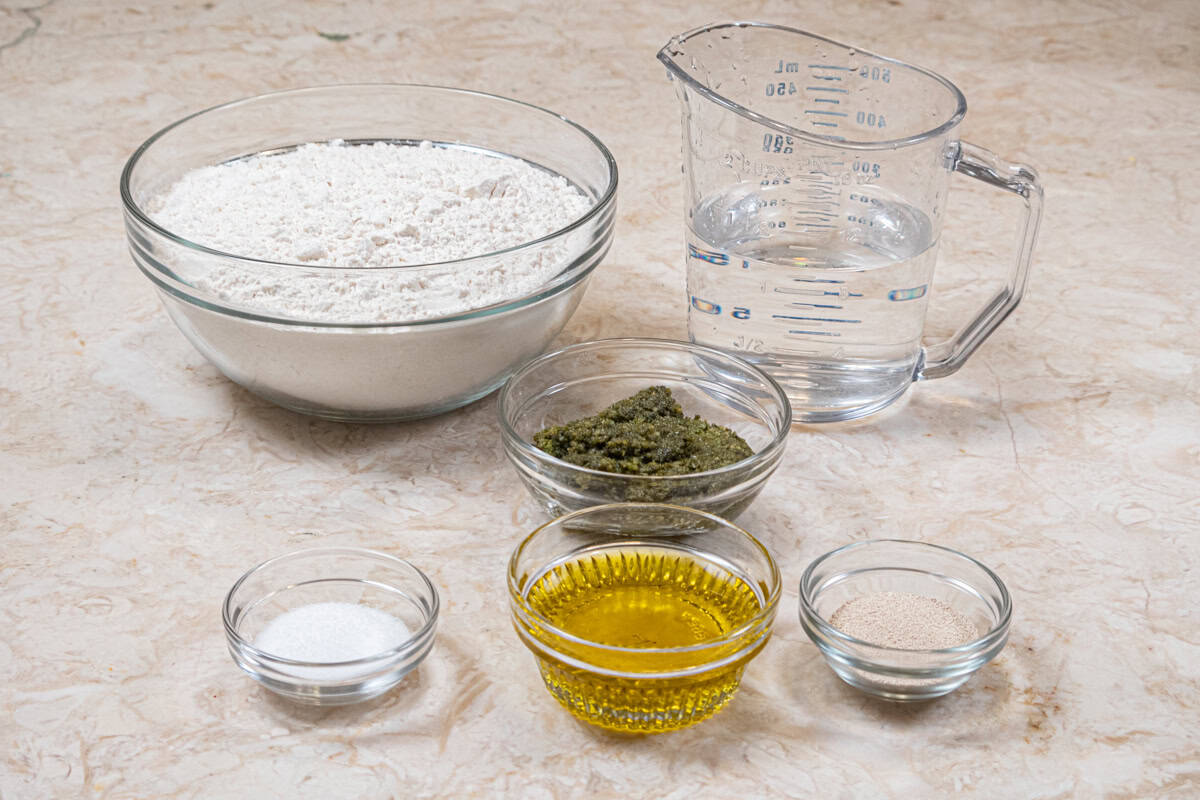
FRONT ROW: Salt, olive oil, instant yeast
MIDDLE ROW: Lemon pepper pesto
BACK ROW: Bread flour, water
key ingredients
- Toast the walnuts to bring out the most flavor.
- Parmesan or Sharp Asiago can be used
- Extra virgin or virgin olive oil is recommended for the best taste.
- The garlic cloves should be large. If not use an extra one or two.
- Bread flour is best with yeast. All-purpose can be used but the results won't be as high or as light.
- I add my instant yeast to the wet ingredients to soften it as I have seen little bumps in some yeast breads where the yeast has not dissolved.
Why Overnight Yeast Doughs
When working with yeast I overnight my finished dough in the fridge and often up to 3 days. This applies to both lean doughs and rich doughs. This allows for more flavor and equally important, the dough doesn't spring back when rolled out as it does if used immediately. The gluten has a chance to relax and makes it much easier to shape. The fact that the dough is cold also makes it much easier to work. It will take a bit longer to rise but an oven proofer takes care of that problem.
What is a Lean or rich dough
A lean dough is one that is basically water, flour, salt, and yeast. It can be milk or part milk, part water. But basically it doesn't have fat or very little in it.
A rich dough or enriched dough is just that. It can have butter, egg, sour cream, etc. that makes the dough richer. Sweet doughs are usually rich doughs. These often take more time to rise than leaner doughs.
How to Make an oven proofer
Professional bread makers use proofers that are nothing more than large enclosed, temperature, and humidity controlled rooms where their yeast products rise. They can control the time by adjusting the temps.
I have seen several versions of home proofers. But they are usually very small and expensive. There is no need to buy one as you have a proofer in your kitchen. I have used this technique forever and it works like a charm.
The Hot water method: Place a pan of very hot water on the bottom rung of your oven. Place the yeast product which is covered on a rung above it and close the door. Check the temperature after 20 to 30 minutes to make sure it doesn't exceed 75°F to 85°F, If it does, prop the door of the oven open with a wooden spoon or remove the water, close the door and let it rise.
The oven light method: This is the one I use all the time. While you are shaping the dough, turn the oven light on. Leave the light on and place the product on the middle rung of the oven. Monitor the oven after 30 minutes to regulate the temperature as above. If it gets too hot prop the door open.
One thing to watch: If the dough is a laminated dough such as croissants or a butter heavy dough such as brioche watch it so the butter does not melt and ooze out. Definitely keep the oven temperature around 70°F and no more than 75°F. If the temperature gets too hot, pull the product out until the oven cools and then put it back in or let it finish rising at room temperature since it will have a good start.
an Important note about the garlic
It's important to simmer the zippy garlic for at least 5 minutes. Along with onions, garlic grows in the ground and can pick up botulism spores. Simmering for 5 minutes will kill anything as long as the garlic is strained out along with the other ingredients. Straining out all solid garlic bits removes the water and organic matter the bacteria need to thrive.
Be sure to see the recipe card below for the full ingredients and instructions.
Step by Step instructions
Lemon Pepper Pesto
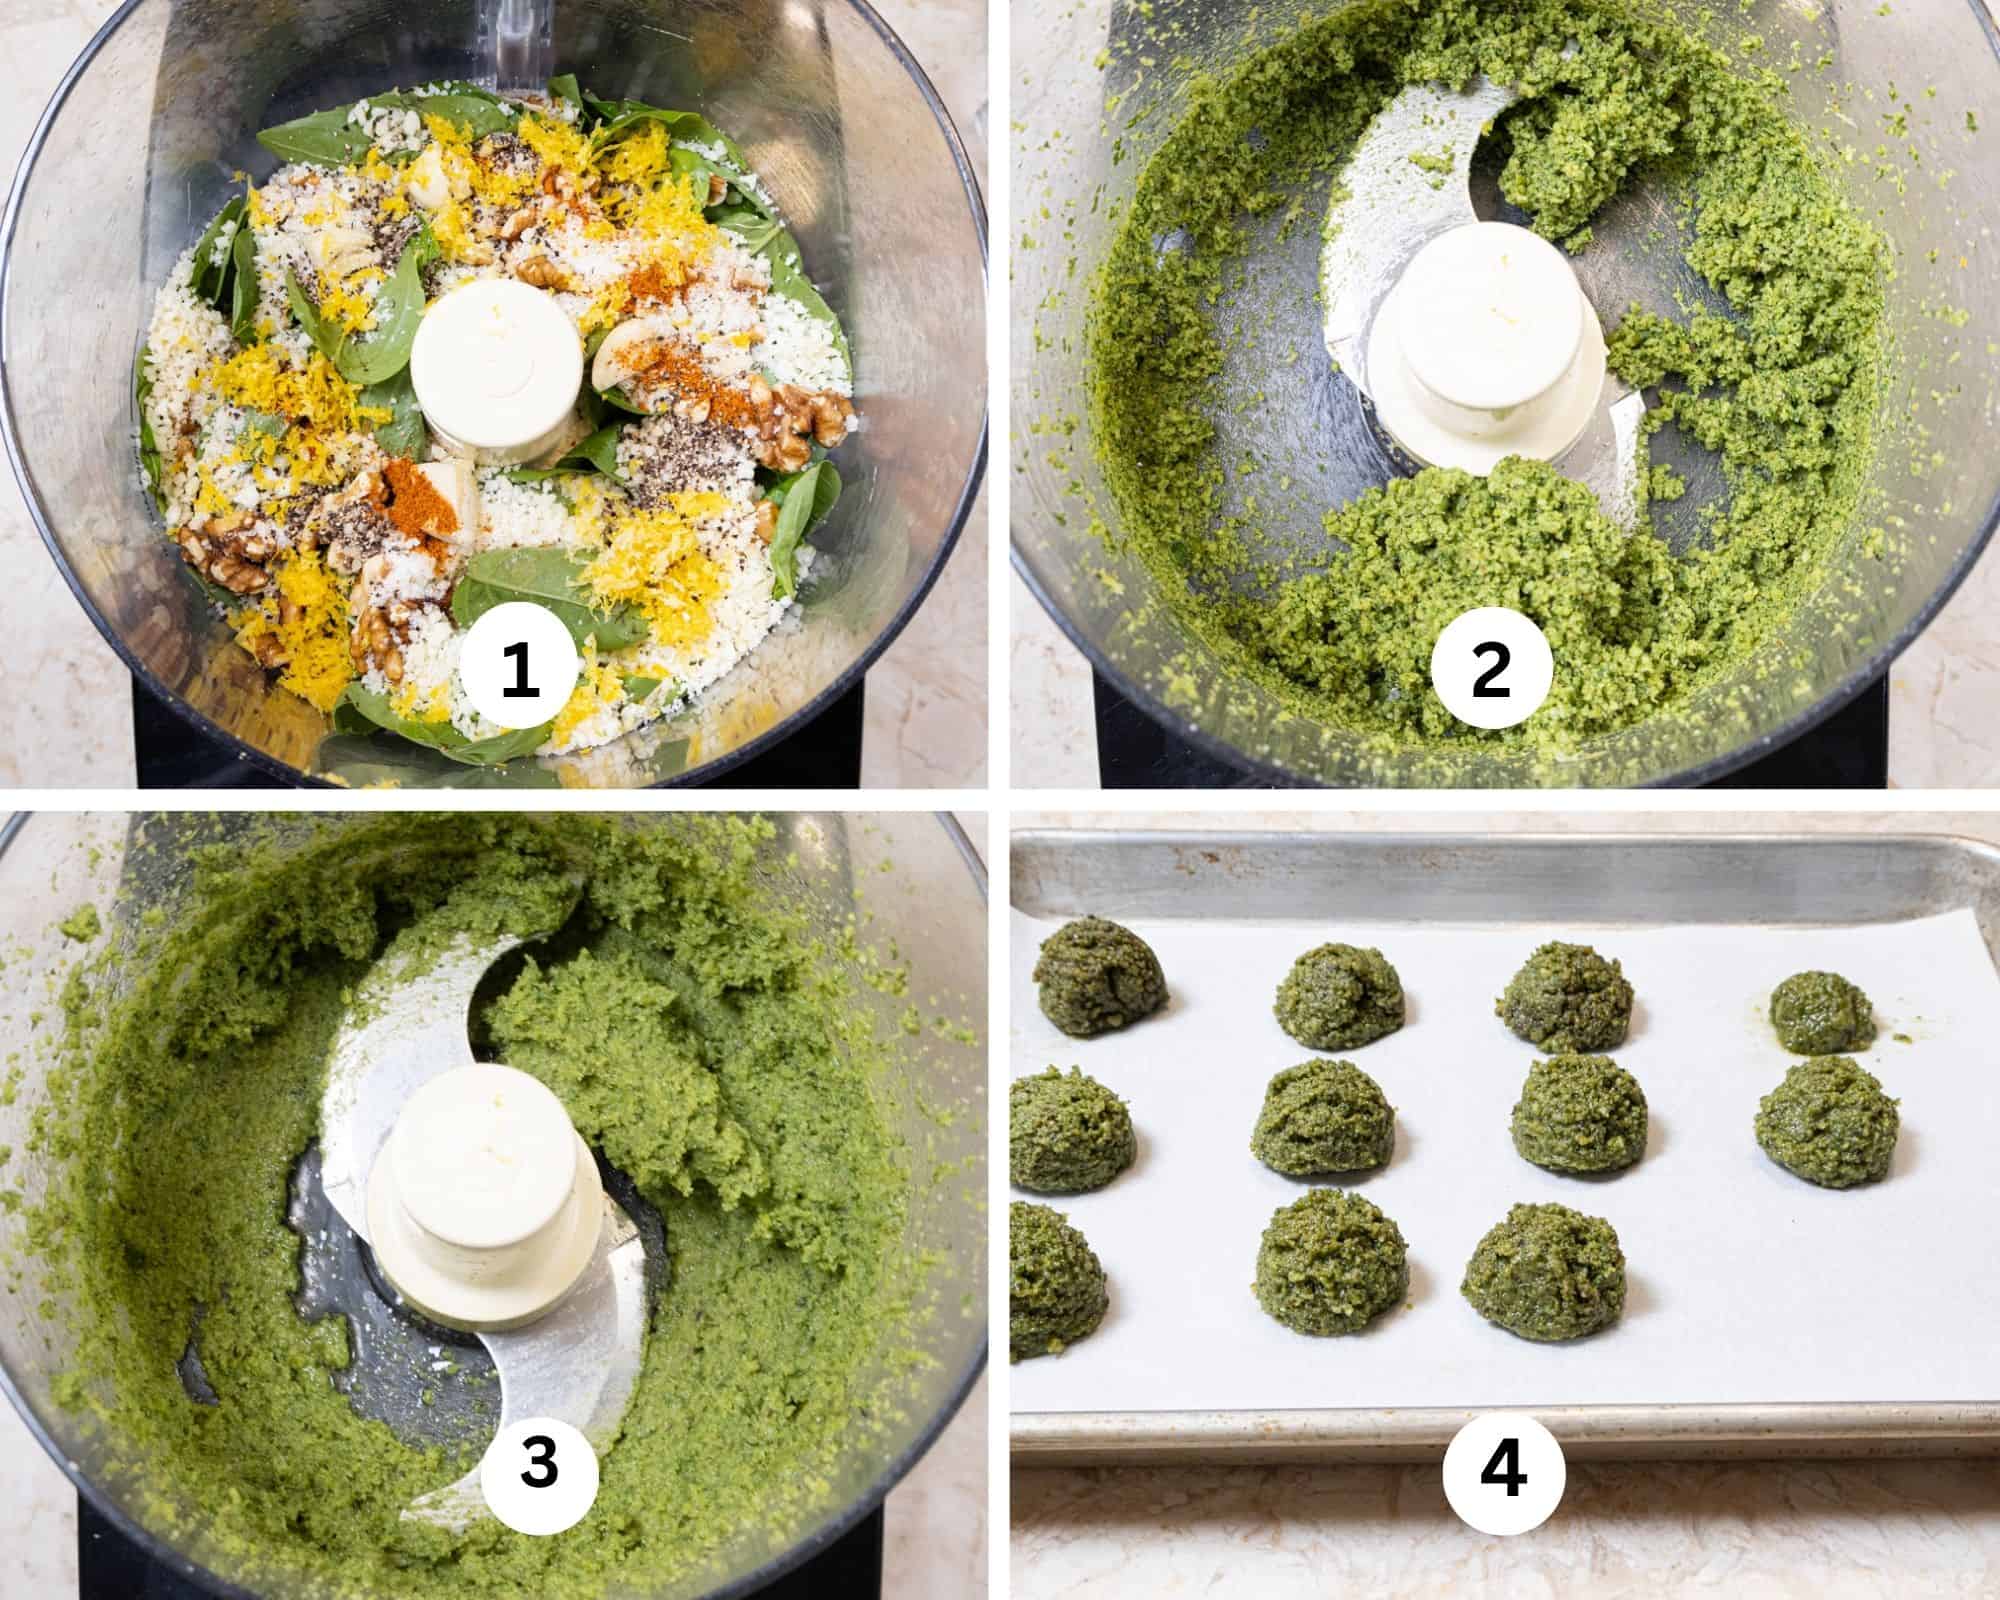
Step 1. Place all of the ingredients except the oil in the bowl of a processor. Step 2. Process until every thing is finely cut together. Step 3. Add the oil and process to blend in. Step 4. With a #100 disher/scoooper drop balls of pesto on a parchment line sheet pan. Freeze until hard and then transfer to a freezer proof container. I dropped mine with a #100 disher/scooper which is 2 teaspoons. If I need 2 tablespoons, I know that is 3 balls. See my Numbers and Sizes of Dishers/Scoopers for a list that includes all the sizes and how much is in each size.
Zippy Garlic Oil
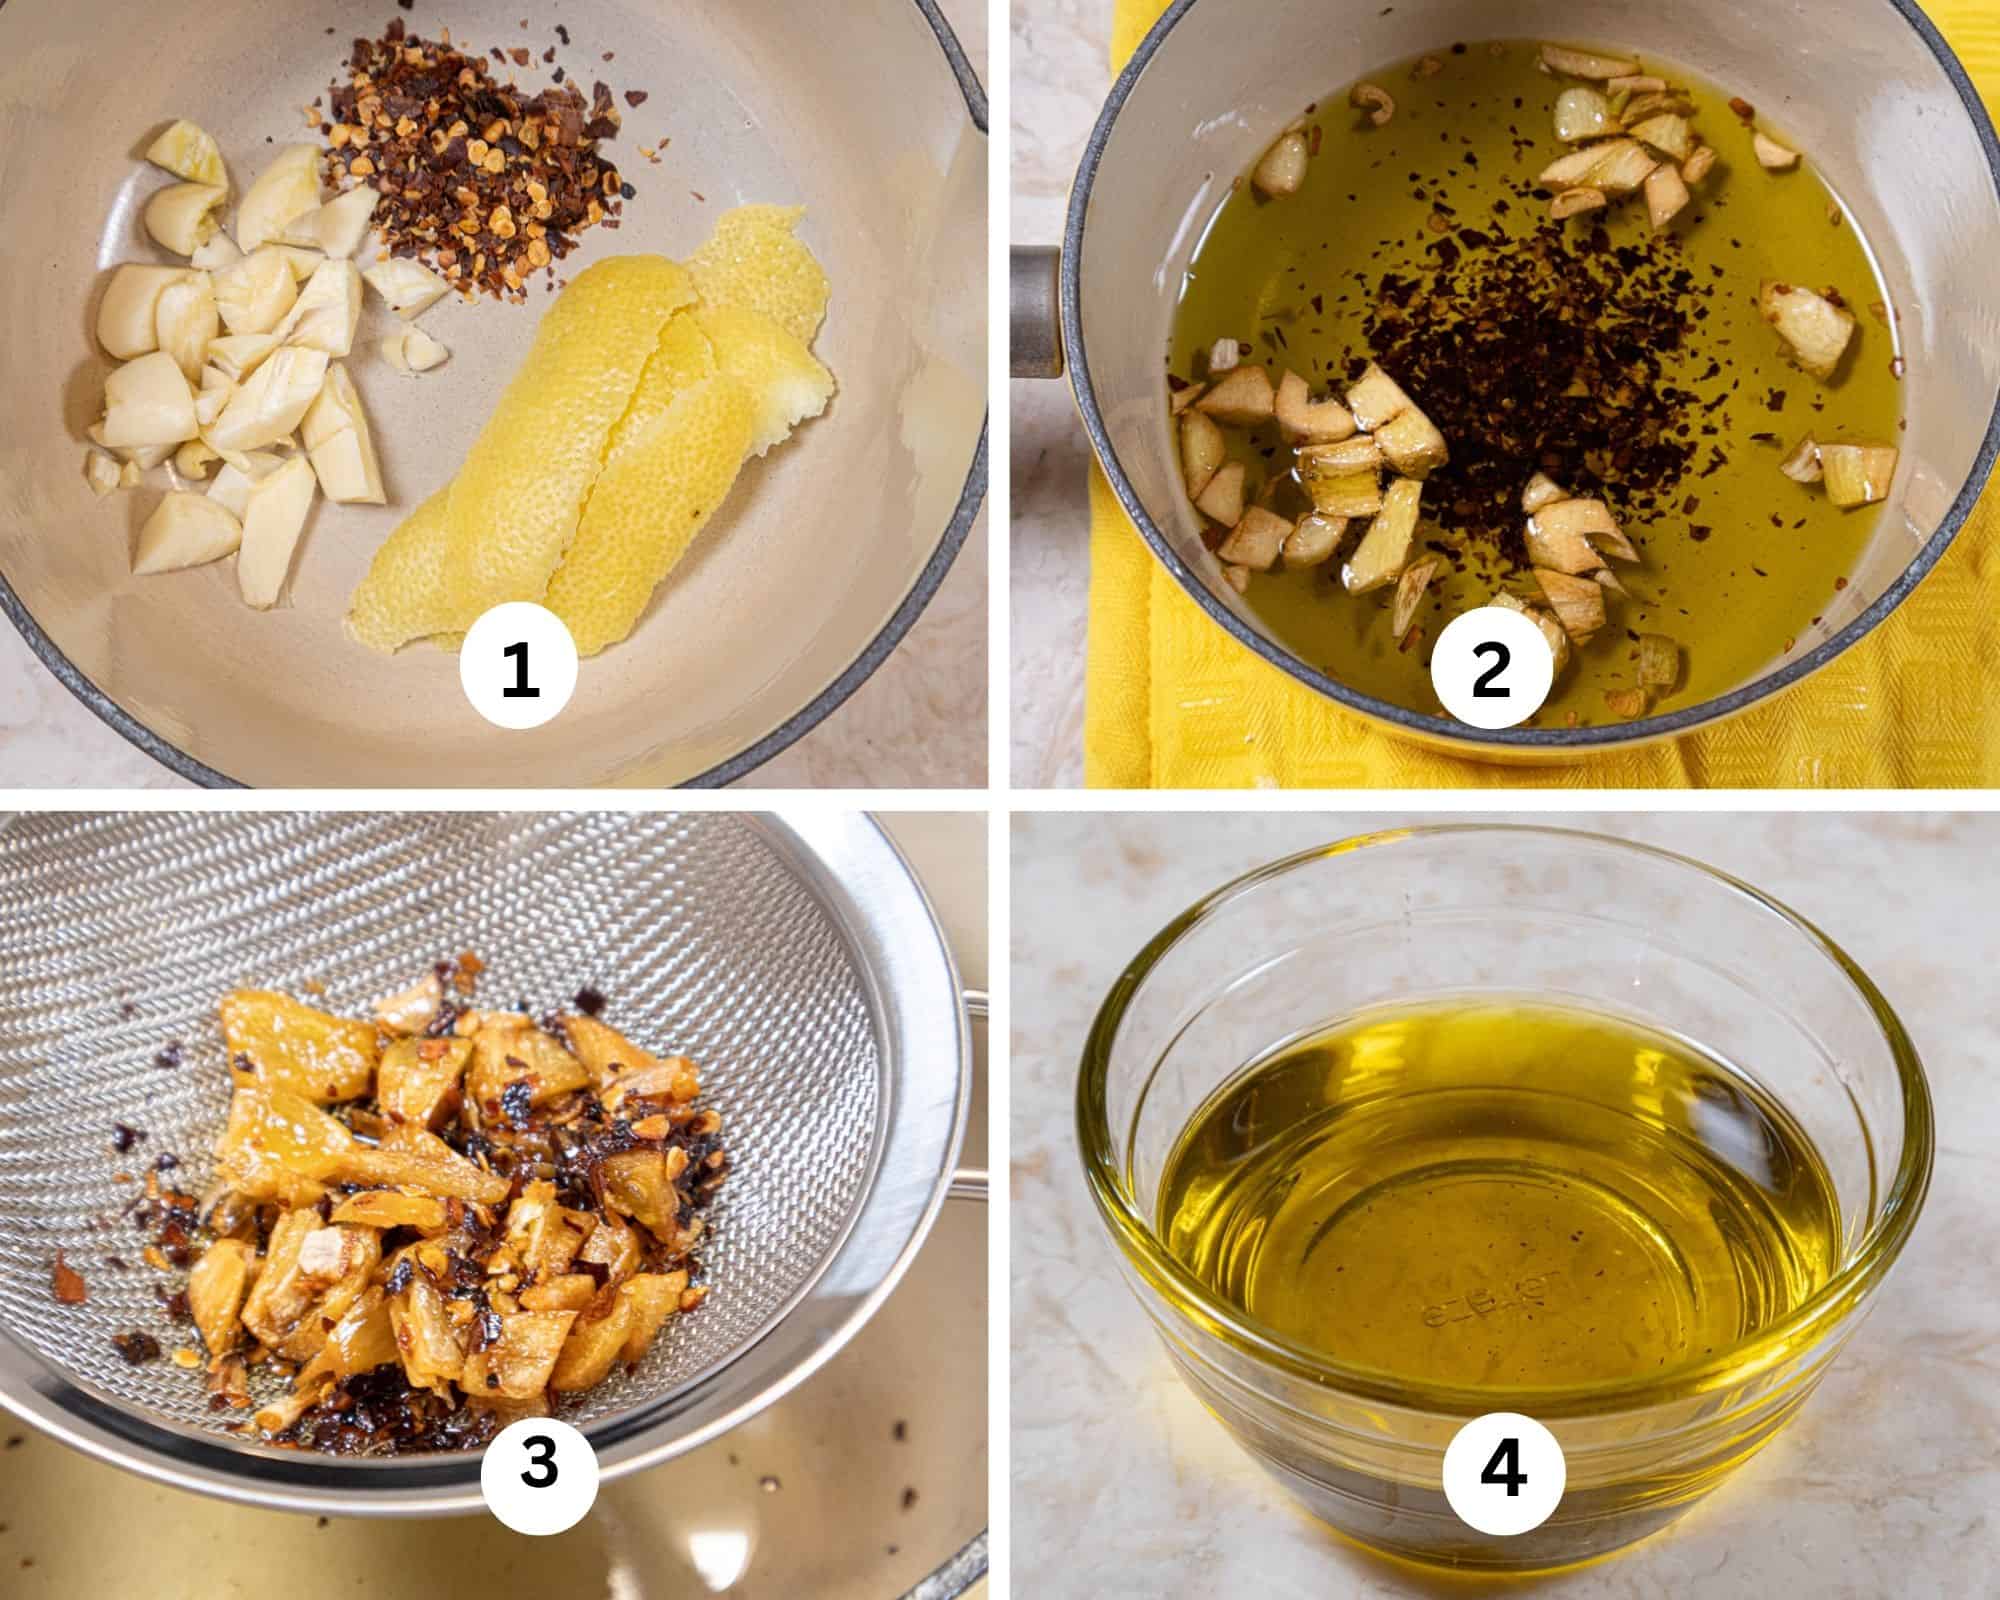
Step 1a. Place the coarsely chopped garlic, lemon strips and hot pepper flakes in a small saucepan. Step 2a. Simmer over low heat until the garlic is light to medium brown. Remove from the heat. Step 3a. Strain the solids out. Step 4a. Only the clear oil should remain. Cool and refrigerate if not using immediately.
Lemon Pesto Focaccia
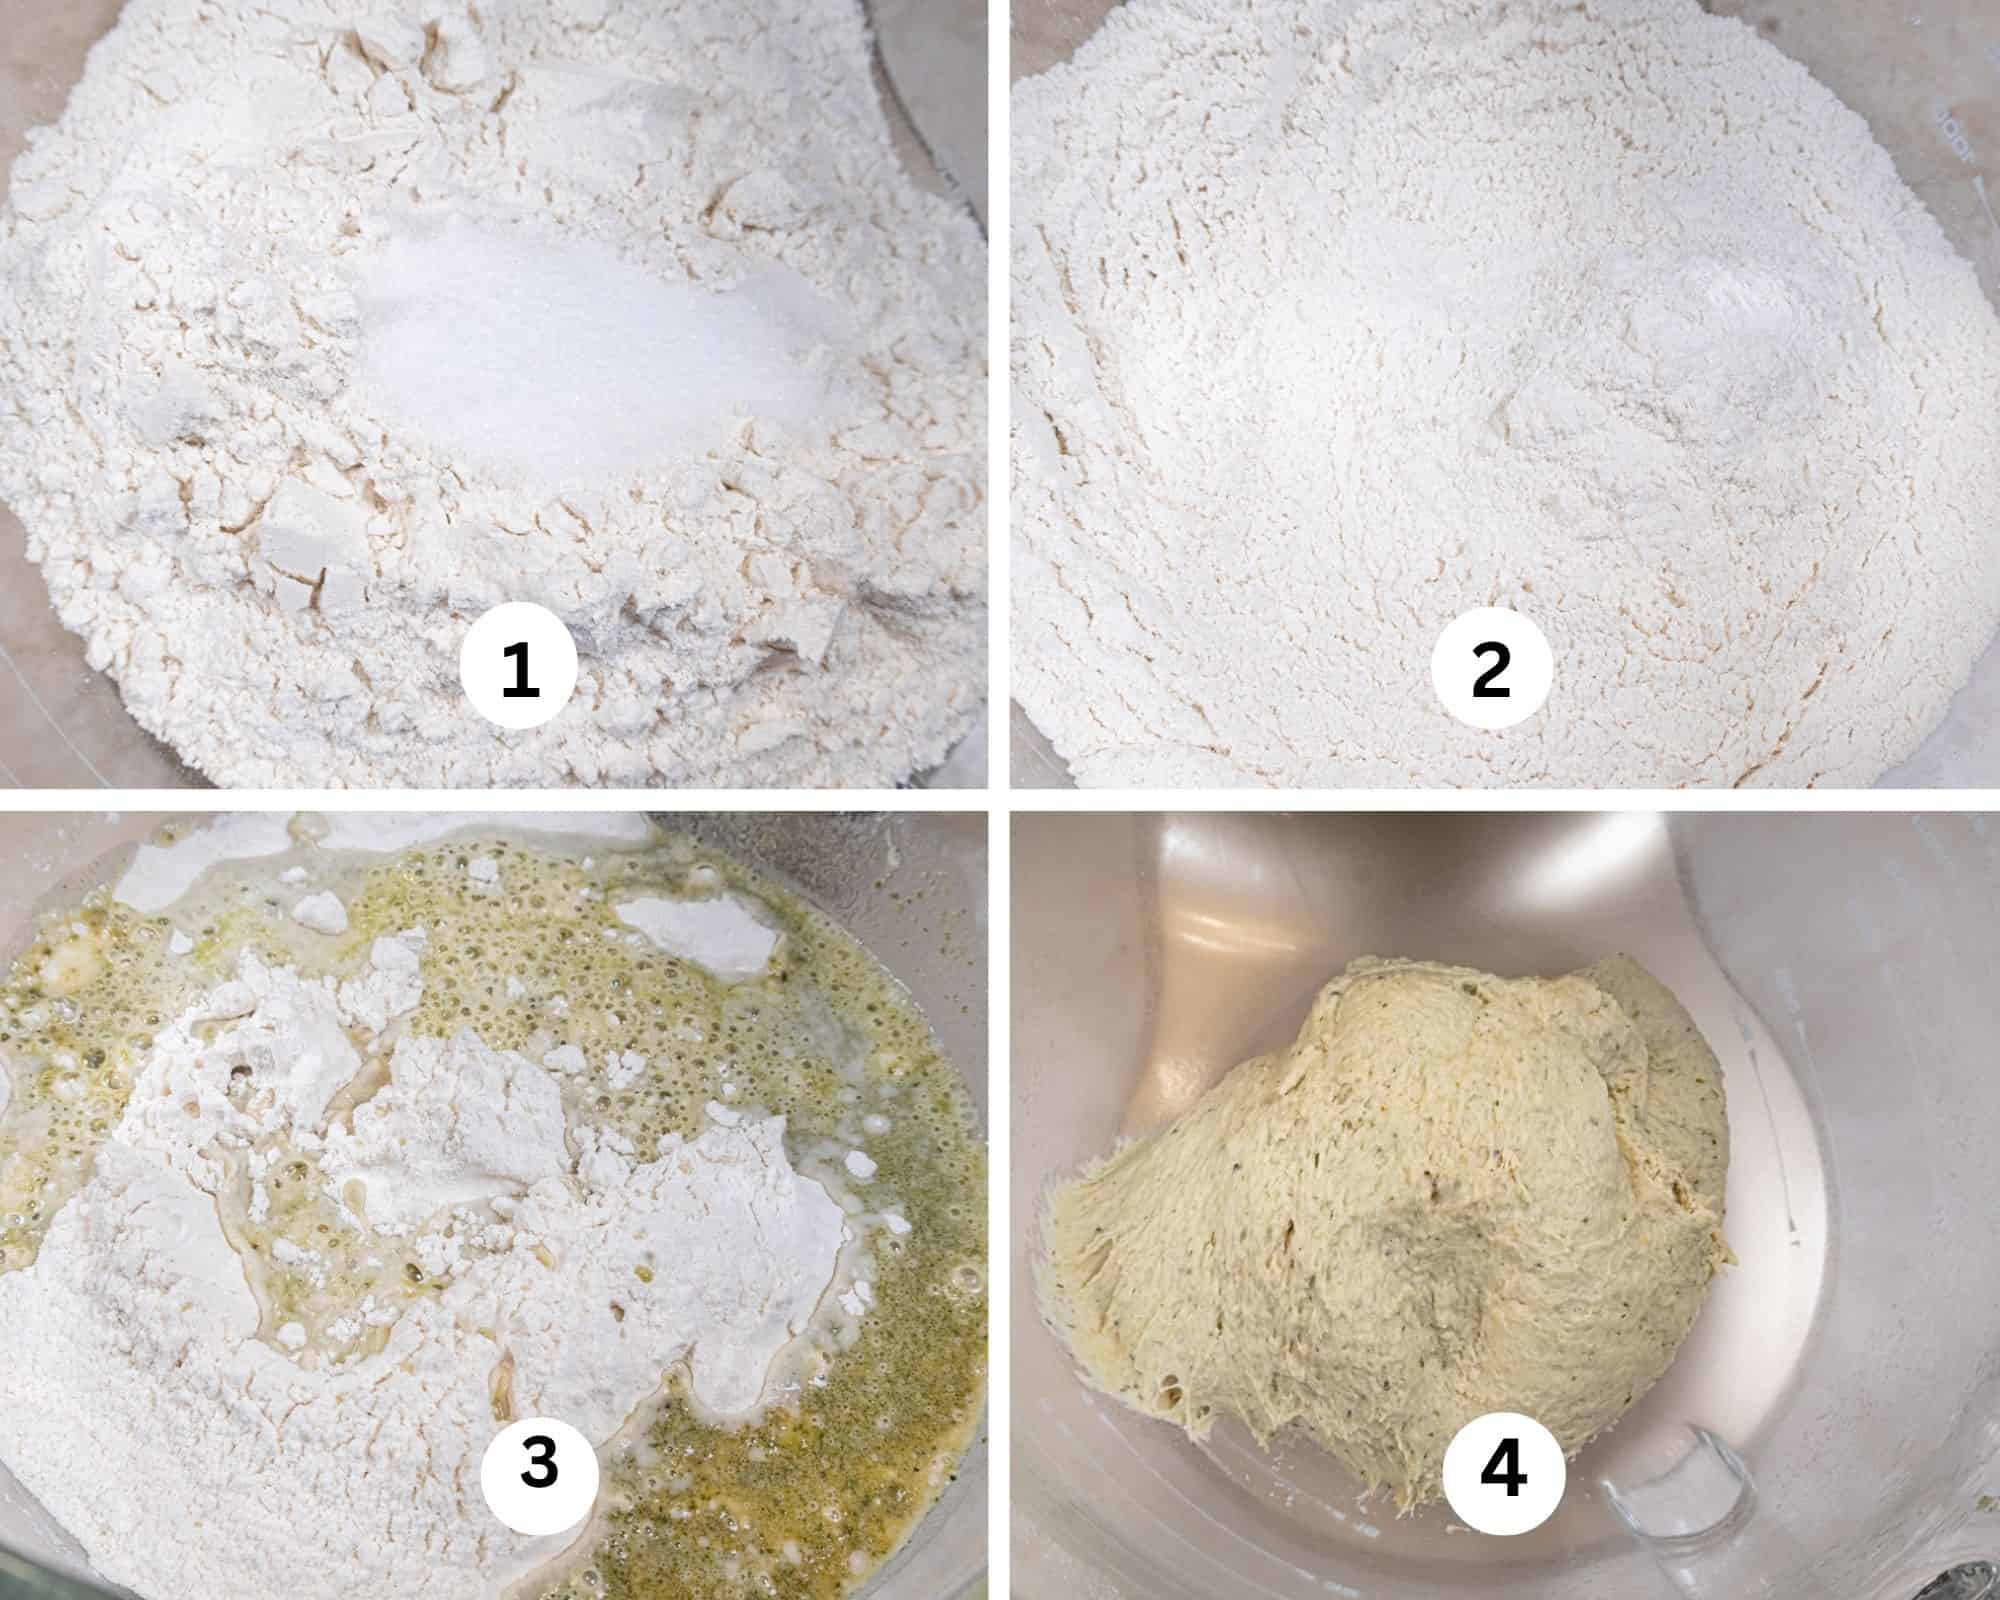
Step 1c. Add the bread flour and salt to a mixing bowl. Step 2c. Whisk them together. STep 3c. Combine the water, pesto and yeast. Whisk together to mix. Let sit for a couple of minutes Add it to the dry ingredients. Step 4c.
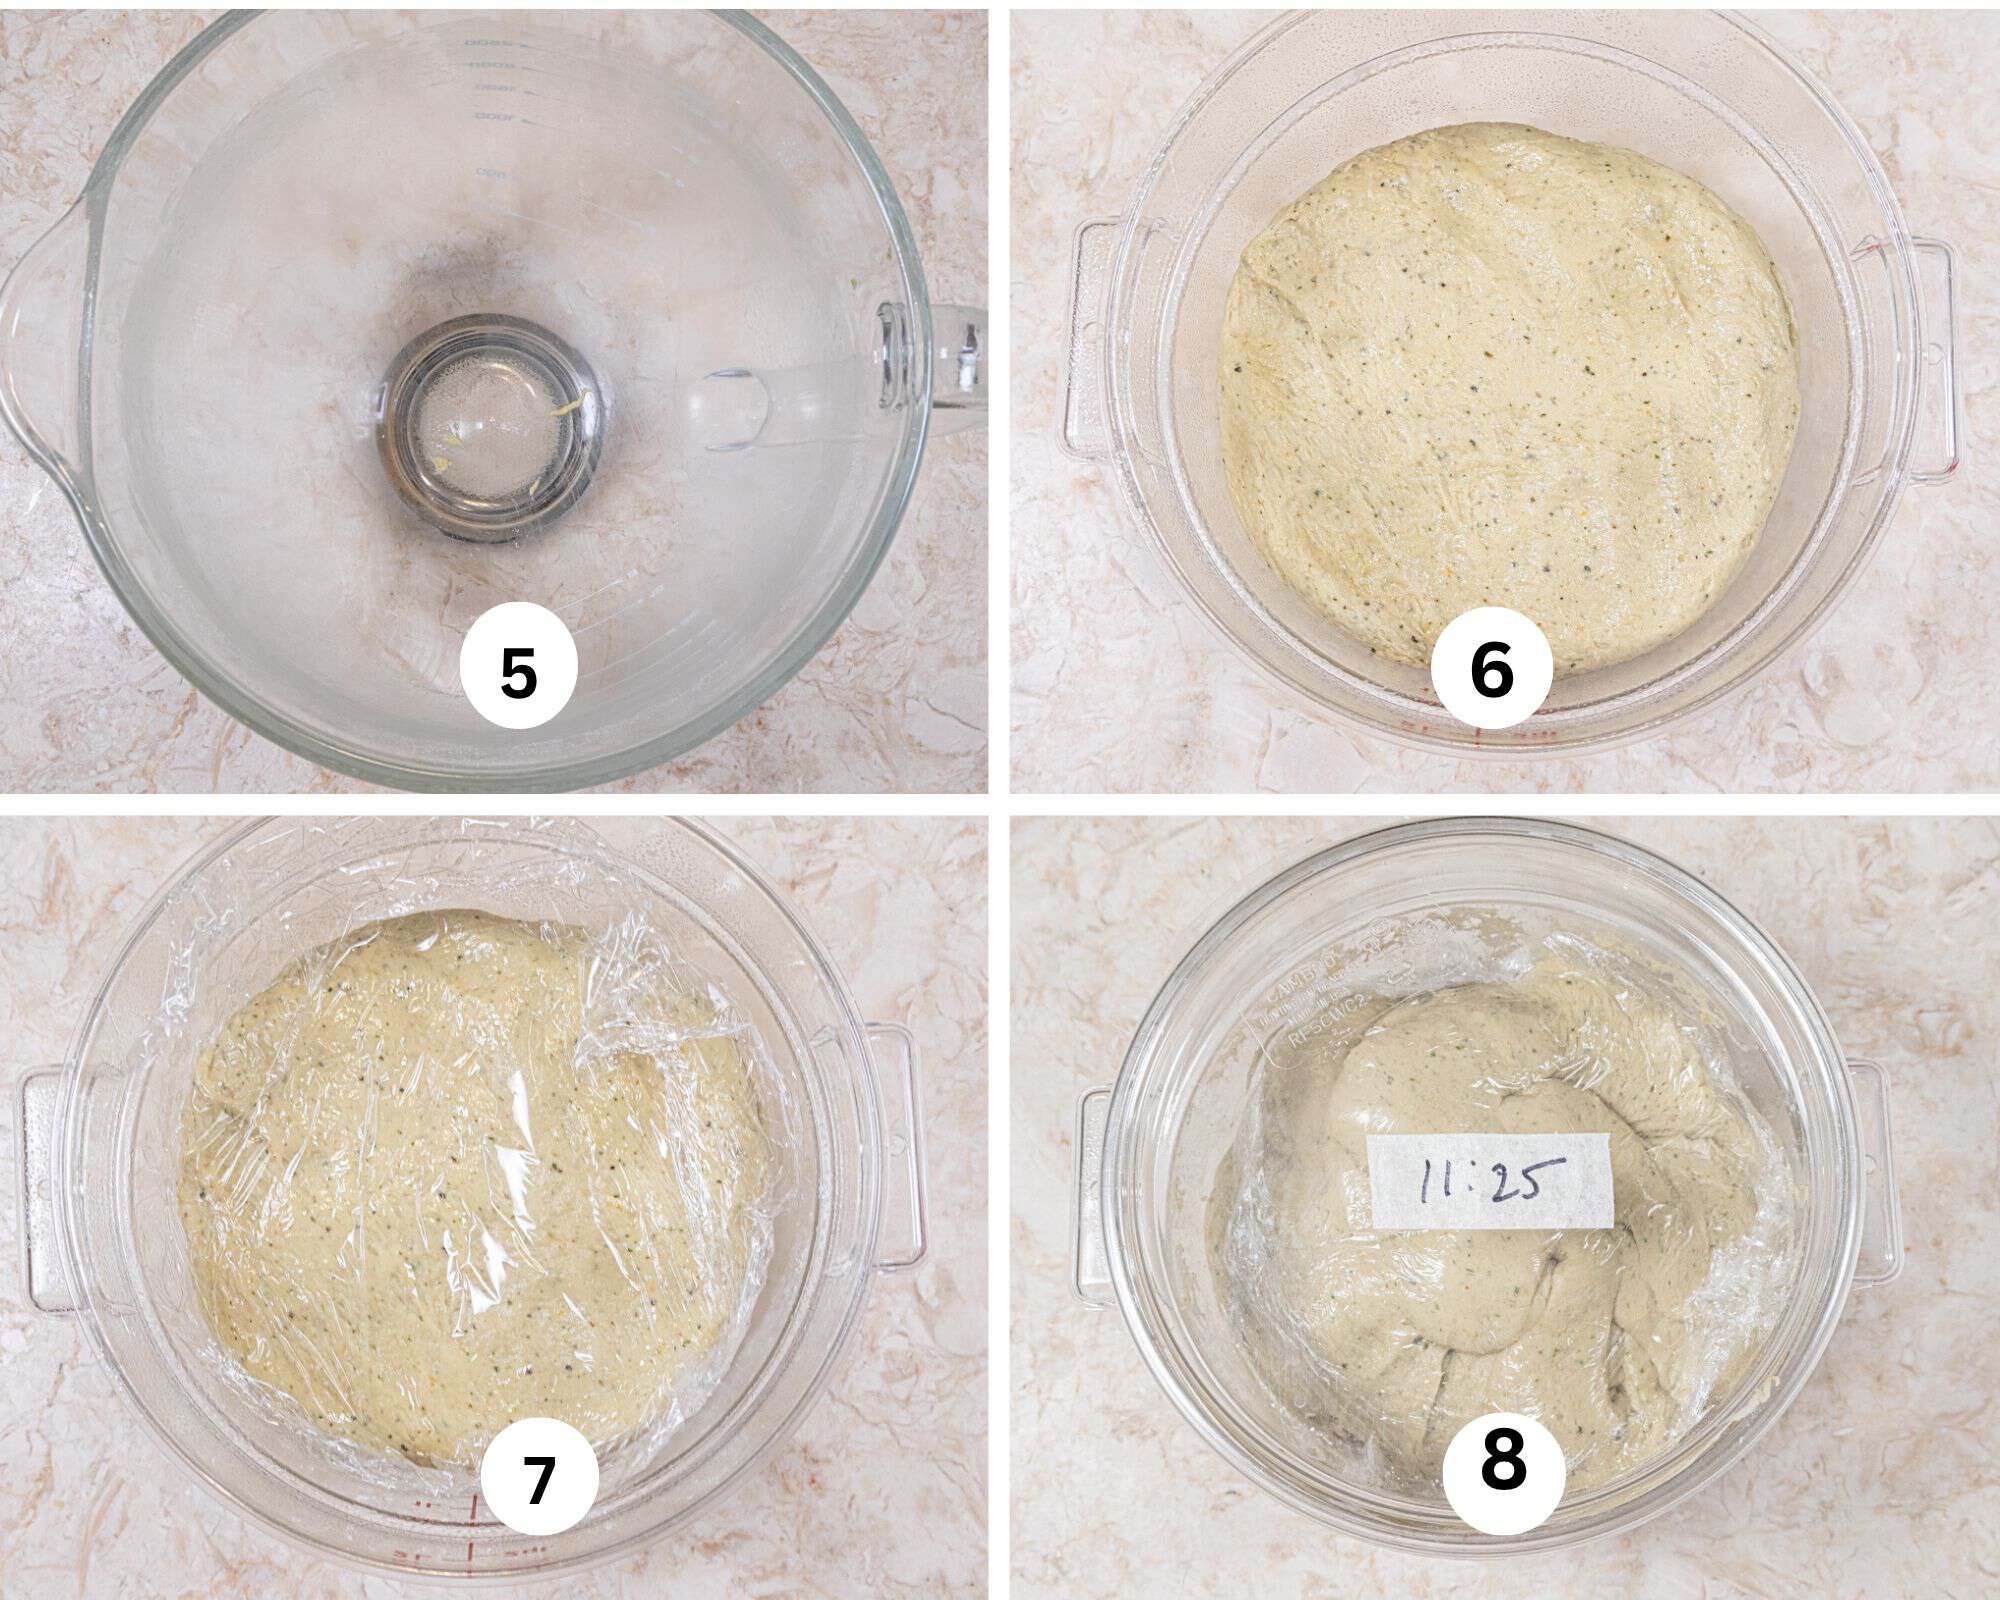
Step 5. After mixing the dough, but bowl should be clean before washing. Step 6. Place the dough into a container sprayed with a non-stick baking release. Step 7. Cover the dough by placing plastic wrap directly on top of the dough. Step 8. Cover the container with the lid and mark the time on it.
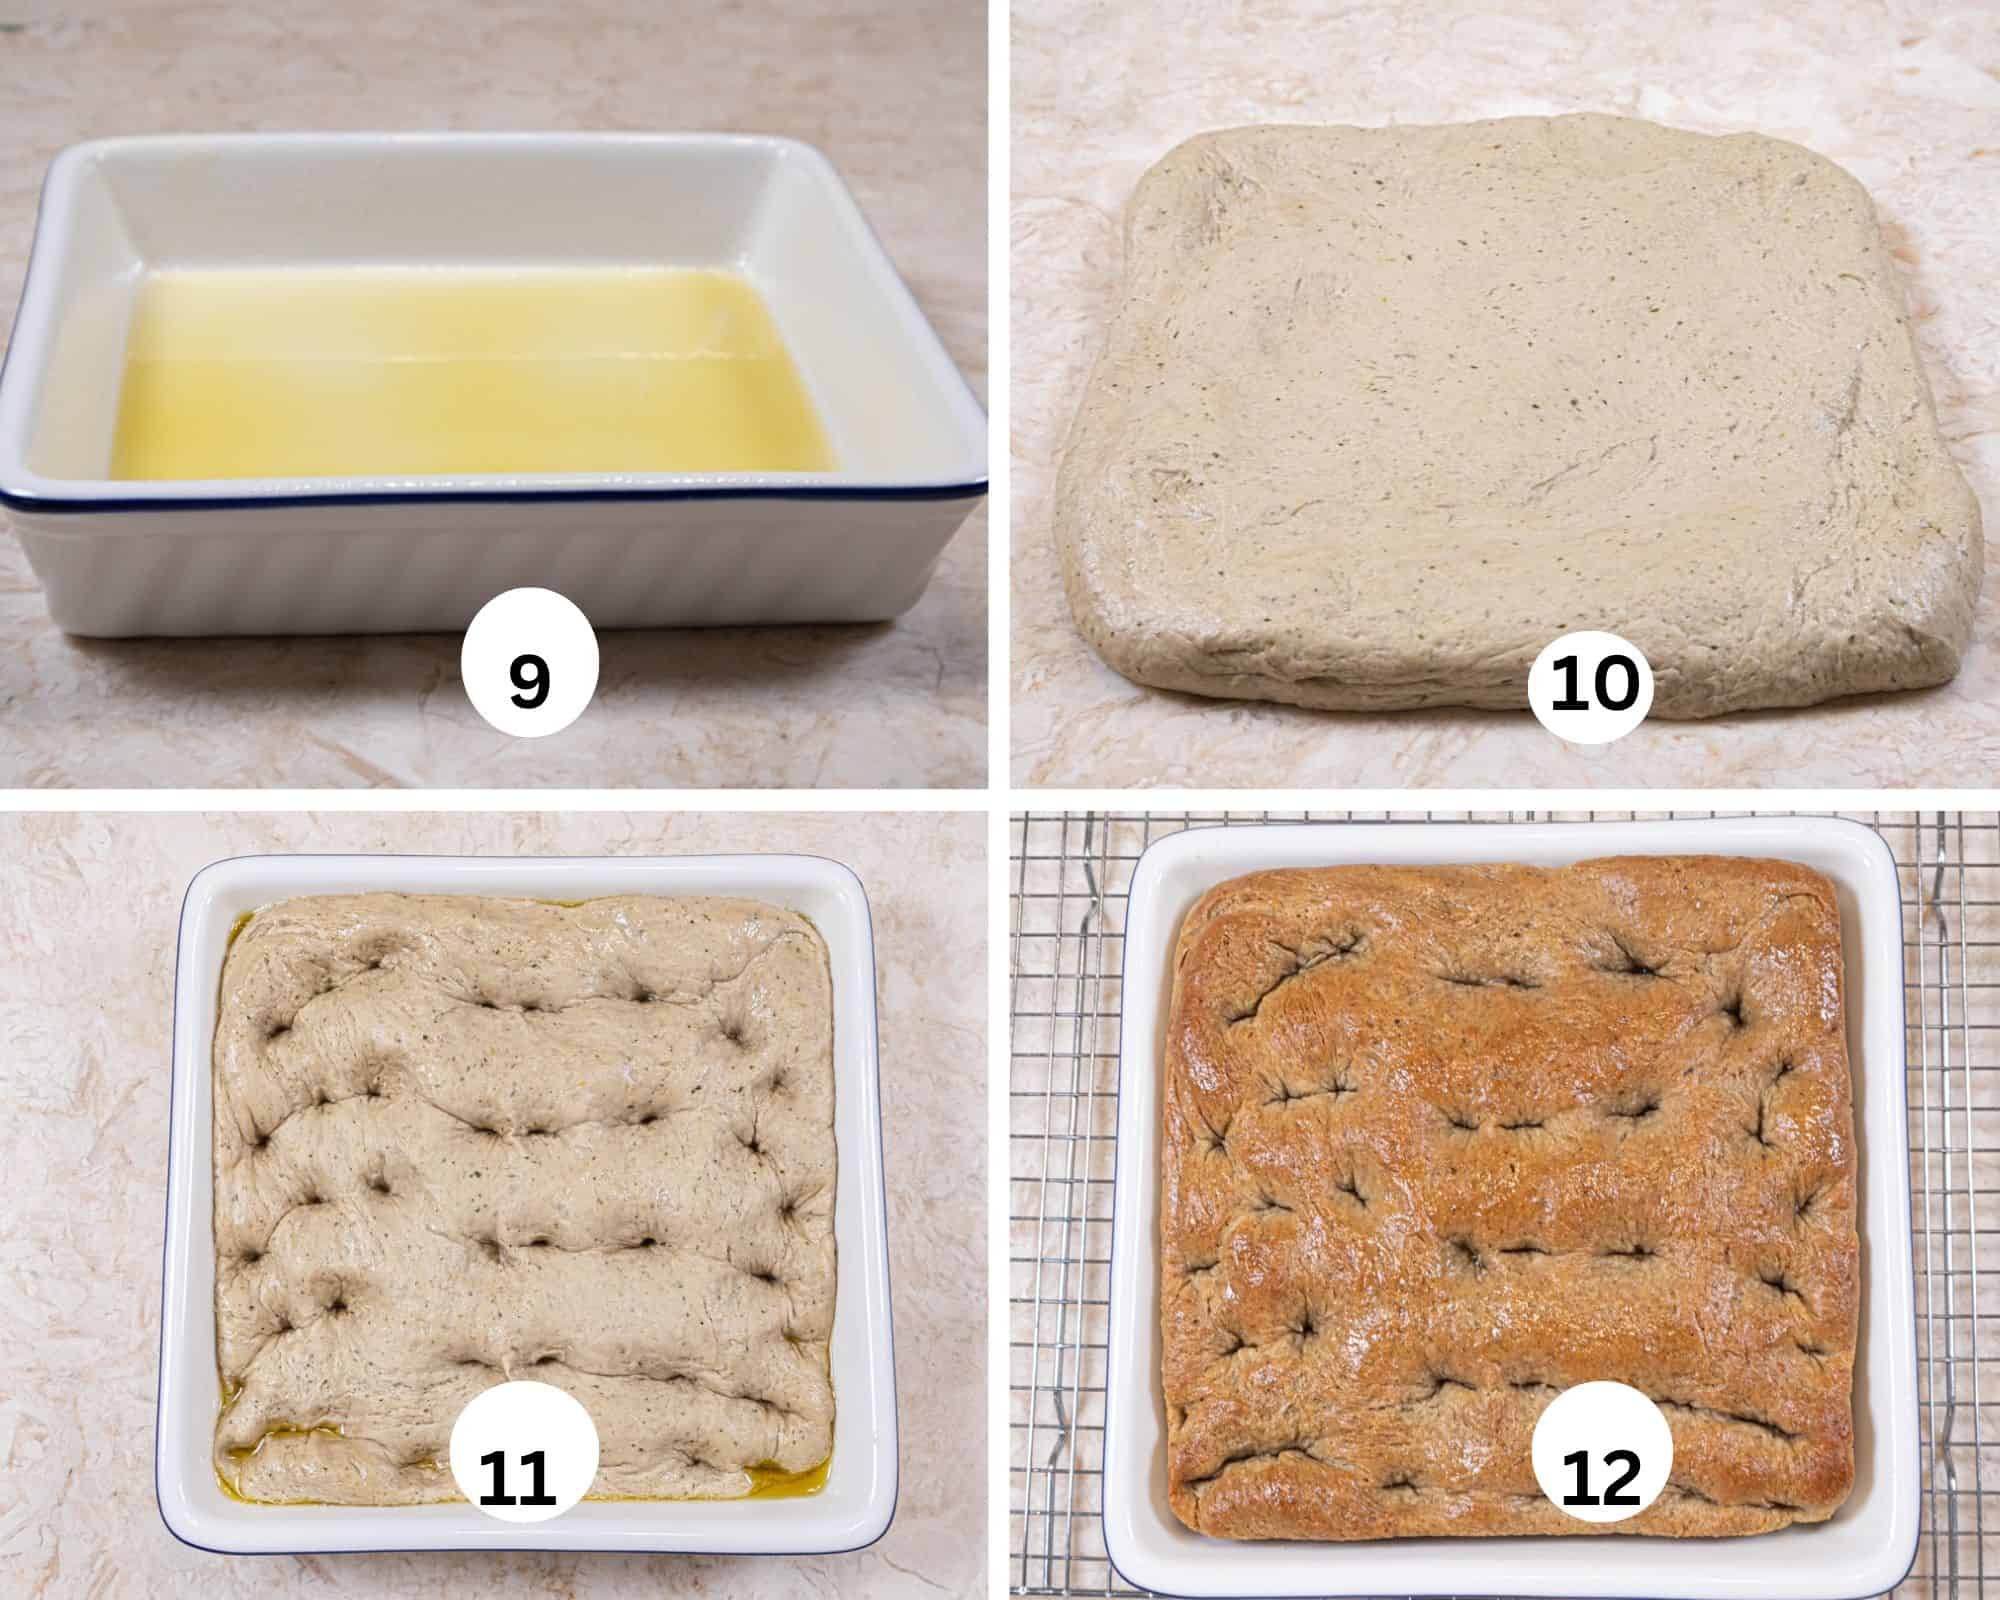
Step 9. Pour 2 tablespoons of zippy garlic oil in the bottom of a 9"x 9" baking dish. Step 10. Remove the lemon pepper focaccia from the fridge and very lightly flour the work surface. Place the dough in the dish and let it rise until it doubles. Step 11. When it has doubled, dimple the focaccia by pressing your fingers to the bottom of the dish. Step 12. Bake as directed. Immediately upon removing from the oven, brush with the remainder of the oil. Cool and turn out.
Recipe FAQ'S
It can. Be sure to choose a thick on rather than a very oily one as it will put too much oil into the bread when mixing it.
A metal pan and enough oil on the bottom produces a crisper crust than a glass or ceramic dish.
Pesto focaccia is delicious served with soups, salads, pasta, grilled vegetables, or Italian-inspired meals. It also makes an excellent sandwich bread when sliced horizontally and filled with mozzarella, tomatoes, or grilled chicken.
Make ahead, STorage and Freezing
The pesto and zippy garlic oil can be made a week ahead and stored, covered in the fridge. The pesto can be made and frozen up to a couple of months.
The dough can be made and held in the fridge for 3 days but it will get darker the longer it's in there. However, it should be refrigerated at least overnight for the flavor and to make it easier to shape.
The lemon pesto focaccia dough can be frozen after mixing. Thaw it in the fridge overnight and continue as it was just made.
It can also be frozen after baking for a month. Thaw it on a cooling rack and then wrap it in foil, leaving a vent hole in the top and refresh in a preheated 350°F oven for about 15 minutes.
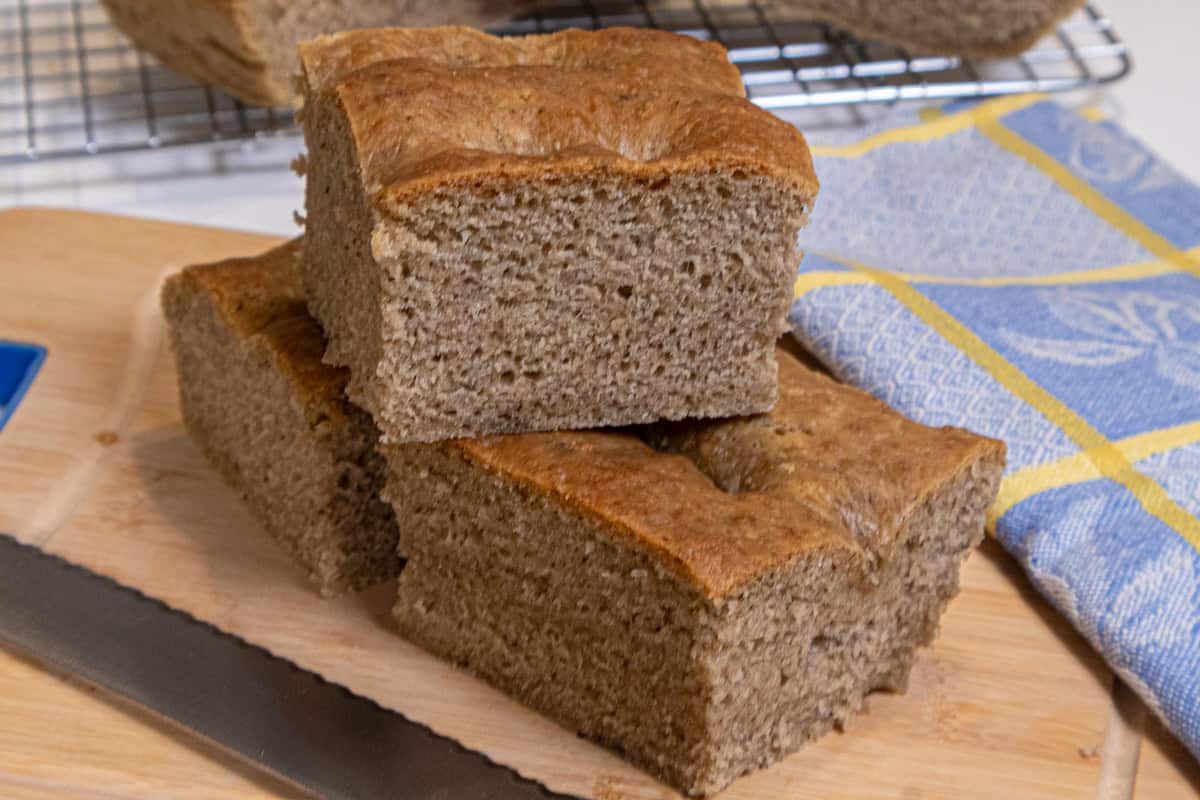
While yeast doughs are generally best the day they are baked, this will hold several days, lightly covered.
Expert Tips
- If store bought pesto is used, add the zest of a lemon. If it is very oily, place it in a strainer to remove some of the oil.
- Beat the dough for about 4 minutes to activate the gluten.
- Refrigerate overnight to increase the flavor and make it easier to shape.
- Dimple the dough to the bottom of the dish. The holes should not close in. If they do, let it rise a bit more. Test it with on or two holes.
- Extra virgin olive oil which is cold pressed or Virgin olive oil is best because it contributes a lot to the taste of the finished product.
- At the end of the basil season and before it goes to seed, make pesto, shape into balls and freeze for a taste of summer during the off months.
- This Lemon Pepper Pesto is excellent when used to finish pasta.
Special Breads you'll want to make

If you love this recipe or any other recipe on my website, please leave a 🌟 star rating in the recipe card and let me know how it went the in 📝 comments below. Thank you and I appreciate each of you being here!
Lemon Pesto Focaccia
Equipment
- 9"x9" oven proof dish or pan
Ingredients
Lemon Pepper Focaccia
- 1/4 cup walnuts or pine nuts (25 grams)
- 3/4 cup basil leaves, packed (28 grams)
- 3 large garlic cloves
- 1/2 cup parmesan or sharp asiago cheese (40 grams)
- 2 tablespoons lemon zest
- 1/2 teaspoon salt
- 1/2 teaspoon black pepper
- 1/8 teaspoon cayenne pepper
- 4 to 5 tablespoons olive oil
Zippy Garlic Oil
- 3/4 cup olive oil (Extra Virgin or Virgin)
- 3/4 teaspoon red pepper flakes
- 4 large garlic cloves
- 1/2 rind of large lemon
Lemon Pesto Focaccia Dough
- 3 1/2 cups bread flour (490 grams)
- 1 1/2 teaspoons salt
- 1 1/3 cups water
- 1/3 cup lemon pepper pesto
- 3 tablespoon zippy olive oil
- 2 1/4 teaspoons instant yeast (7 grams)
Instructions
Lemon Pesto Focaccia
- Toast the walnuts at 350°F for 5 to 7 minutes until ligltly browned and fragrant. Cool before using.
- Pull the leaves off the stems of the basil stems. Rinse and dry them well.
- Place all the ingredients except the oil in the bowl of a processor and process until finely cut together.
- Add the smaller amount of oil first and see if it makes a paste. if not, add the remainder of the oil. You want more of a paste than it swimming in oil
- Using a disher/scoooper or a spoon, drop the pesto on a sheet of parchmenet and freeze. When they are hard, place them in a freezer proof bag. Thaw as many as needed.
- I dropped mine with a #100 disher/scooper which is 2 teaspoons. If I need 2 tablespoons, I know that is 3 balls. See my Numbers and Sizes of Dishers/Scoopers for a list that includes all the sizes and how much is in each size.
- Yield: 10 to 11 balls of pesto.
Zippy Garlic Oil
- Place all the ingredients in a small saucepan.
- Bring to a simmer and simmer for 5 minutes.
- Immediately, strain out the solids and cool the oil. Store in the fridge.
- Yields: About 3/4 cup
Lemon Pesto Focaccia
- Combine the flour and aalt in the bowl of a mixer. Whisk to mix. Fit the bowl with a dough hook if possible.
- Combine the water, lemon pepper pesto, zippy garlic oil, and instant yeast. Whisk to blend completely.
- Pour over the flour mixture and mix on low initially to combine the ingredients Raise the speed to medium or whatever your mixer suggests and beat for 3 to 4 minutes. The dough will come together and clean the bowl. It will be soft and slightly sticky. If it is not, add another tablespoon of water at a time until it gets to that consistency,
- Spray a container at least twice as big as the dough with a non-stick baking release and transfer the dough to the container. Turn it over so the top is coated. Cover directly with plastic wrap, put the top on the container and mark the time on it. Let it double in bulk.
- At this point I suggest you refrigerate it overnight to make it easier to shape and deepen the taste.
- The next day, spray the sides of the baking dish as above. Add 2 to 3 tablespoons of zippy garlic oil. Rotate the dish to coat the bottom.
- Remove the focaccia from the fridge and lightly flour your work surface. Pat the into a slightly larger than 9" x 9" square. Lift it into the dish and let it rise until doubled either at room temperature or in the oven proofer. See the notes in the header of the post if you are not familiar with this technique.
- Preheat the oven to 425°F. While the oven is preheating, dimple the dough using your four fingers. The holes should stay open if the dough is properly risen.
- Bake for 30 to 35 minutes until the top is deeply browned. Immediately upon removing from the oven, brush the top with the remaining oil Cool completely
- While most yeast products are best the same day they are made, this bread can be held loosely covered for several days.
- Freezing the bread. It can be baked and stored in the freezer, well wrapped for a couple of months. Thaw at room temperature and then freshen in a preheated 350F oven for 15 to 20 minutes.
Notes
Nutrition


Leave a Reply