
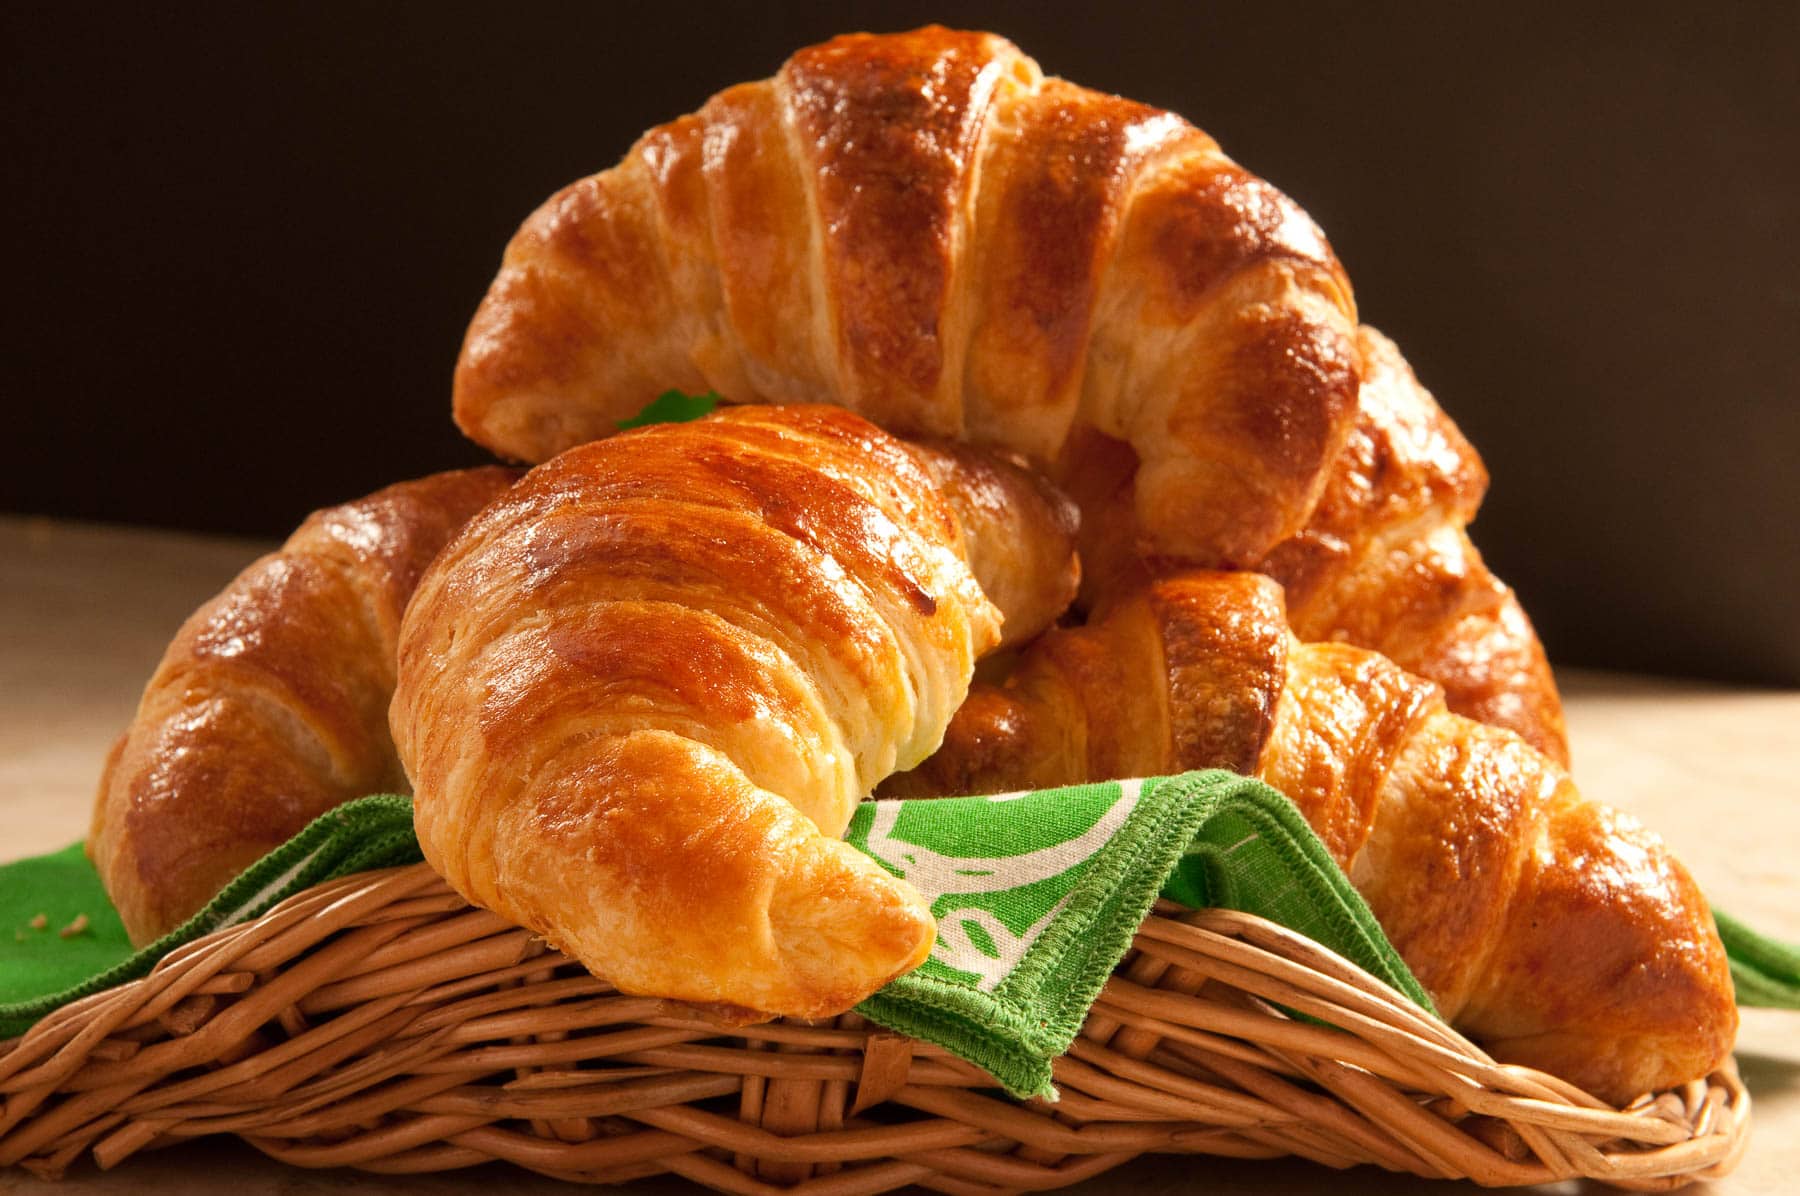
These Modern French Croissants in 4 Hours was developed for my first book, The New Pastry Cook using the processor to cut frozen butter into chilled dough. This technique, along with controlling the rising, yields the flakiness that is the standard by which good croissants are judged. See the picture below. In addition, altering the traditional method of making the folds produces a croissant ready to eat in 4 to 5 hours, start to finish--a far cry from the 18 to 36 hours it used to take.
This 4 hour technique for French Croissants requires no butter blocks and no traditional lamination of the butter and dough.
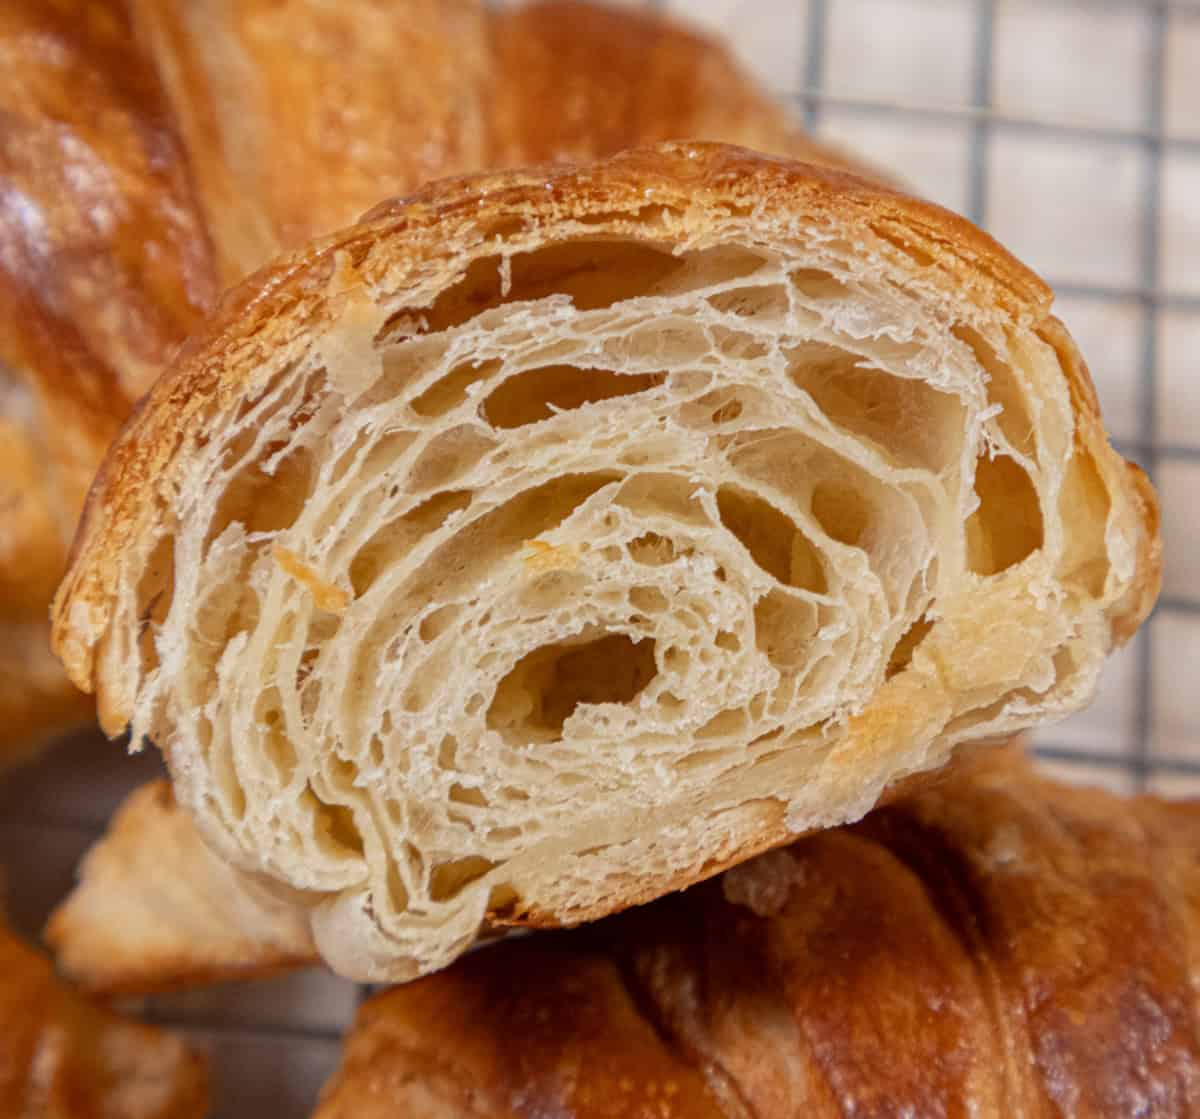
While all the text and photos seem like a lot, I have done this on purpose to give you every help I could think of to ensure your success with this new method.
Of all the pastries thought of as French, the flaky, buttery rolls, Croissants have gotten to be the best known in America. The word means crescent, and the French give croissants a special place of honor at their breakfast table.
Recently, the St.Louis food editor questioned the timing of only 4 hours to make these. Here's what he had to say, "We didn't believe it either: You can make exceptional croissants in just four hours. It's true. Why take three days when you can do it in a fraction of the time?" So he did and it resulted in a front page and inside article on the food page attesting to the veracity of the recipe.
For other laminated doughs using the same technique see: A Better Kouign Amann, Pithiviers, and Sunny Side Up Apricot Pastries.
Croissant Queen of Breads is the preface to the Croissant chapter featured in my book, "The New Pastry Cook", published by Wm. Morrow Co., in 1986. The book focuses on modern methods of making classic pastraies. It is usually available on ebay and sometimes through Amazon.com as well as other resell book stores. Each chapter is made up on a base recipe that uses modern techniques that make it easier, faster and/or better while keeping the core of the original recipe.
Jump to:
- What's the Origin of Croissants
- What is Laminated Dough
- Modern Method of Making Croissants
- Keeping the Croissant Dough Cold
- Baking
- Recipe Ingredients
- Key Ingredients
- Step by Step Instructions
- Shaping the Croissants
- Recipe FAQ'S
- Storage and Freezing
- Expert Tips
- Other Spectacular Laminated Doughs
- Modern French Croissants in 4 hours
What's the Origin of Croissants
While the popular story that croissants were invented to celebrate the defeat of the Ottomans during the 1683 Siege of Vienna is widely repeated, historians consider that story more legend than established fact.
Croissants are French in their modern form, but their story begins in Austria.
The earliest ancestor is the kipferl, a crescent-shaped Austrian pastry that dates back centuries. In the 19th century, Austrian bakers in Paris helped introduce this style of pastry to France. French bakers eventually transformed it into the buttery, laminated pastry we recognize today.
The modern croissant—with layers of yeast-leavened dough and butter—is generally associated with 19th-century France, where it became an iconic part of French baking. In 1839, an Austrian entrepreneur, August Zang, opened the Boulangerie Viennoise in Paris, introducing the crescent kipferl and other Viennese treats.
Early French croissants were made with a simple, brioche-like yeast dough. Around 1915, a French baker named Sylvain Claudius Goy introduced tourage or lamination—repeatedly folding butter into the yeast dough to create delicate, airy layers. The French government officially recognized the flaky croissant as a staple national product by 1920.
What is Laminated Dough
Laminated dough is the technique of layering butter between sheets of dough. In addition to Croissants, it is used for puff pastry and danish dough.
With any layered dough such as croissant dough or puff pastry, the most important process is to get the butter between the layers of dough but not to incorporate it into the dough. When the butter has been properly layered, it will melt in the heat of the oven, forming steam that separates the layers, causing the dough to expand and achieving the much sought after flakiness.
Traditionally, for croissants, this has been done by making a bread dough and rolling it out in a rectangle, two thirds of which is buttered. The dough is then folded and turned. The rolling, folding, and turning are repeated several more times, forming hundreds and hundreds of layers of butter and dough. In this method, the most traumatic occurrence was having the butter break through the dough. It gave many aspiring at-home pastry chefs a complex they never got over.
Modern Method of Making Croissants
Ingredients for Croissant
Although any yeast product is best eaten the day it is made, slight changes I have made in the formula provide a dough that is tasty and acceptable the second day as well as the first. Bread flour is used for its high gluten content, which makes it a strong flour capable of supporting the rapid expansion, caused by the yeast and by the method of layering the butter, when the dough is baked.
While bread flour provides the structure that allows the croissants to rise to their fullest potential, to provide the tenderest possible dough, buttermilk has replaced the traditional milk and water. The acid in the buttermilk tenderizes the gluten and allows the use of a strong flour without sacrificing texture.
Unsalted butter is used for its purity of taste and the fact that it stays harder longer than salted butter does which is important for this technique.
Along with unsalted butter, there is also a small amount of oil in this formula, which lubricates the gluten strands, allowing them to stretch without breaking. In addition, the oil keeps the dough pliable when it is cold and facilitates rolling out. By allowing the pastry to rise only once, after the croissant is shaped, a bready texture is avoided and time is saved.
It is the cook's good fortune to have available dry powdered buttermilk, usually found in supermarkets near the regular dry milk or in the dairy section. If buttermilk powder is not available, regular buttermilk can be used, but, because of the difference in viscosity, it is necessary to dilute it with water. It is also very important that any liquid be cold when it is added to the flour in the processor, to avoid fermentation taking place before desired. Cold tap water or refrigerated buttermilk are fine.
Keeping the Dough Chilled
Croissant dough must be kept chilled. The basic flour dough is made in the processor and is chilled in the freezer for about an hour after it is made. It is then returned to the processor and cut together. Chilling the dough and using frozen butter prevents the butter from being incorporated into the dough. The dough is then rolled out and given a double turn or four-fold (folded into four layers) called a book turn, as opposed to the traditional three-fold referred to as a letter turn.
Therefore, the number of times the dough must be rolled and folded can be reduced from four single turns to three double turns, making is possible to complete the rolling and folding in one fell swoop and eliminating the long rest formerly needed between turns.
Keeping the Croissant Dough Cold
A chilled marble rolling pin and a marble surface are best for rolling the dough, as they will stay cold. However, a wooden rolling pin and a Formica surface are also acceptable. The least desirable are a wooden rolling pin and a wooden rolling surface, as they have a tendency to soften the dough.
Should the dough become too soft or elastic to roll, put it on a baking sheet and place in the freezer to firm up. As long as the dough remains chilled, a light sprinkling of flour uder and on top of the dough should suffice when rolling out.
Baking
Other departures from the traditional method of making croissants will be found in the baking. Several of the recipes call for the pastries to be "double- panned" and also baked in the upper third of the oven. This simply means that two baking sheets are used, one directly on top of the other. This prevents the bottom of the pastry from burning during the time it takes to finish the baking, and it is done even when heavy professional baking sheets are used.
However, if you are using insulated baking pans, do not double-pan. For croissants I have also found that lowering the usual baking temperature to 350 degrees and baking for a longer priod of time (25 minutes) provides a completely baked product without sacrificing any of the flakiness.
Recipe Ingredients
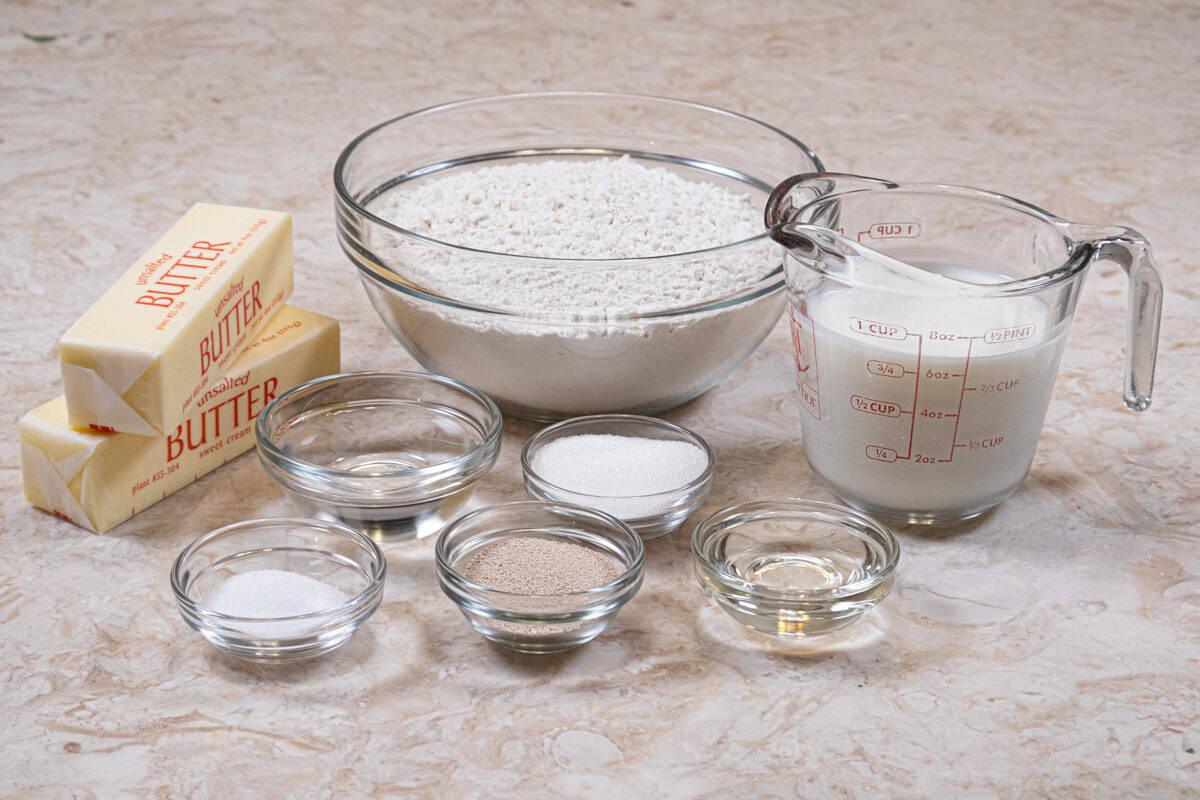
FRONT ROW: Salt, instant yeast, vegetable oil
MIDDLE ROW: Water, sugar and buttermilk
BACK ROW: Unsalted butter, bread flour
1 egg is used for the egg wash. I forgot it in the photo.
Key Ingredients
- While European butter is often suggested, I find that it softens much faster than American butter because it has a higher fat content. I prefer to use American butter for its ability to remain cold and harder longer extending the time the dough can be worked.
- Bread flour is used for its strength when using yeast and ability to rise higher given its high protein count.
- Instant yeast is used for its fast acting rise.
- Buttermilk is used to temper the bread flour yielding a softer baked roll and for its flavor. Because the buttermilk is thicker than water and milk, water is added to thin it down. Dry buttermilk powder can also be used.
- A bit of granulated sugar is food for the yeast to maximize its growth.
- The oil helps keep the strands from breaking while allowing them to stretch to their limits.
Be sure to see the recipe card below for the full ingredients and instructions.
Step by Step Instructions
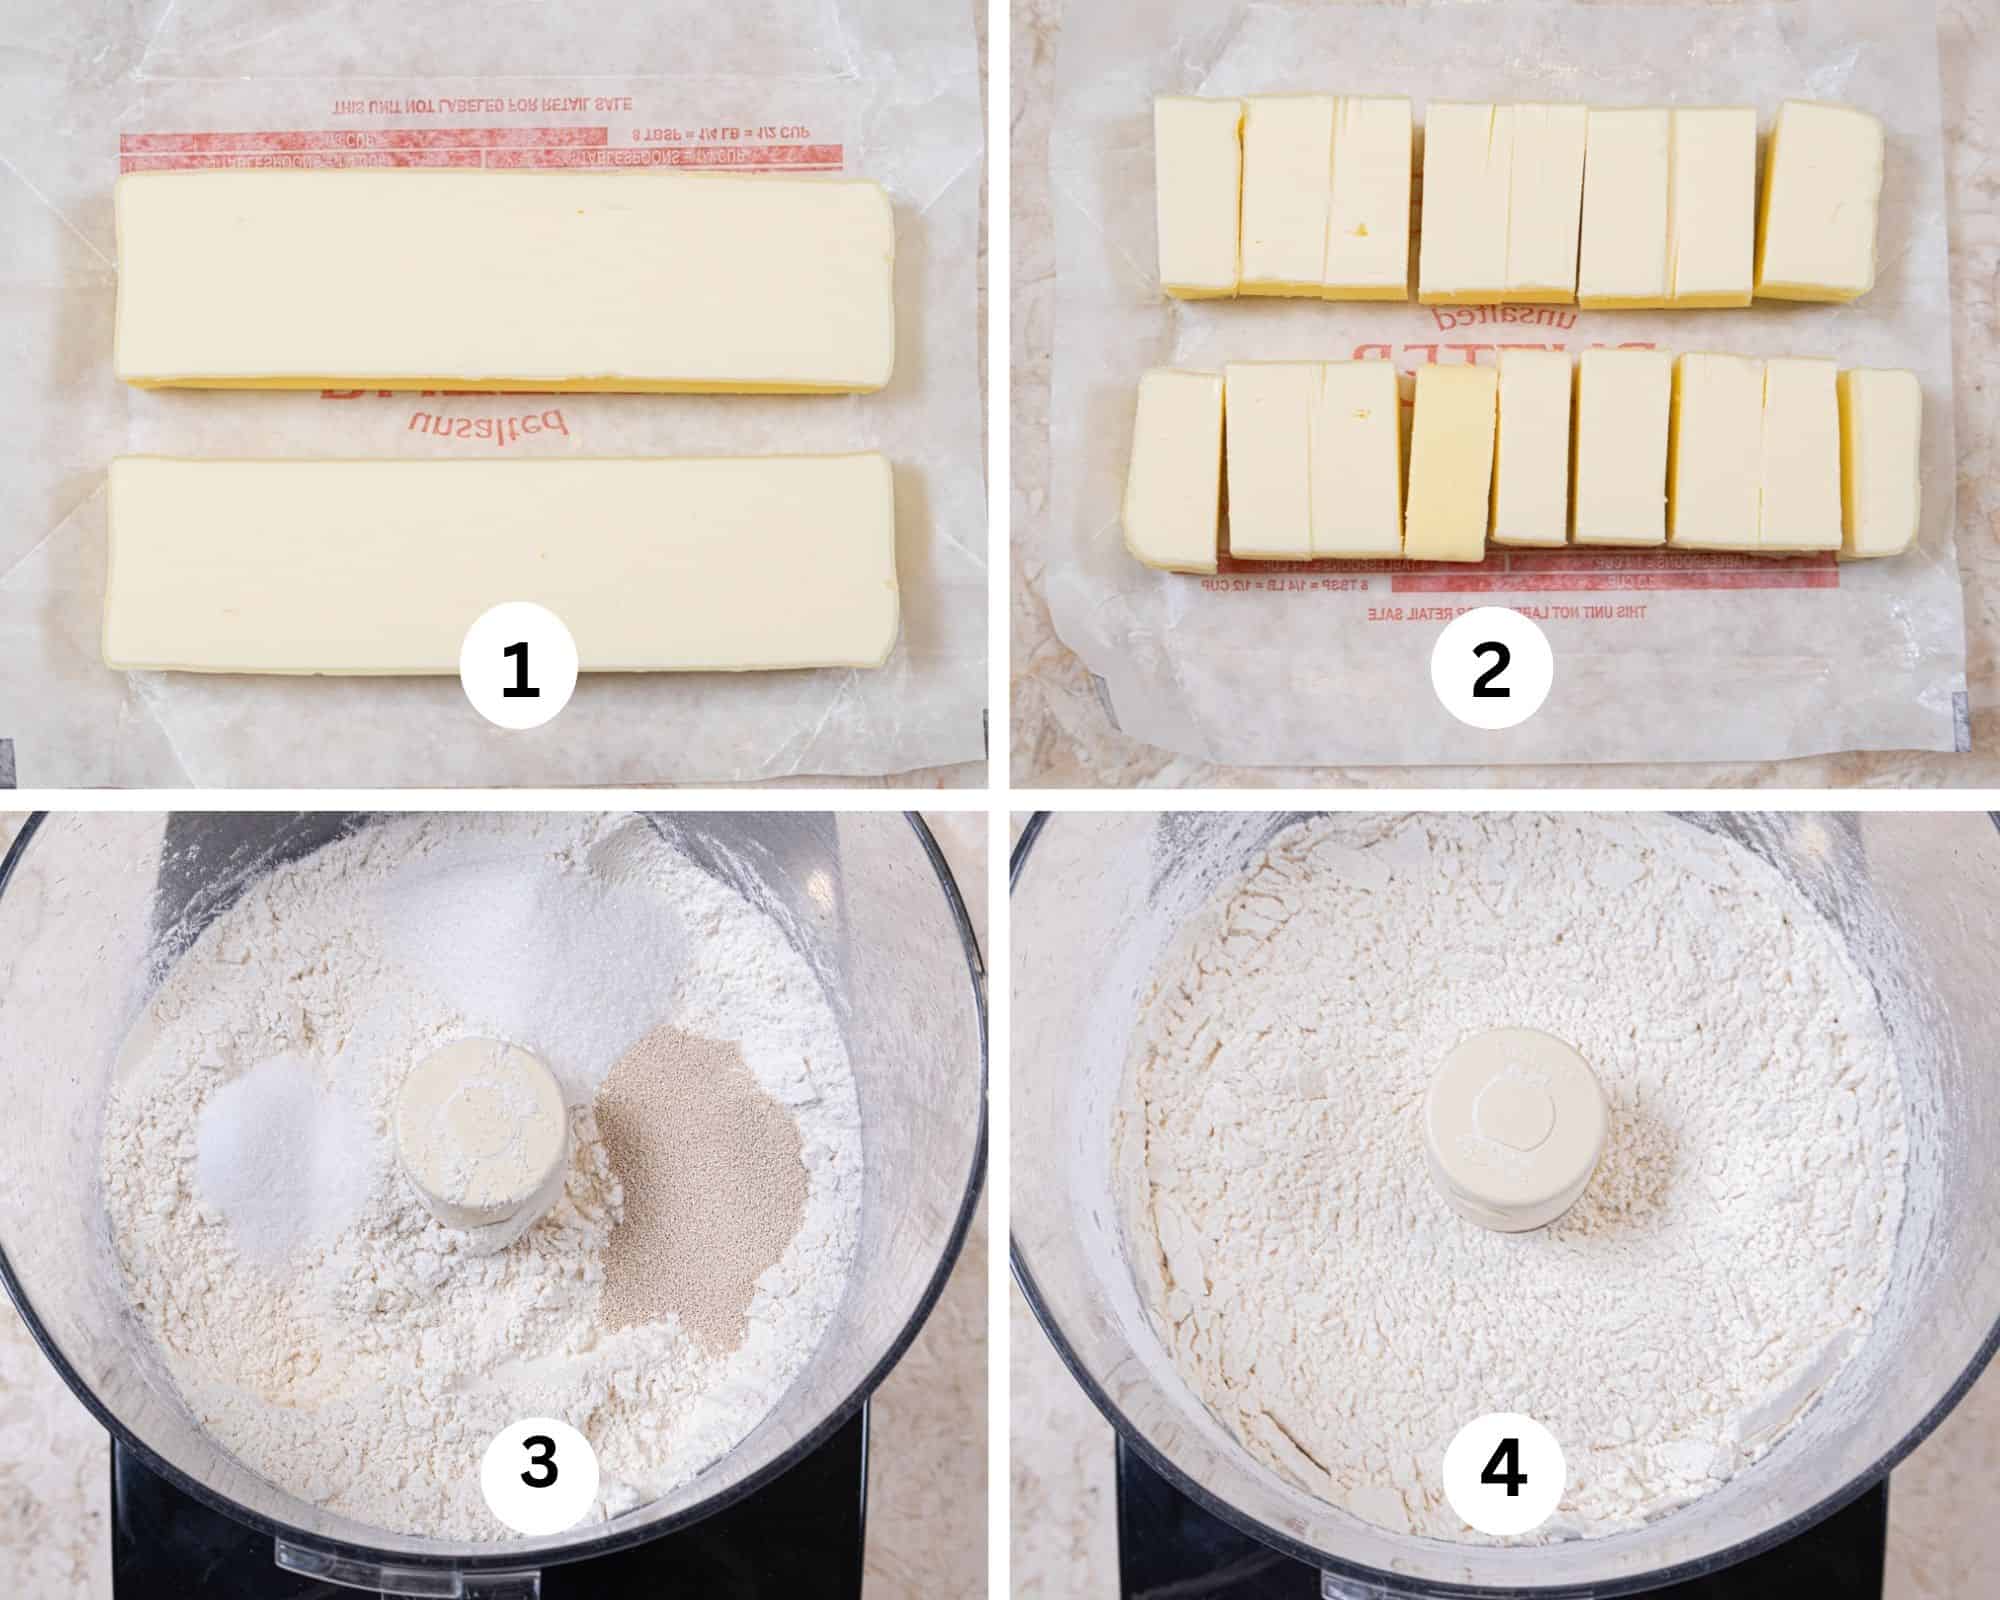
Step 1. Cut each stick of butter in half legnthwise. Step 2. Cross cut the butter into about 8 pieces each. Repeat with second stick of butter. Freeze until rock hard. Step 3. Place the bread flour, sugar, instant years and salt in the bowl of a processor. Step 4. Process about 5 seconds to mix.
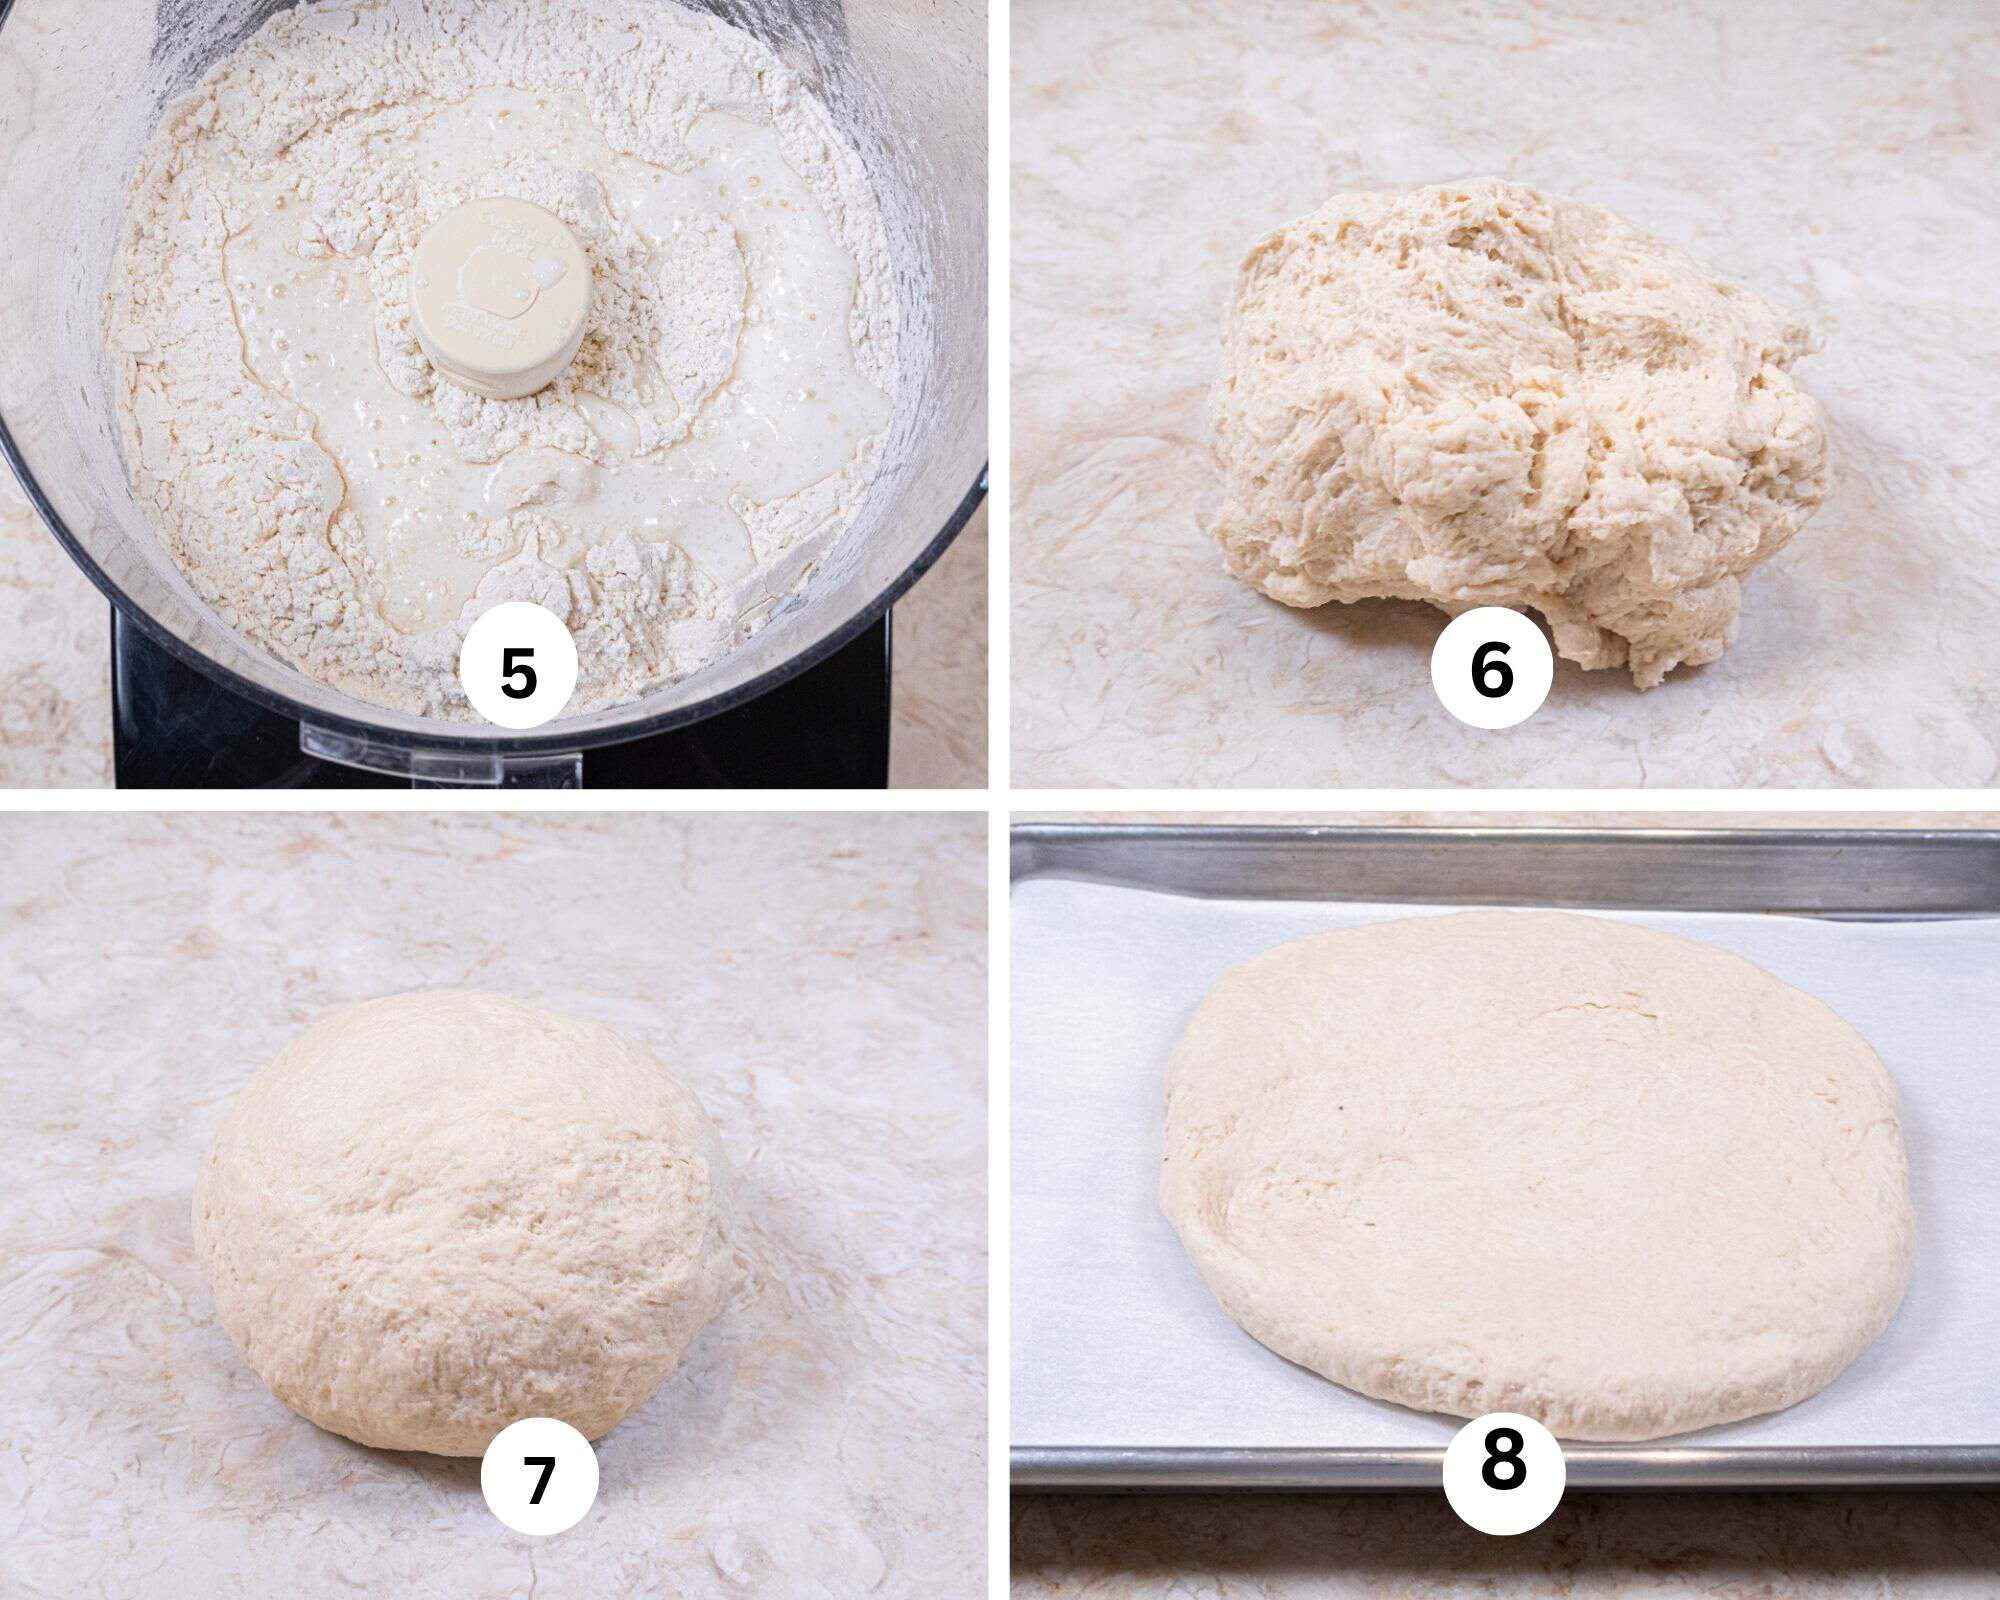
Step 5. Pour the buttermilk evenly over the dry ingredients. Step 6. Process until the dough comes together. It should be soft and slightly sticky but not wet. If it is not, add another tablespoon of water. Step 7. Shape it into a ball. Step 8. Flatten it into about an 8" round, place it on a tray covered with parchment paper and freeze for 60 to 90 minutes, or until the edges are very firm about 1/2 inch in all the way around.
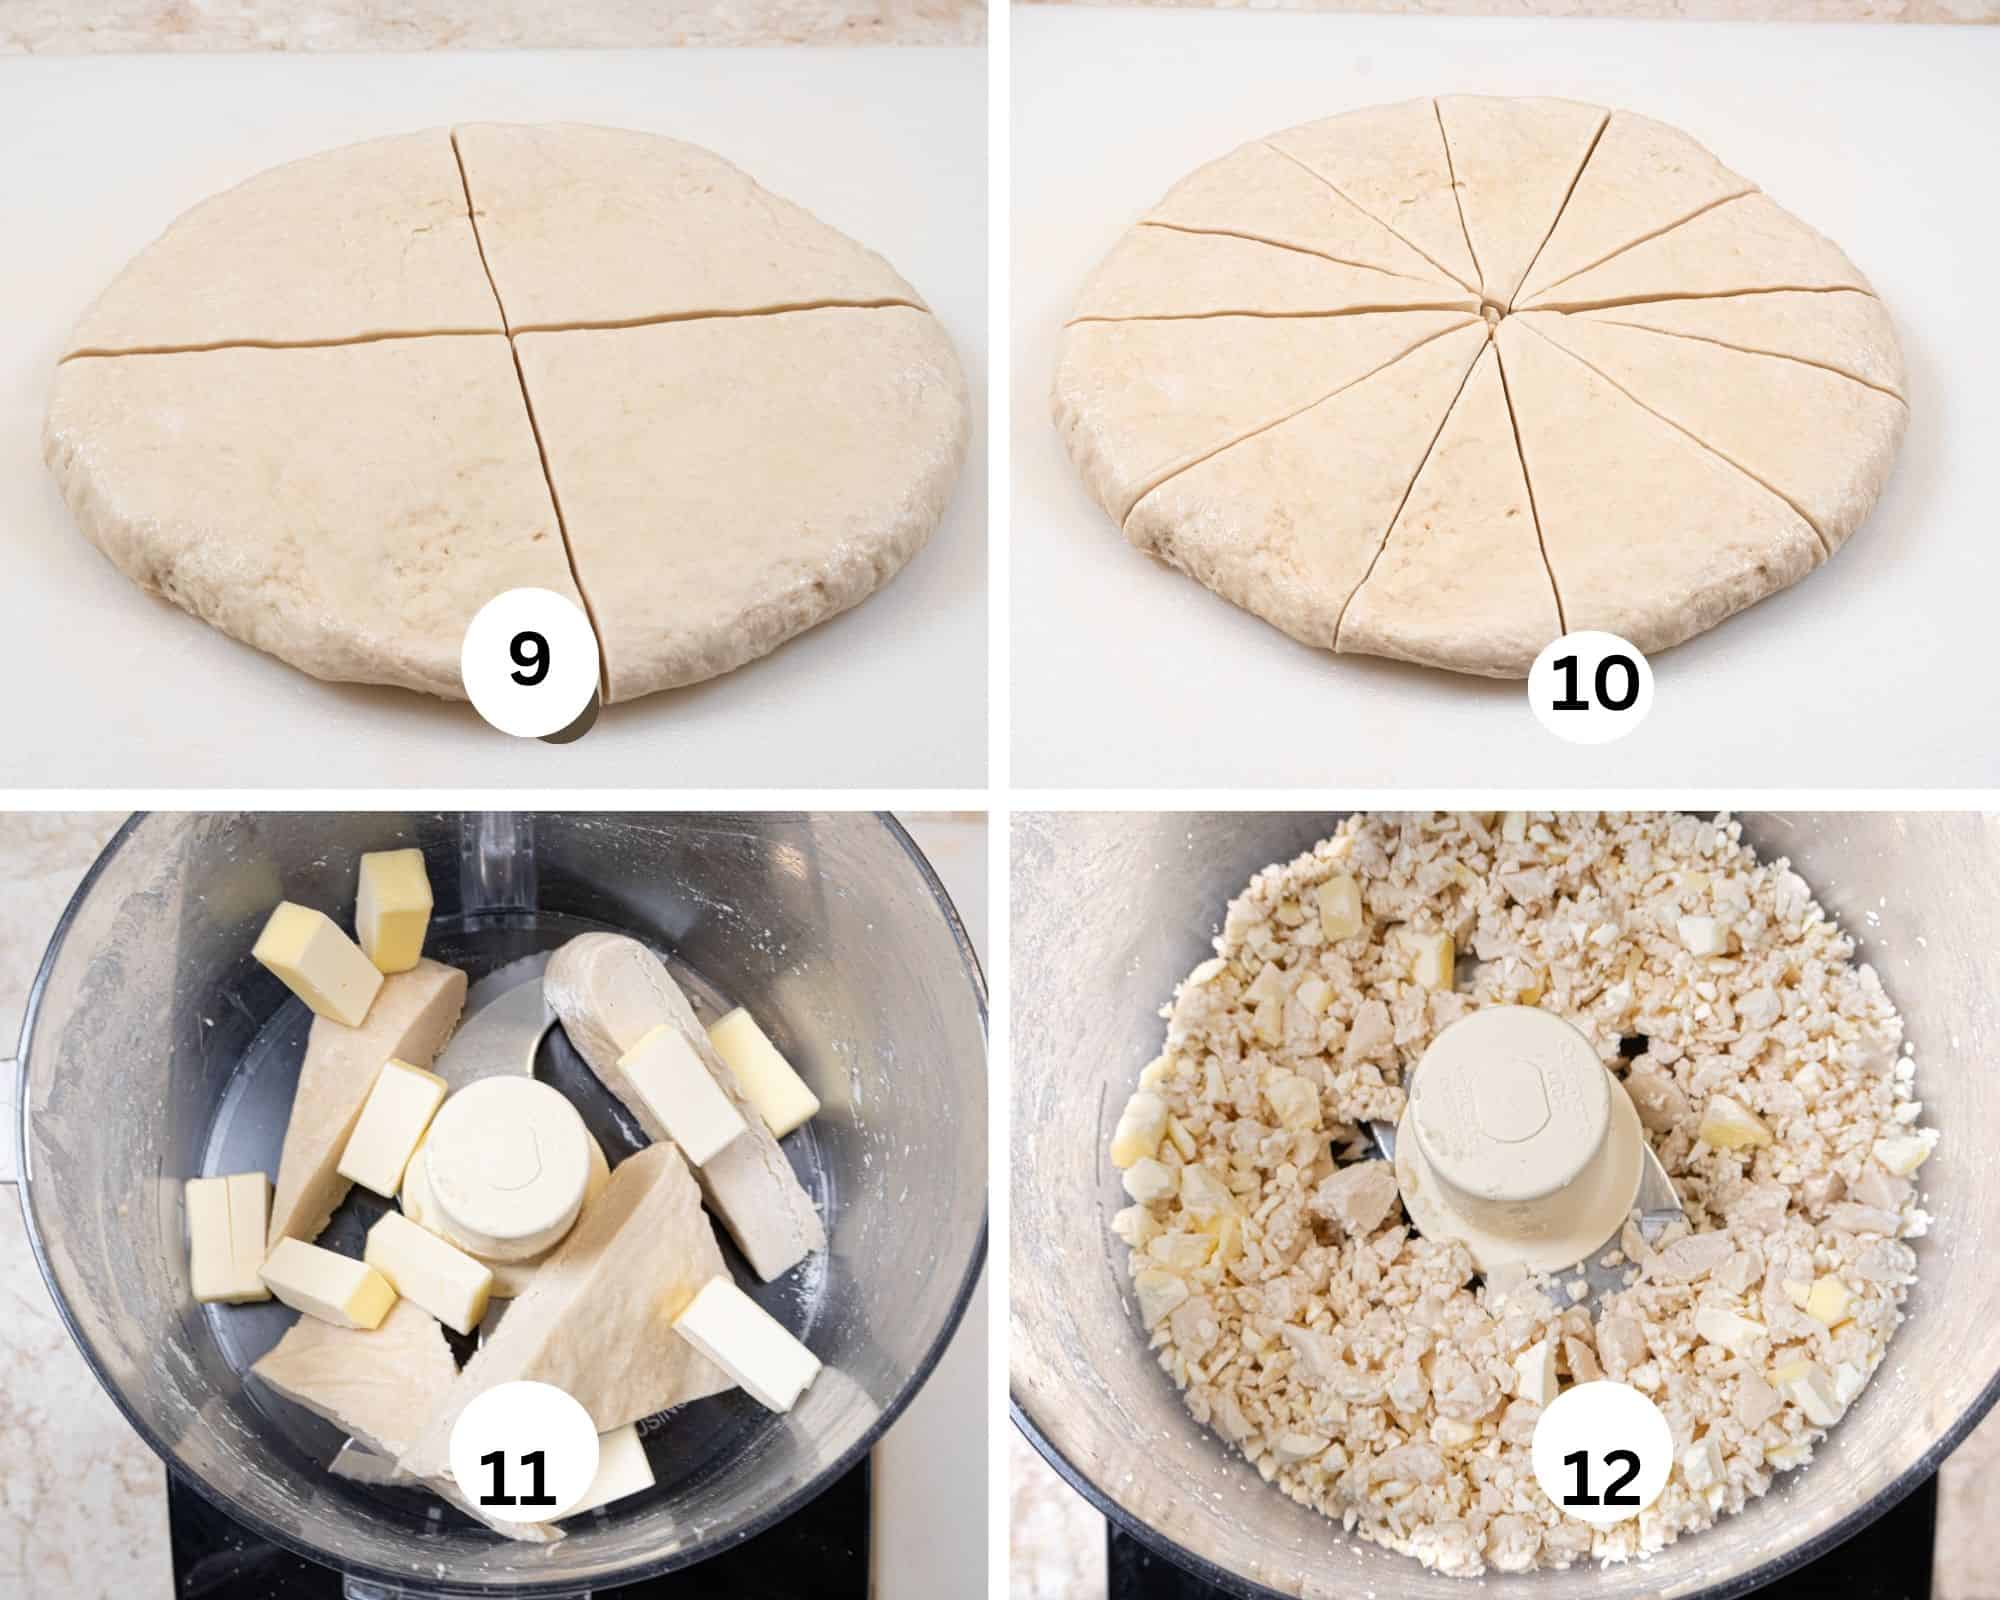
Step 9. Remove the dough from the freezer. Divide the disc into fourths. Step 10. Divide each fourth into 3 pieces. making 12 pieces total. Step 11. Place 4 pieces of dough in the processor with 1/3 of the butter. Step 12. Process until the butter and dough are cut into varying sizes but keeping some of the larger pieces in tact. It is important not to get the butter too small.
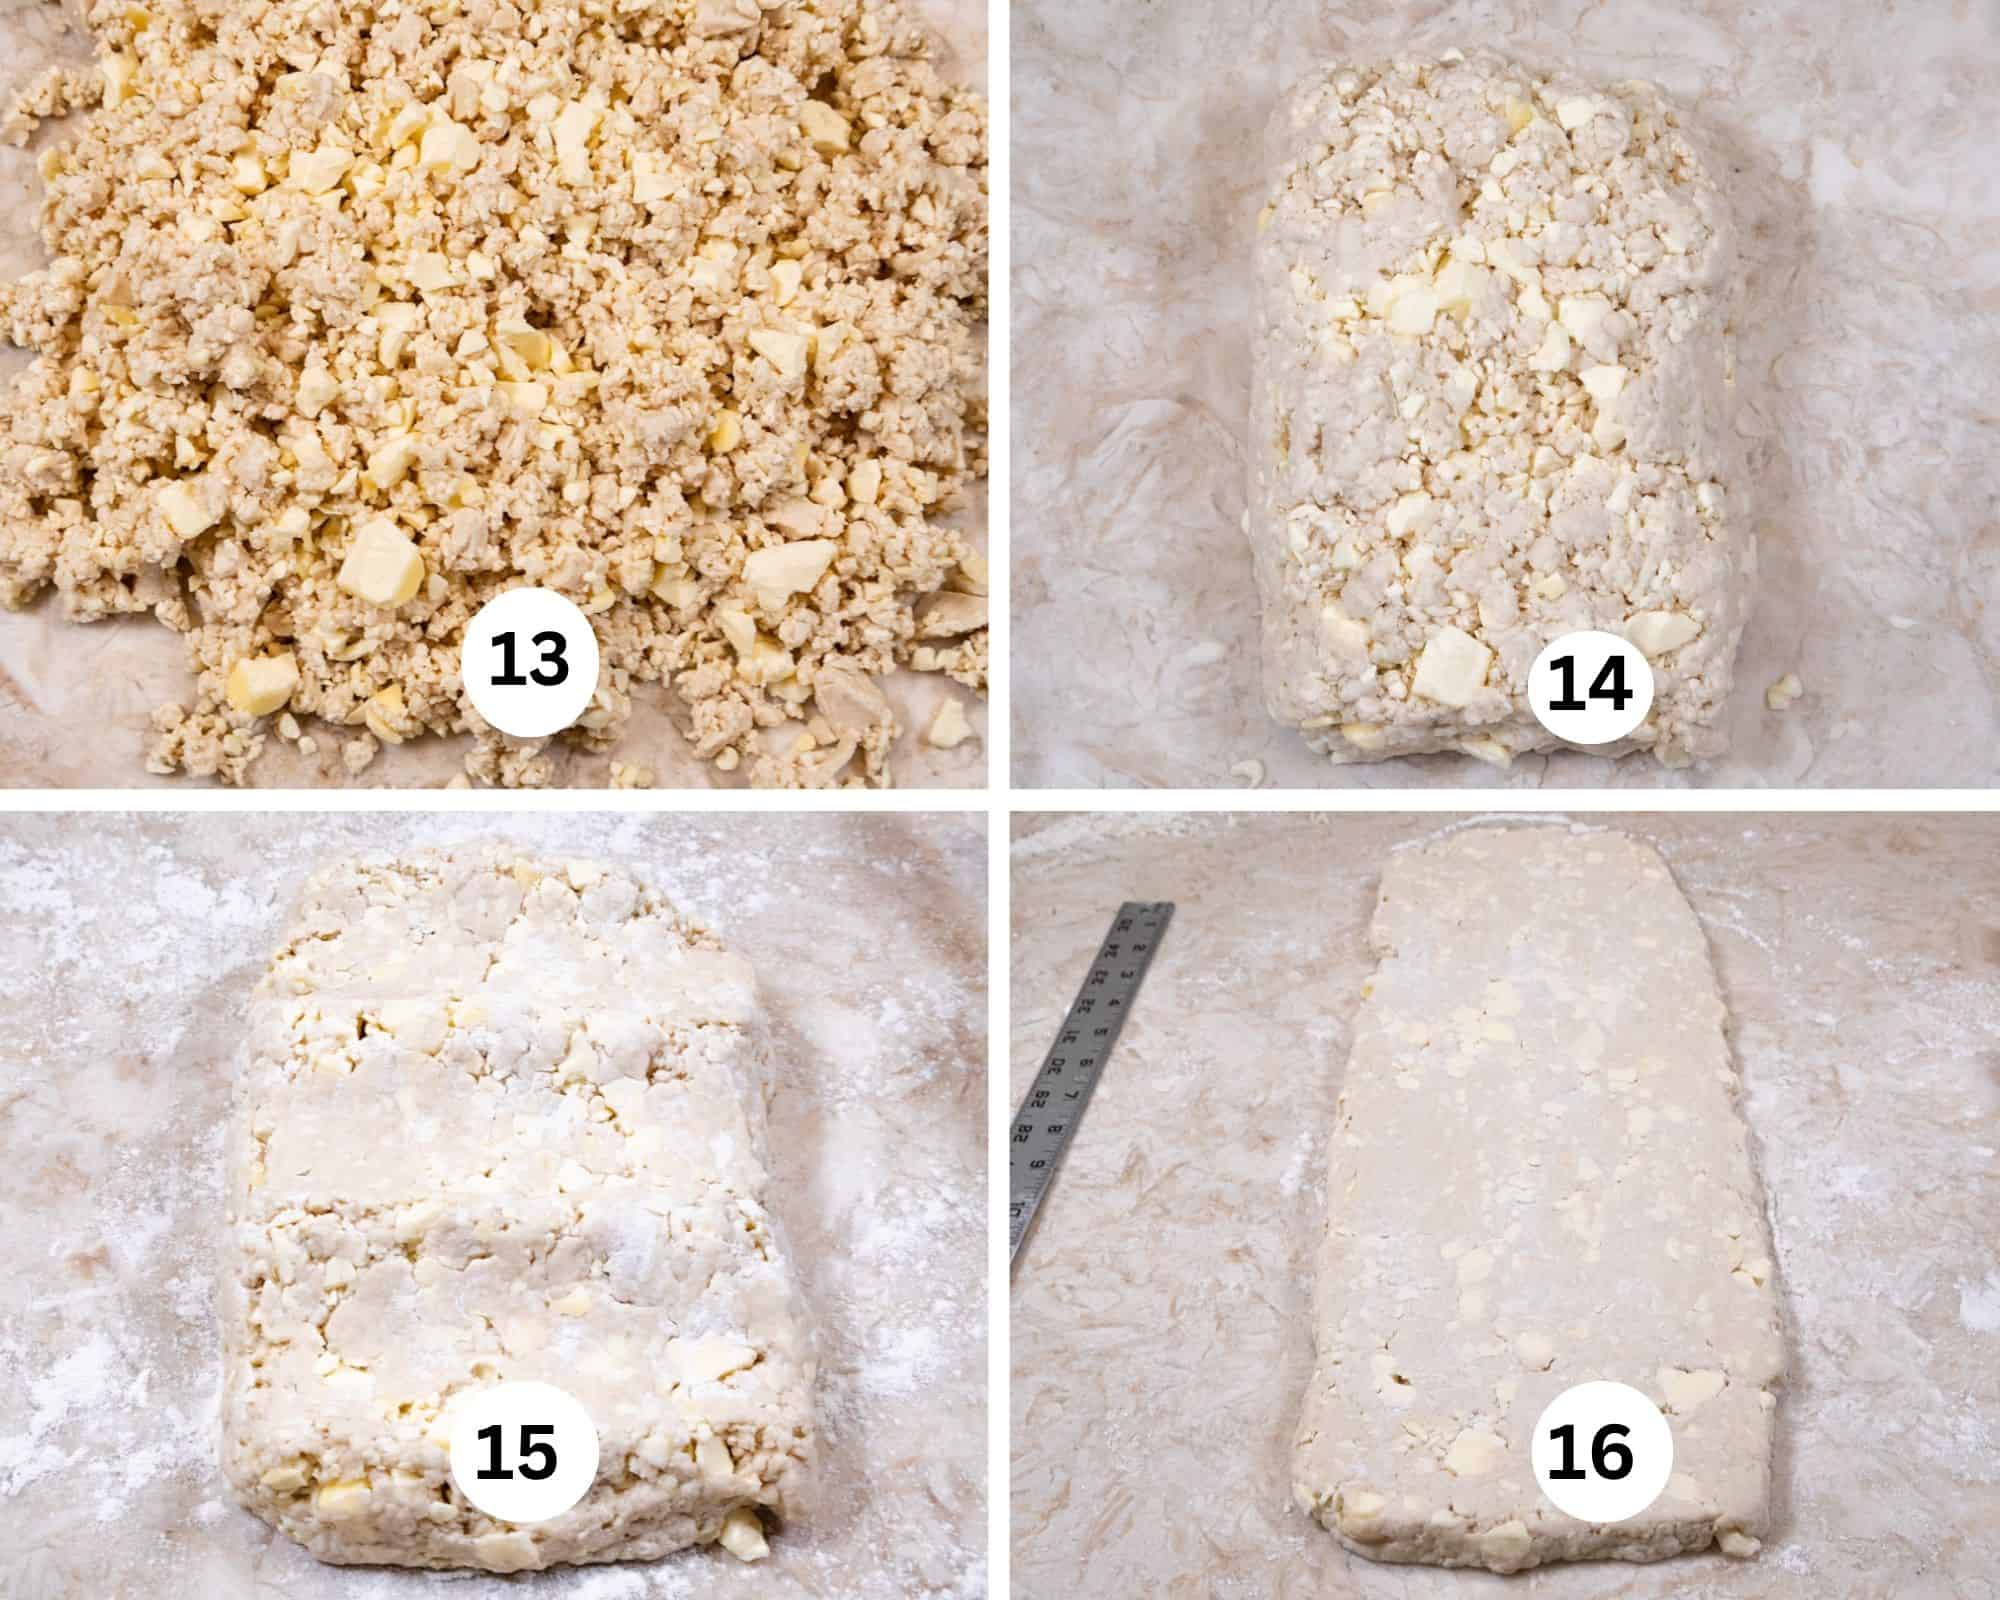
Step 13. Turn the butter/dough mixture out onto a work surface. Step 14. On a lightly floured surface, shape the mixture into a rectangle about 6" wide and 10" long. Step 15. To make it easier to roll out, take your rolling pin and make 3 or 4 dents into the dough. Step 16. Lightly flour the top of the dough and roll it into a 18x6 inch rectangle. Keep the ends as square as possible and the sides as straight as possible. Use your hands to even it out and keep the butter from scooting out by placing one hand on each side of the dough and lightly pushing toward the middle. Wipe the rolling pin frequently with paper toweling to keep it clean so it rolls the dough out smoothly. and scrape the work surface to prevent the dough from sticking.
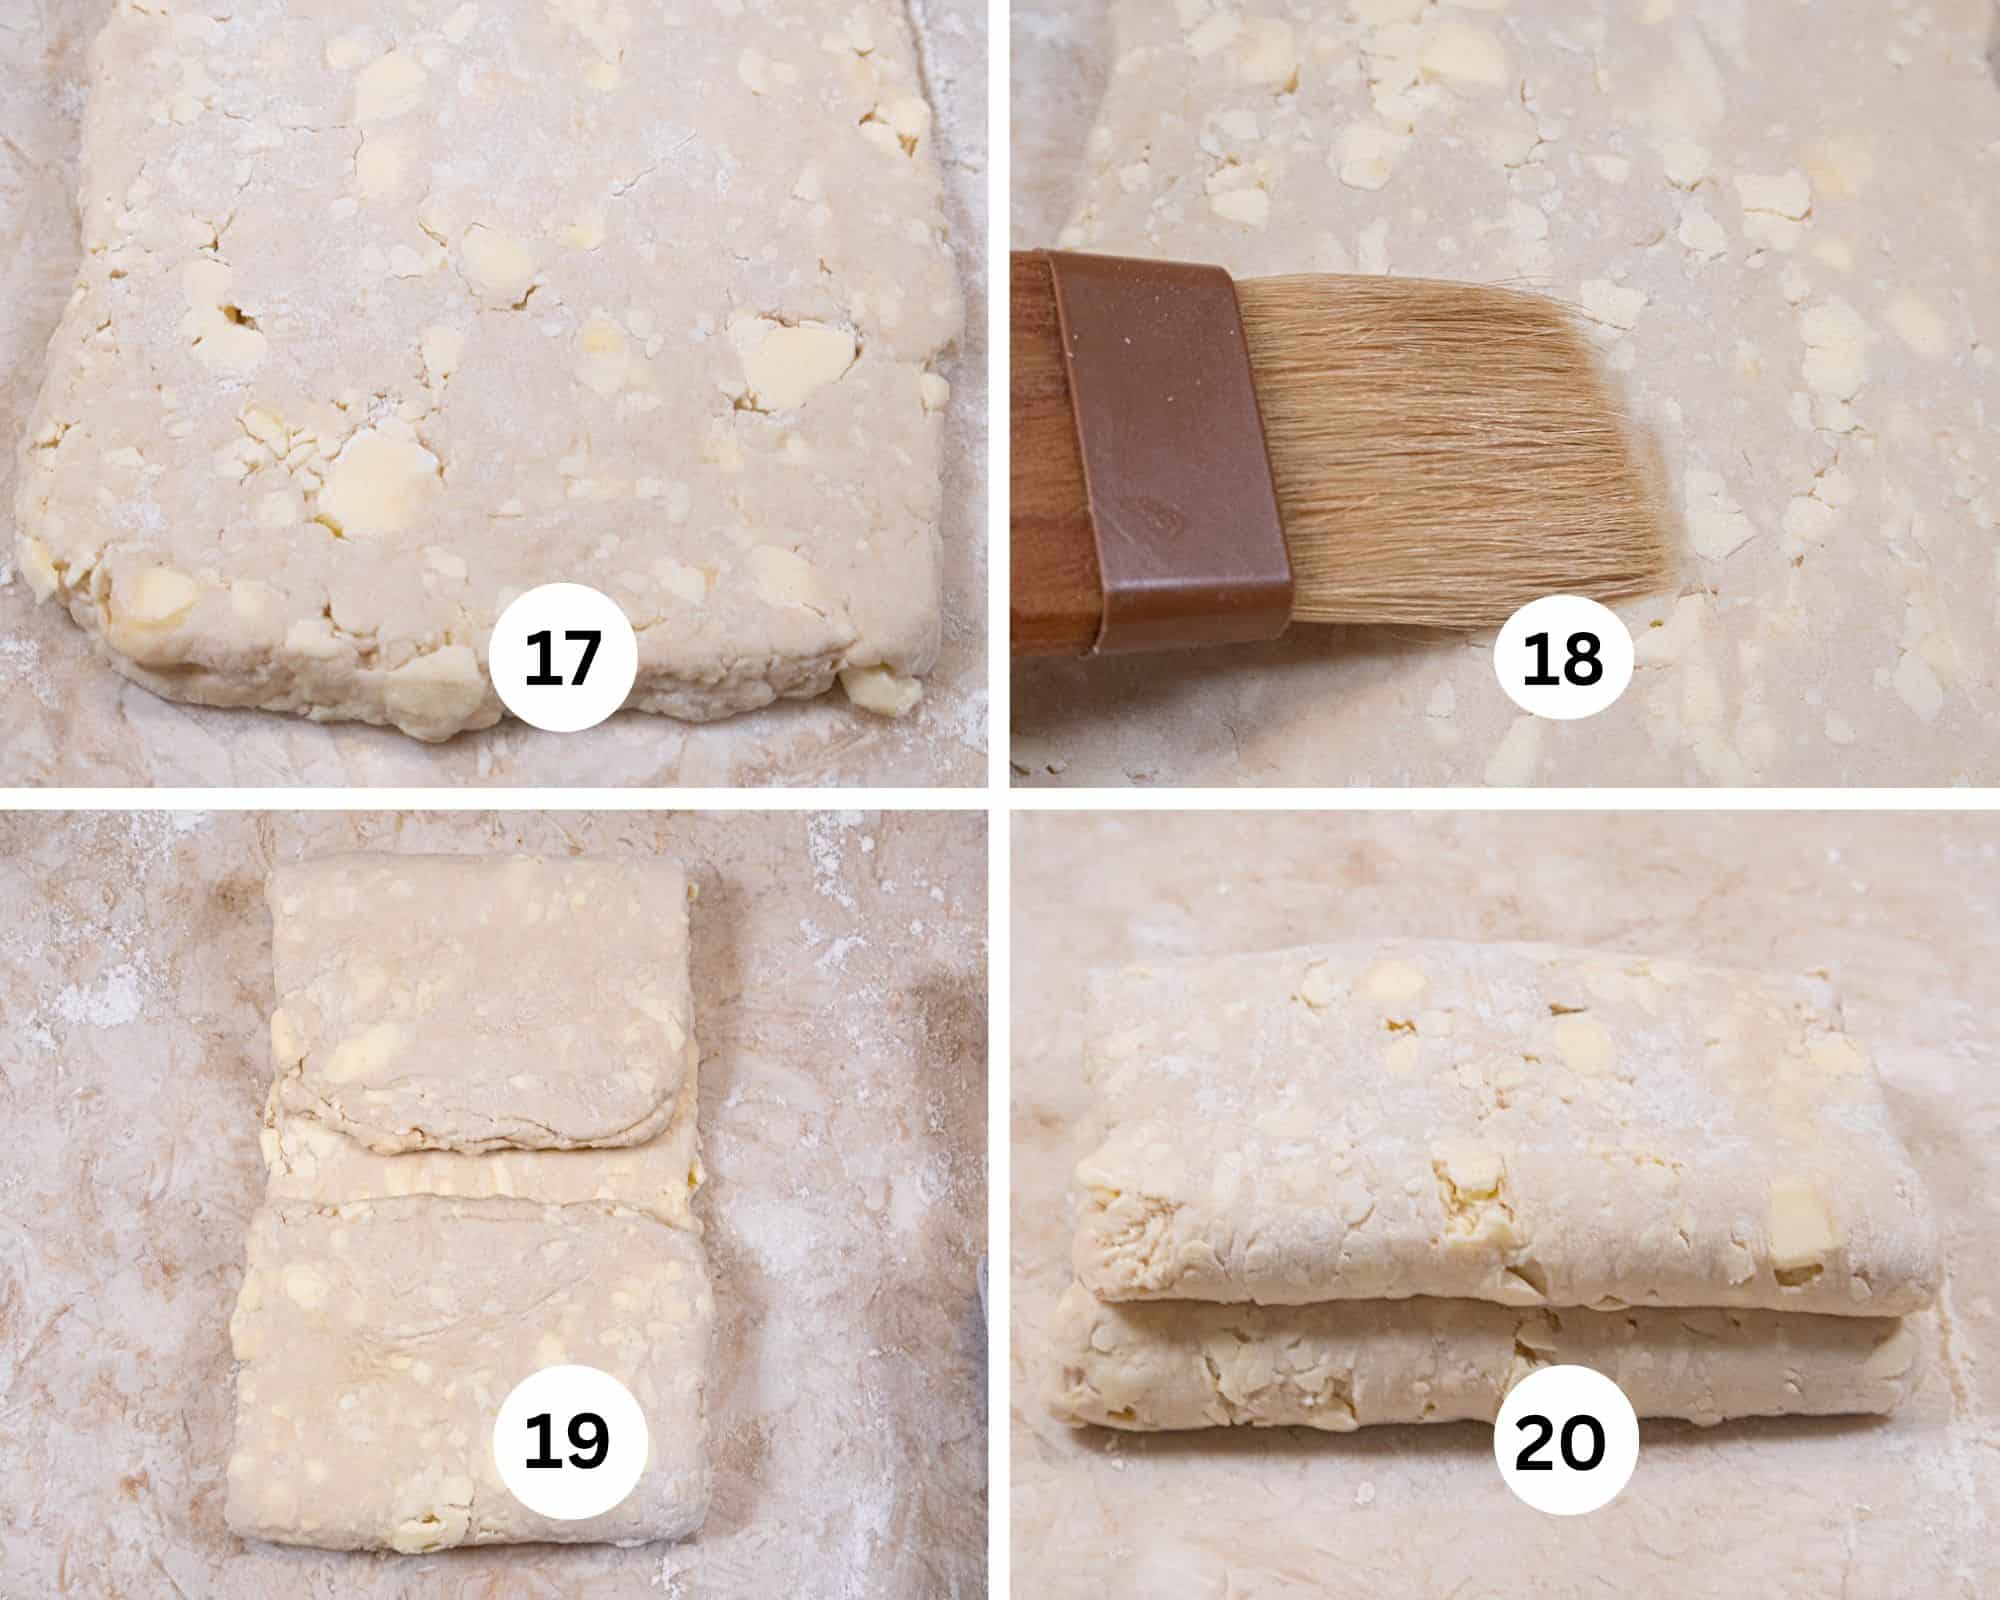
Step 17. After the first roll out, the butter will be visible and of varying sizes throughout the dough. With each successive roll out, the butter will be less noticeable but still there. Step 18. Brush off any excess flour before folding so the pastry will adhere properly. Step 19. Fold into fourths by bringing the top and bottom ends of the dough to the center. Leave about a 1" channel in the center were the top and bottom will meet. Step 20. Brush the excess flour off again, then fold in half.
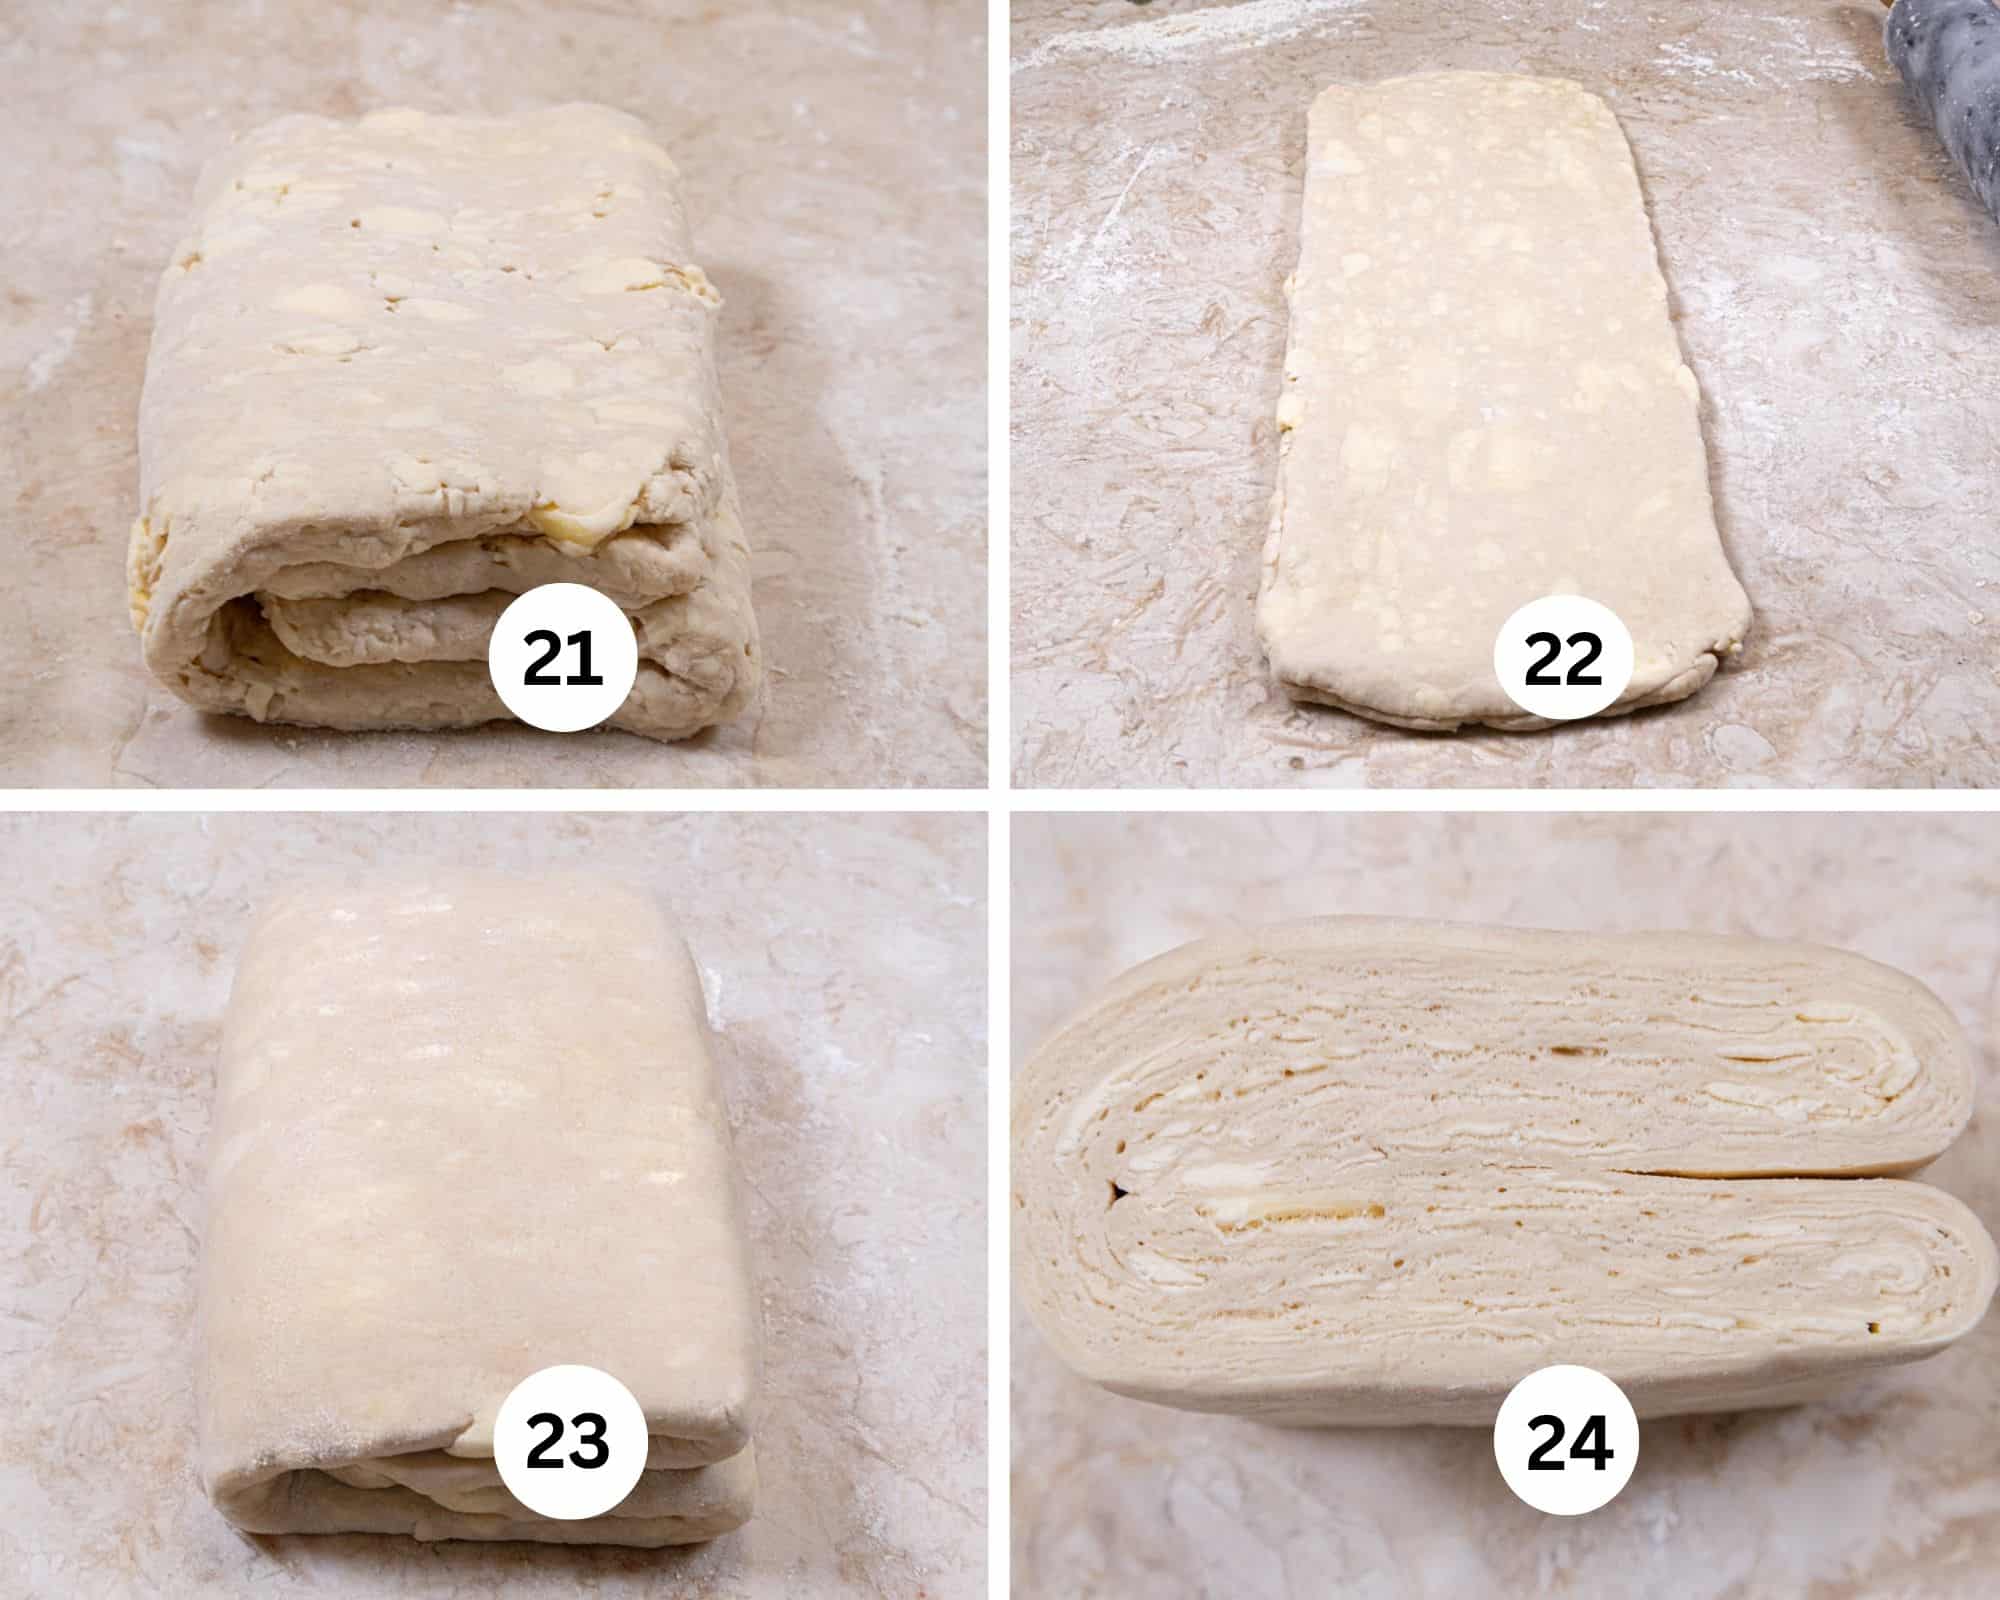
Step 21. Turn the dough so the folded edge is to the left. This completes the first double turn. Step 22. Repeat rolling, folding, and turning in this manner for the second turn and once more for a total of 3 turns. Because the butter is frozen and the dough well chilled, it should be possible to complete all 3 turns without chilling the dough between turns. However, if necessary, place the dough on a baking sheet and put it in the freezer for 15 to 20 minutes, then proceed. Step 23. With each turn the dough will become smoother but still with butter visible. If desired, the dough may be refrigerated between turns. Step 24. Be sure to scrape the work surface with a bench scraper between roll outs and lightly flour the surface to make sure the dough does not stick.
After the third turn, place the dough in a plastic bag and put in the freezer for about 30 minutes before shaping. If the dough is not to be used immediately, remove from the freezer after 30 minutes and refrigerate up to 3 days before using. Or the dough may be frozen after completion for 3 to 4 months. In this case, defrost 24 hours in the refrigerator before using.
Shaping the Croissants
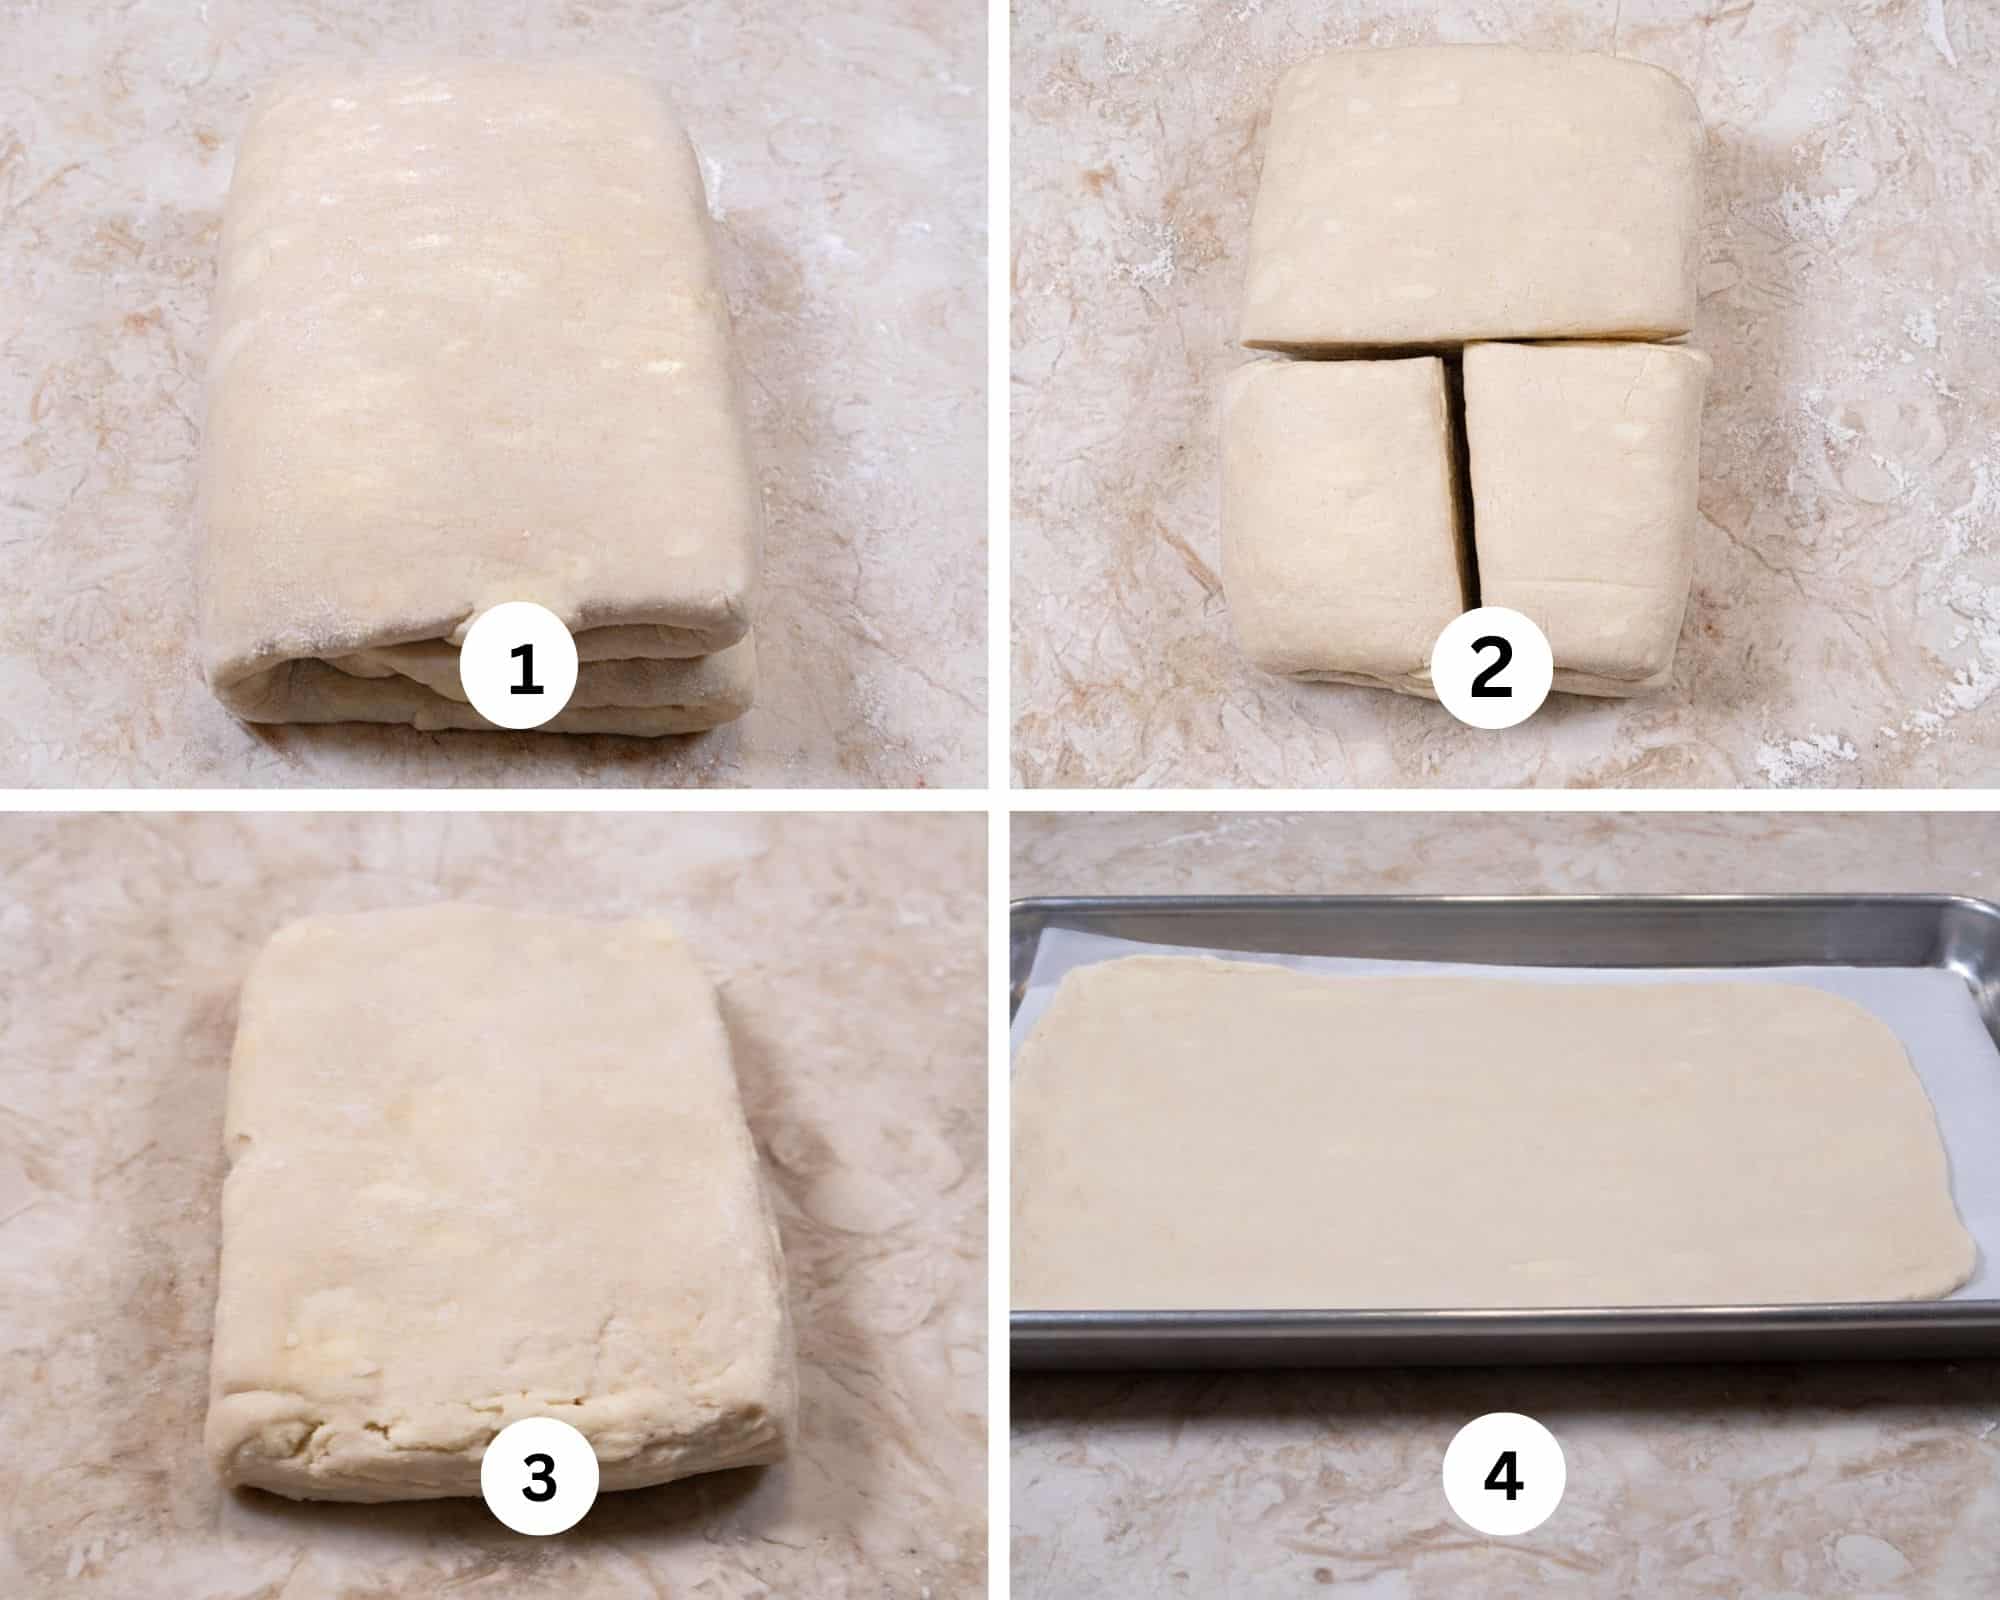
Step 1. Line 2 baking sheets with parchment paper. Remove the finished dough from the refrigerator. Step 2. Divide the dough in half and then in half again, making 4 quarters . Return 3 pieces of dough to the refrigerator. Step 3.Place the remaining quarter piece of dough on a lightly floured surface. Step 4. Place it on a parchment lined sheet pan and chill it or freeze it briefly to firm it up and keep the butter hard,
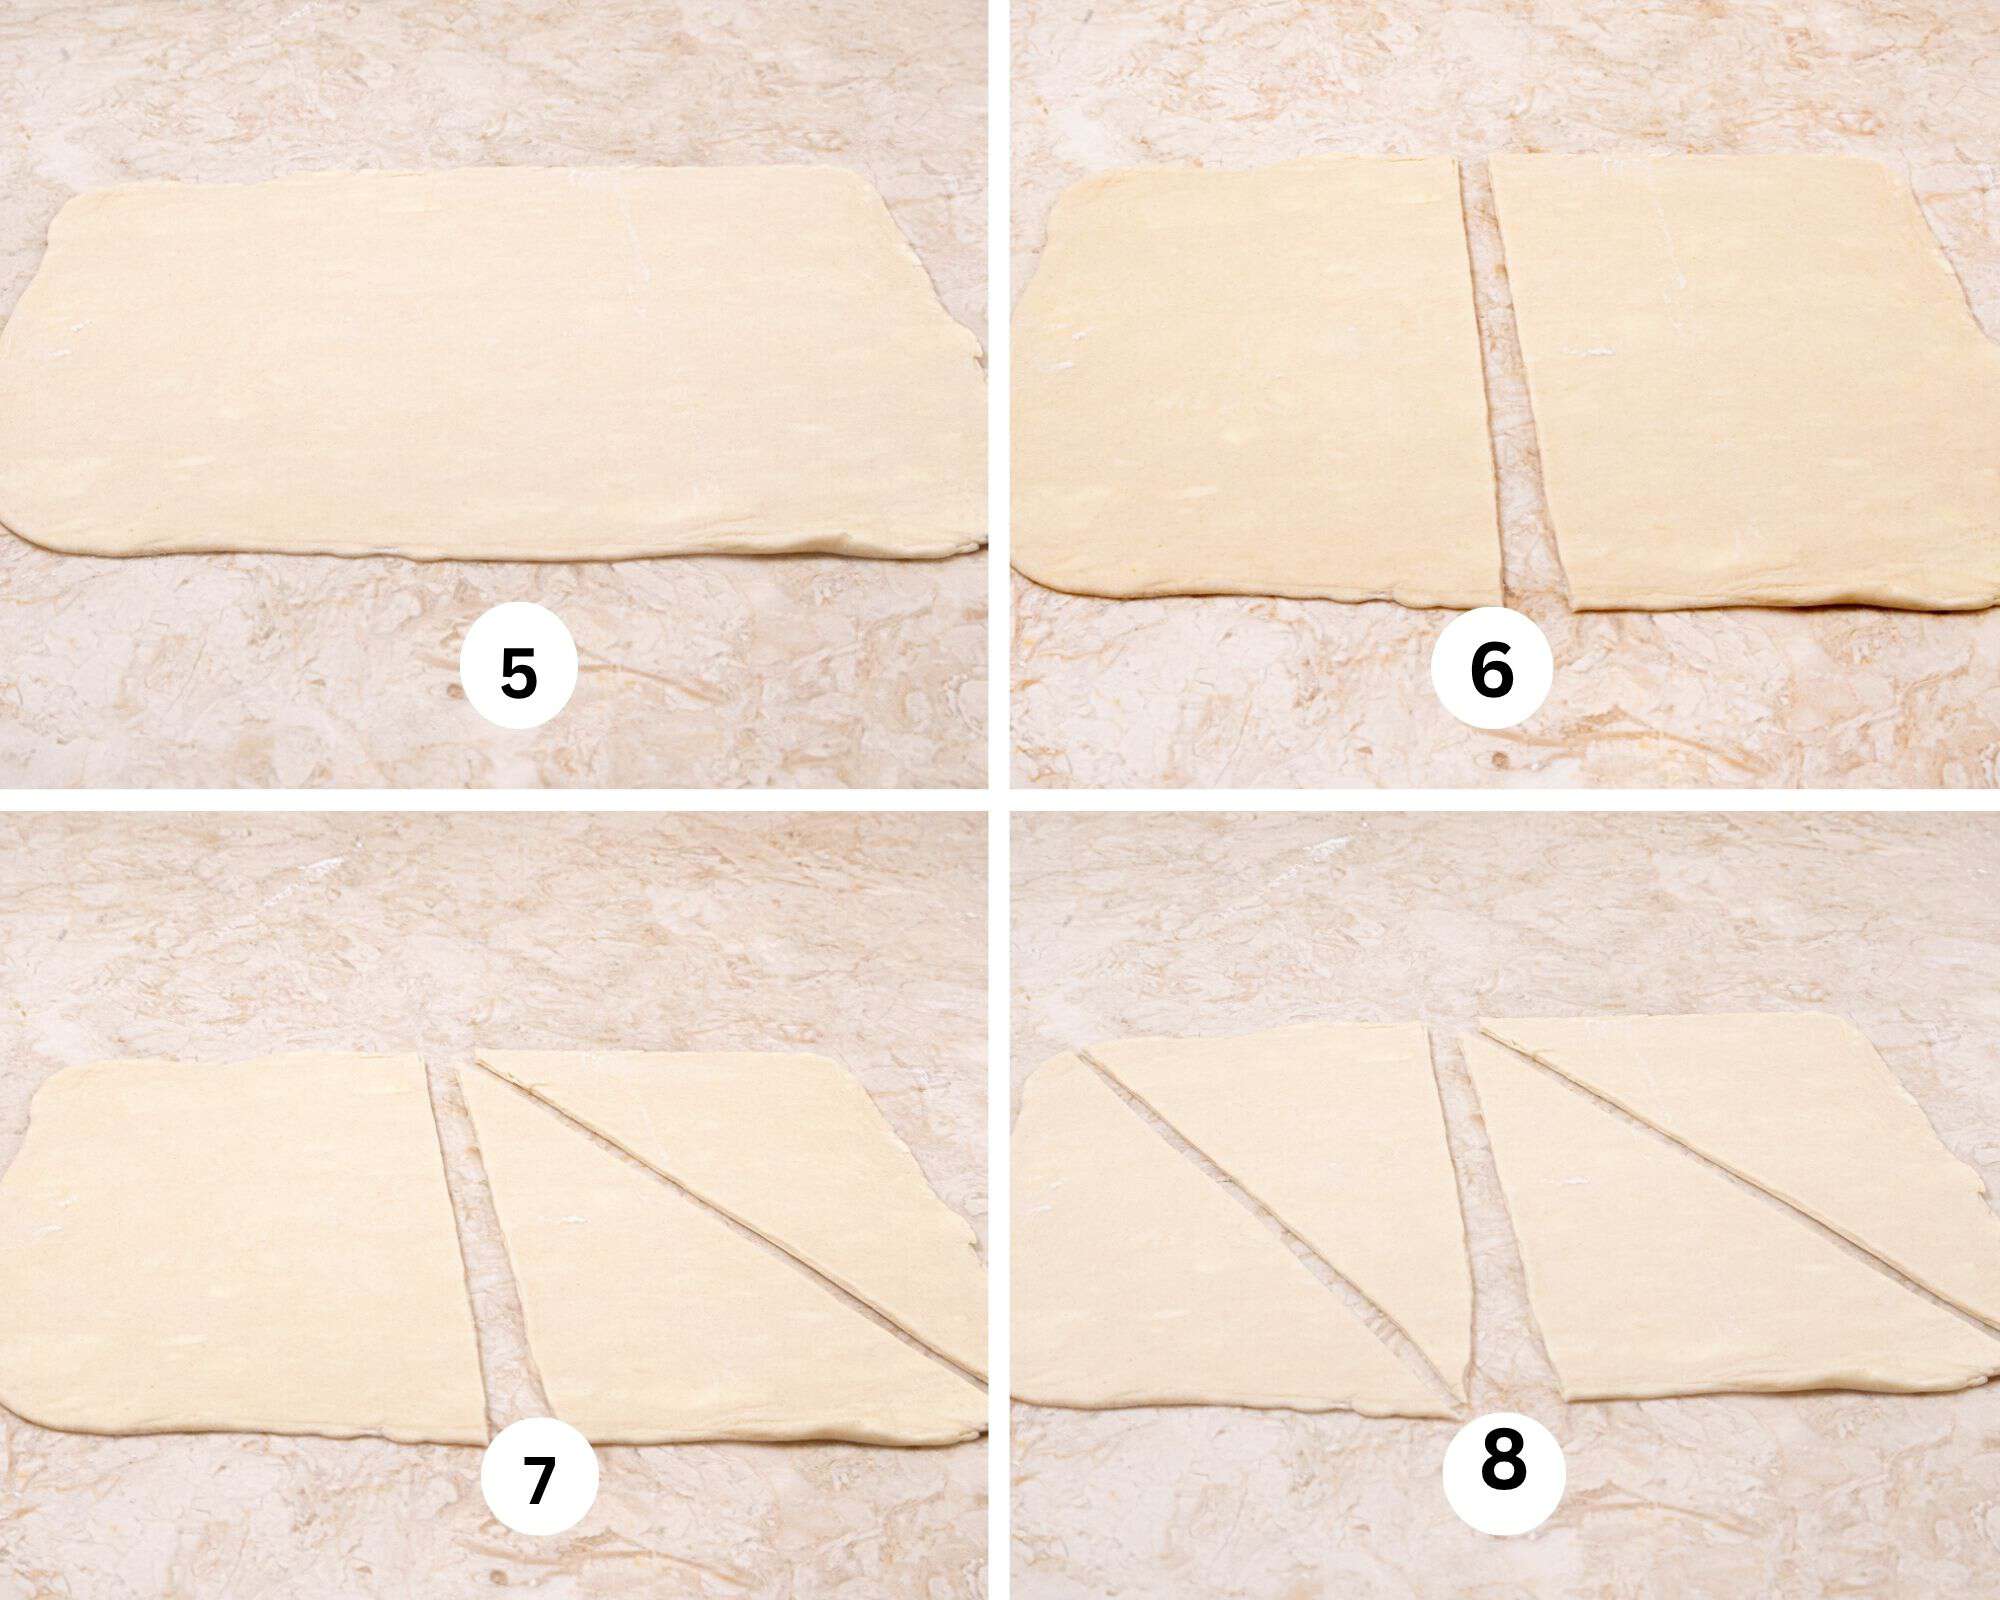
Step 5. Remove the dough from chilling and place it in front of you horizontally Step 6. Cut the rectangle in half. Step 7. Cut one piece on the diagonal into 2 triangles Step 8 8. Repeat with the second piece of dough.. Each piece will have one square and two pointed corners. Pull the square corner gently to the side to even up the triangle somewhat
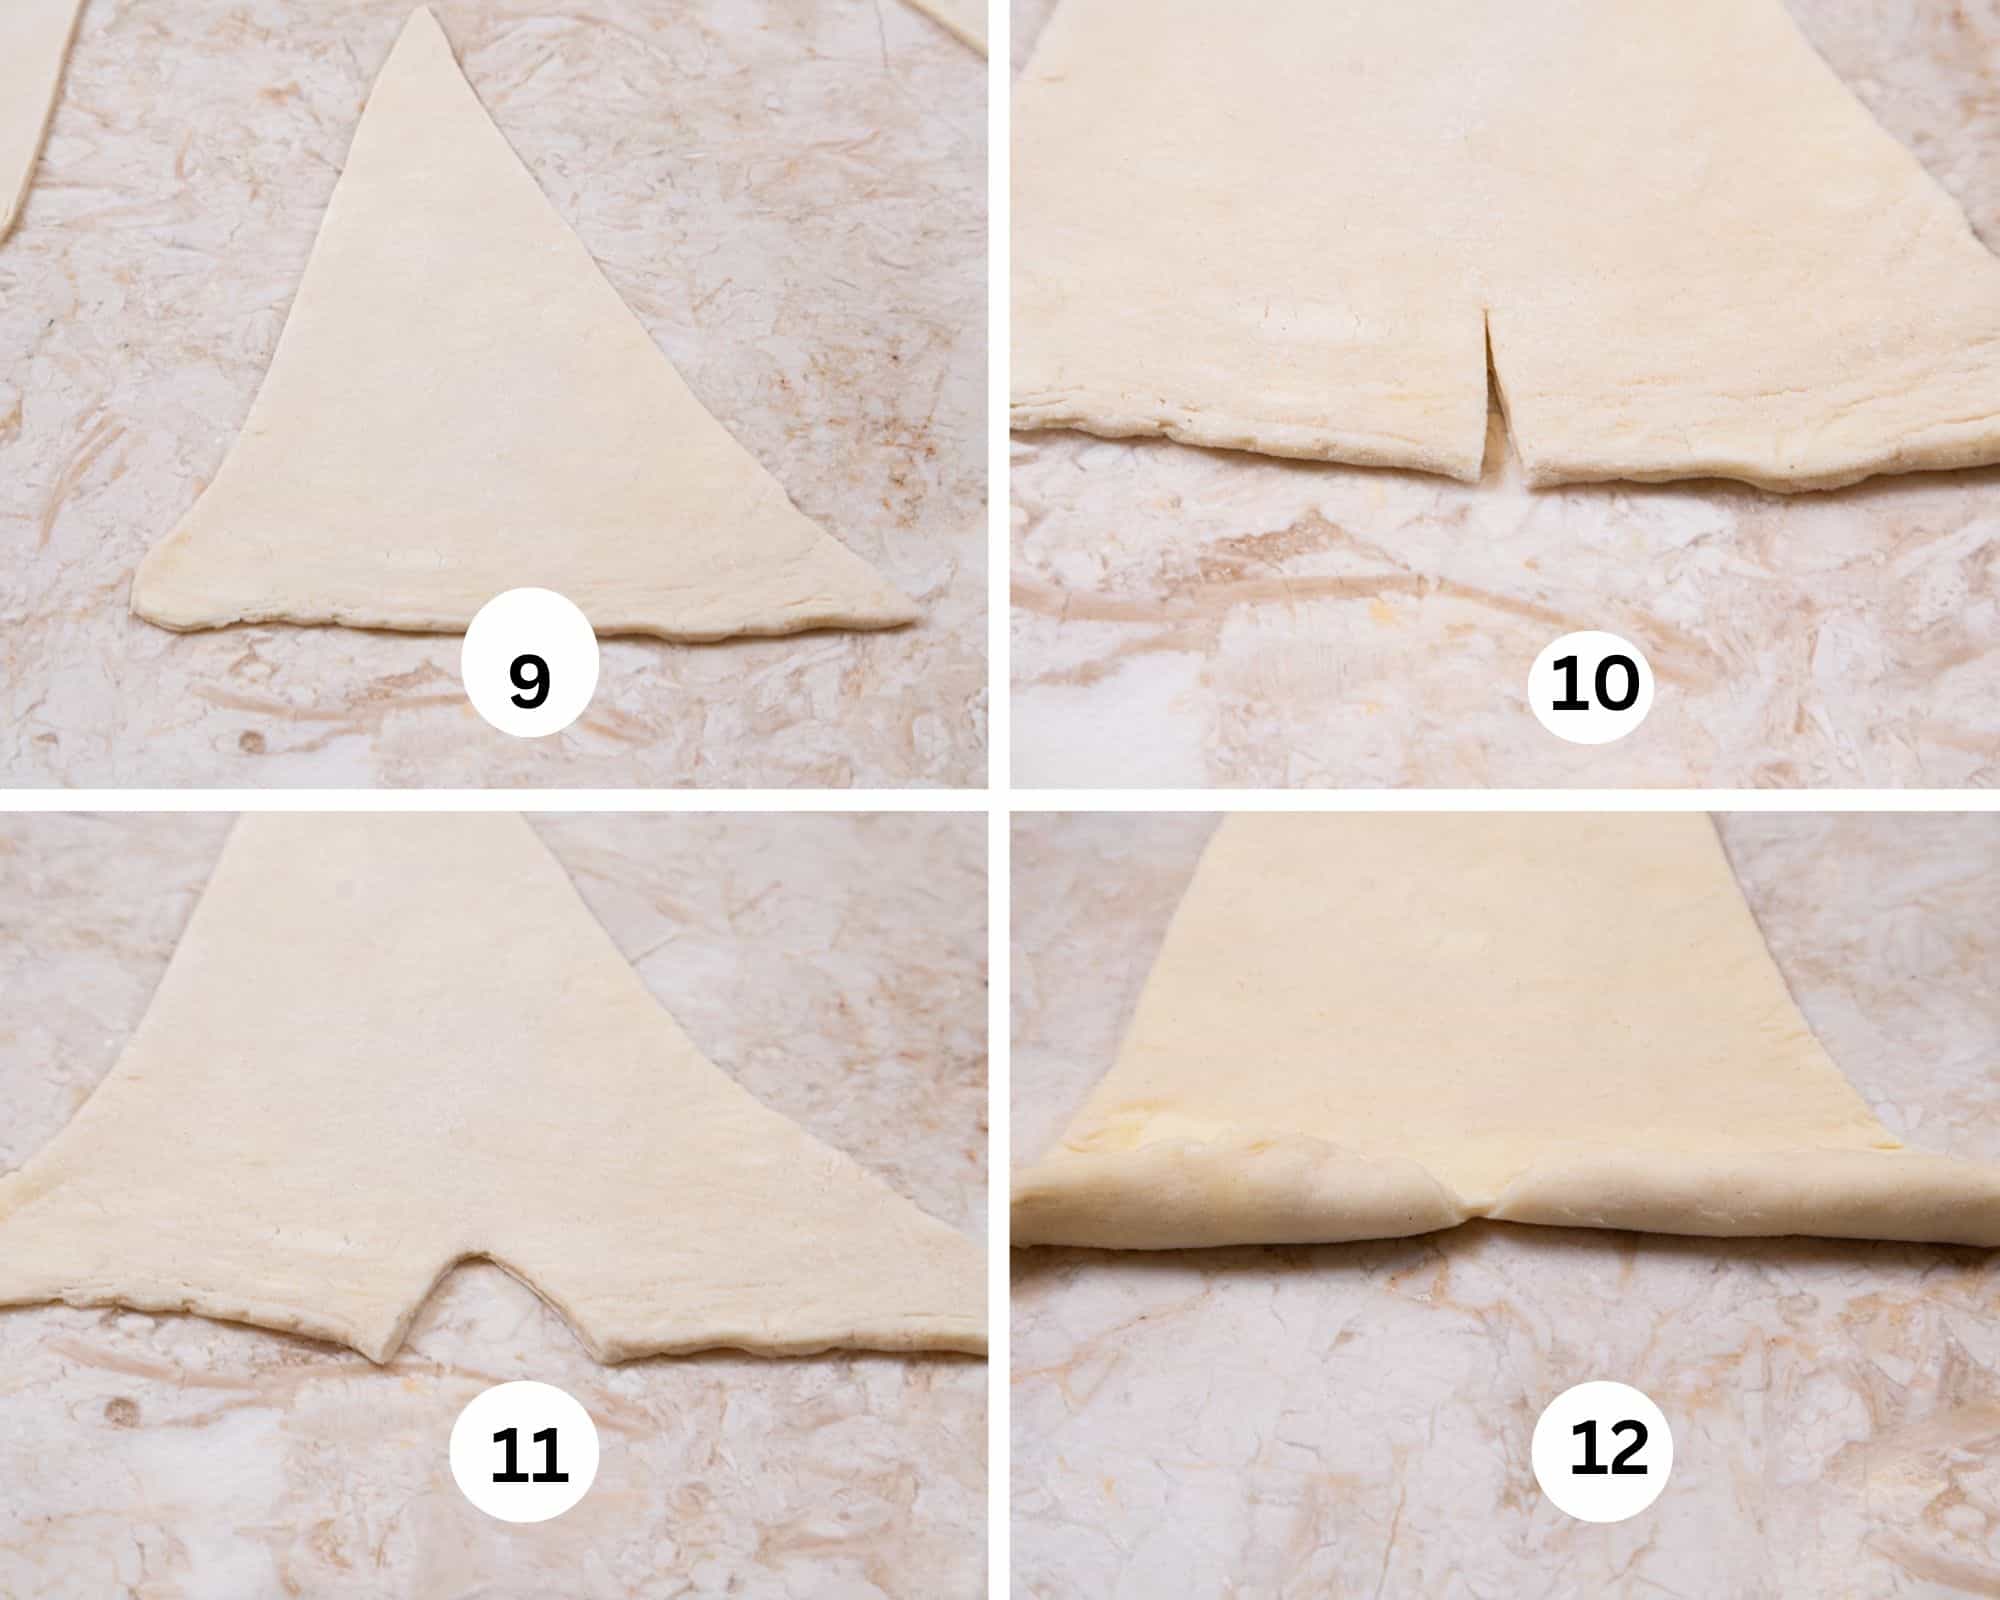
Step 9. Place one triangle in front of you with the pointed end away from you. Step 10. Starting at the top, make a 5/8" cut in the center top of the dough. Step 11. Stretch the dough sideways to open the cut up. Step 12. Fold the dough down on either side of the cut.
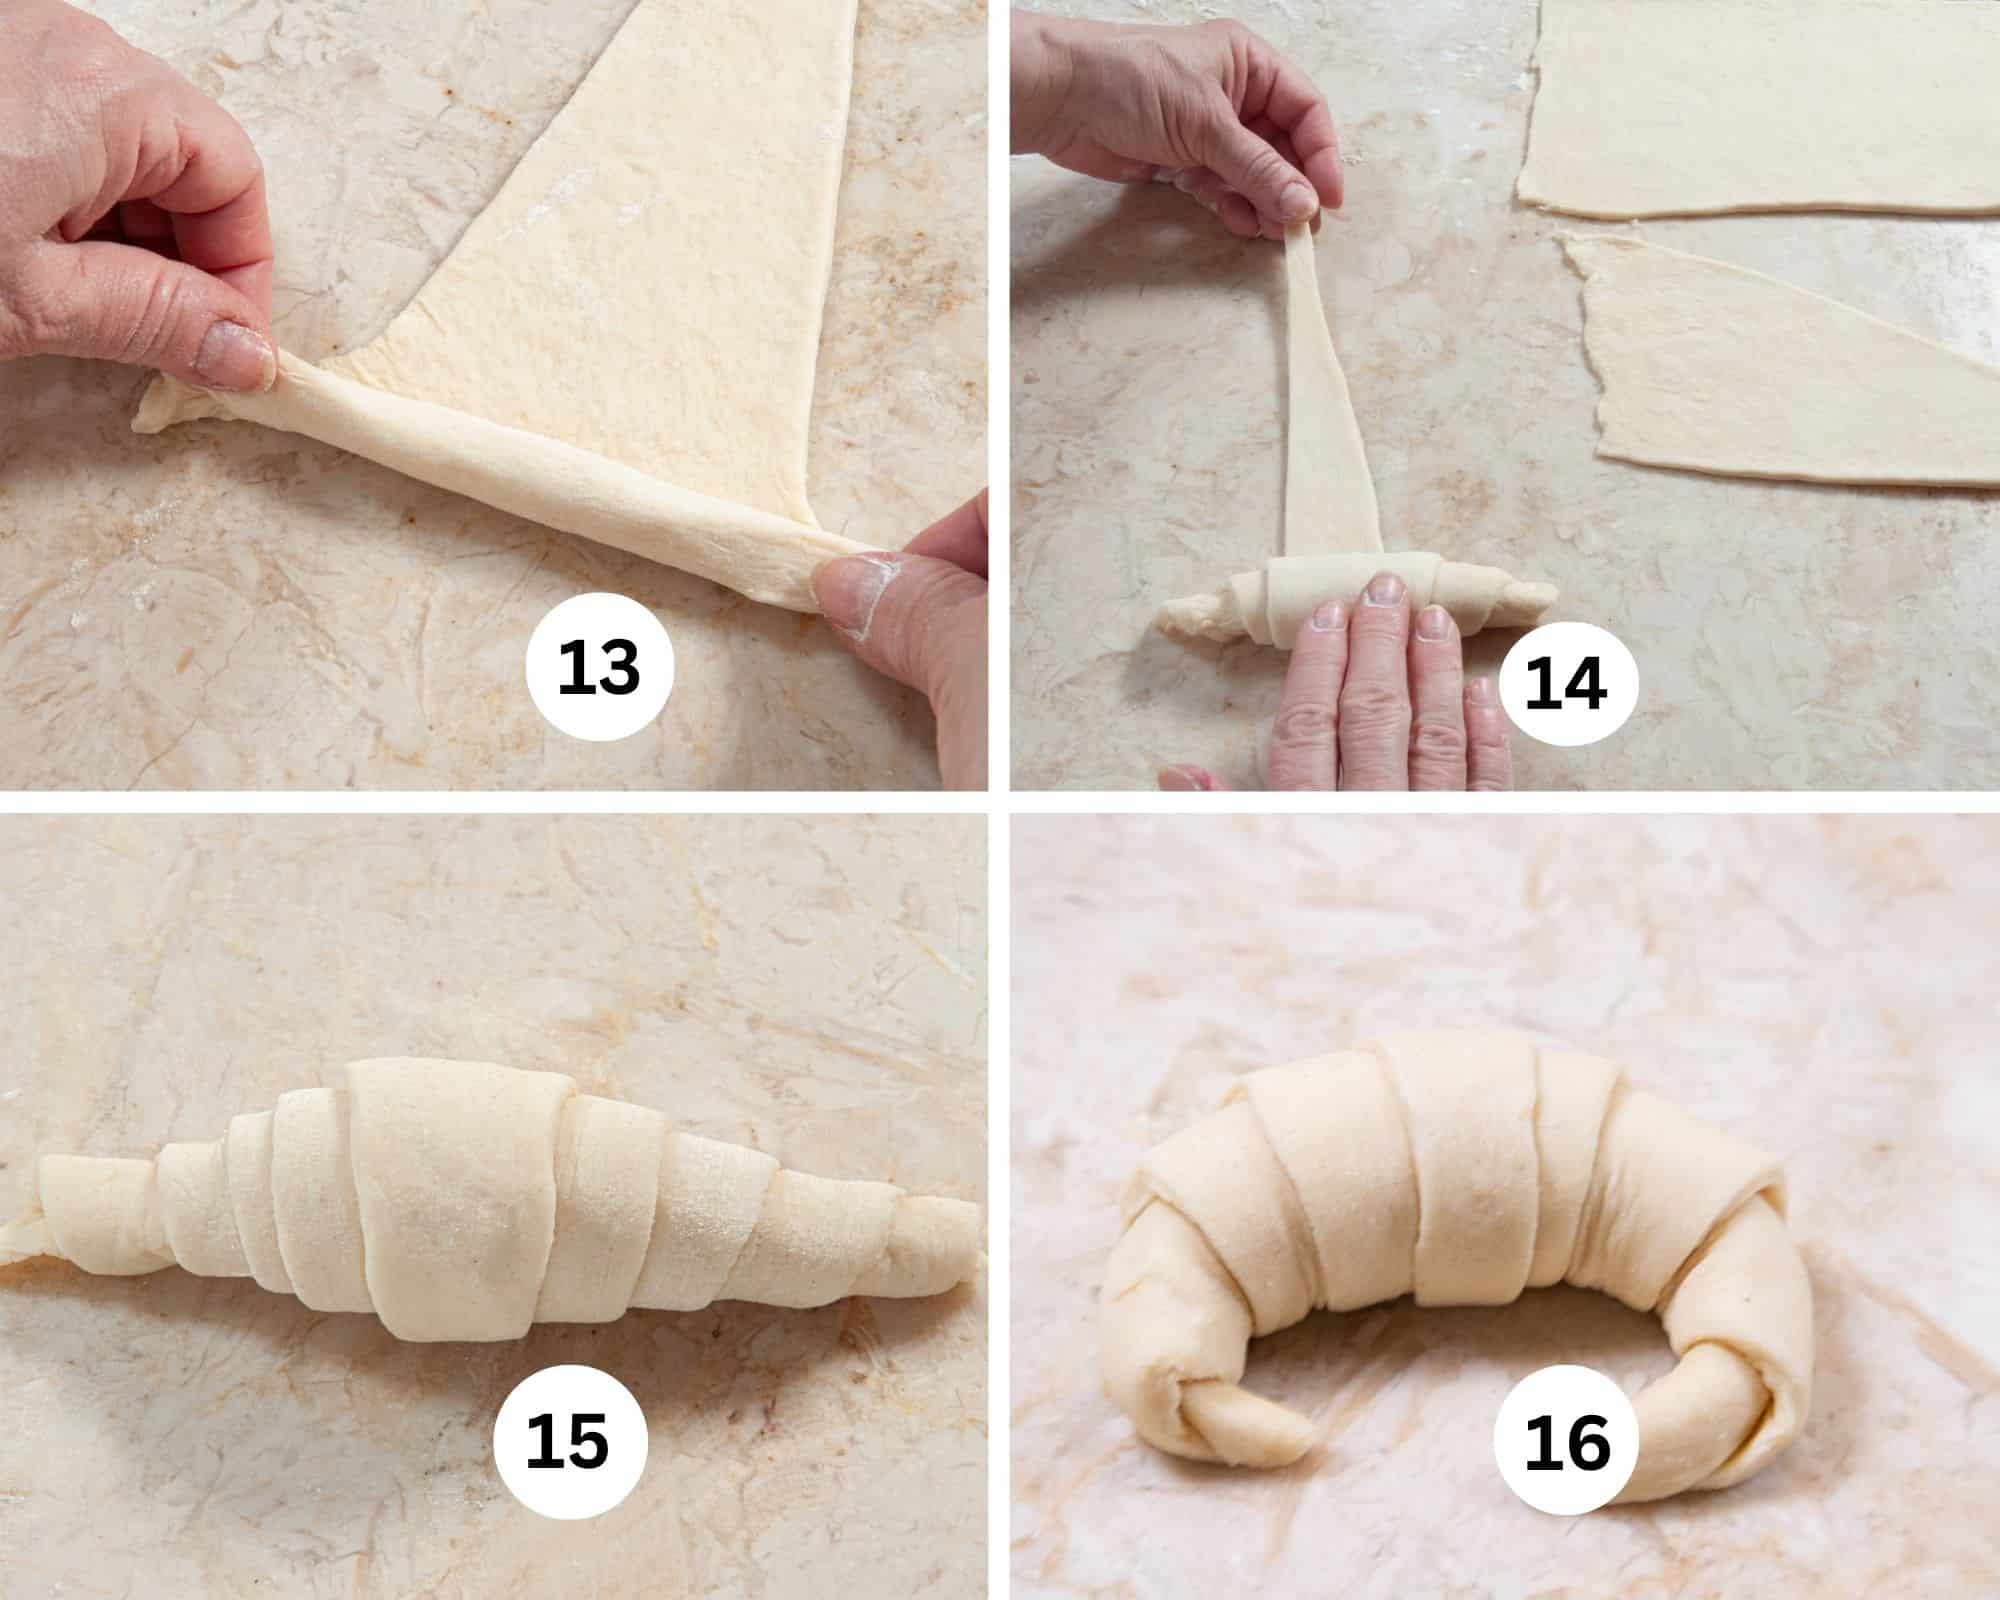
Step 13. Continue rolling the triangle towards the point. Step 14. While rolling with one hand, gently stretch the point of the roll to lengthen it. Be careful not to pull to hard or it can break off. Step 15. Roll all the way to the bottom. Make sure the pointed tail is tucked well underneath so it can't unroll as it bakes. Step 16. To make the traditional crescent shape, gently bend the ends inward,
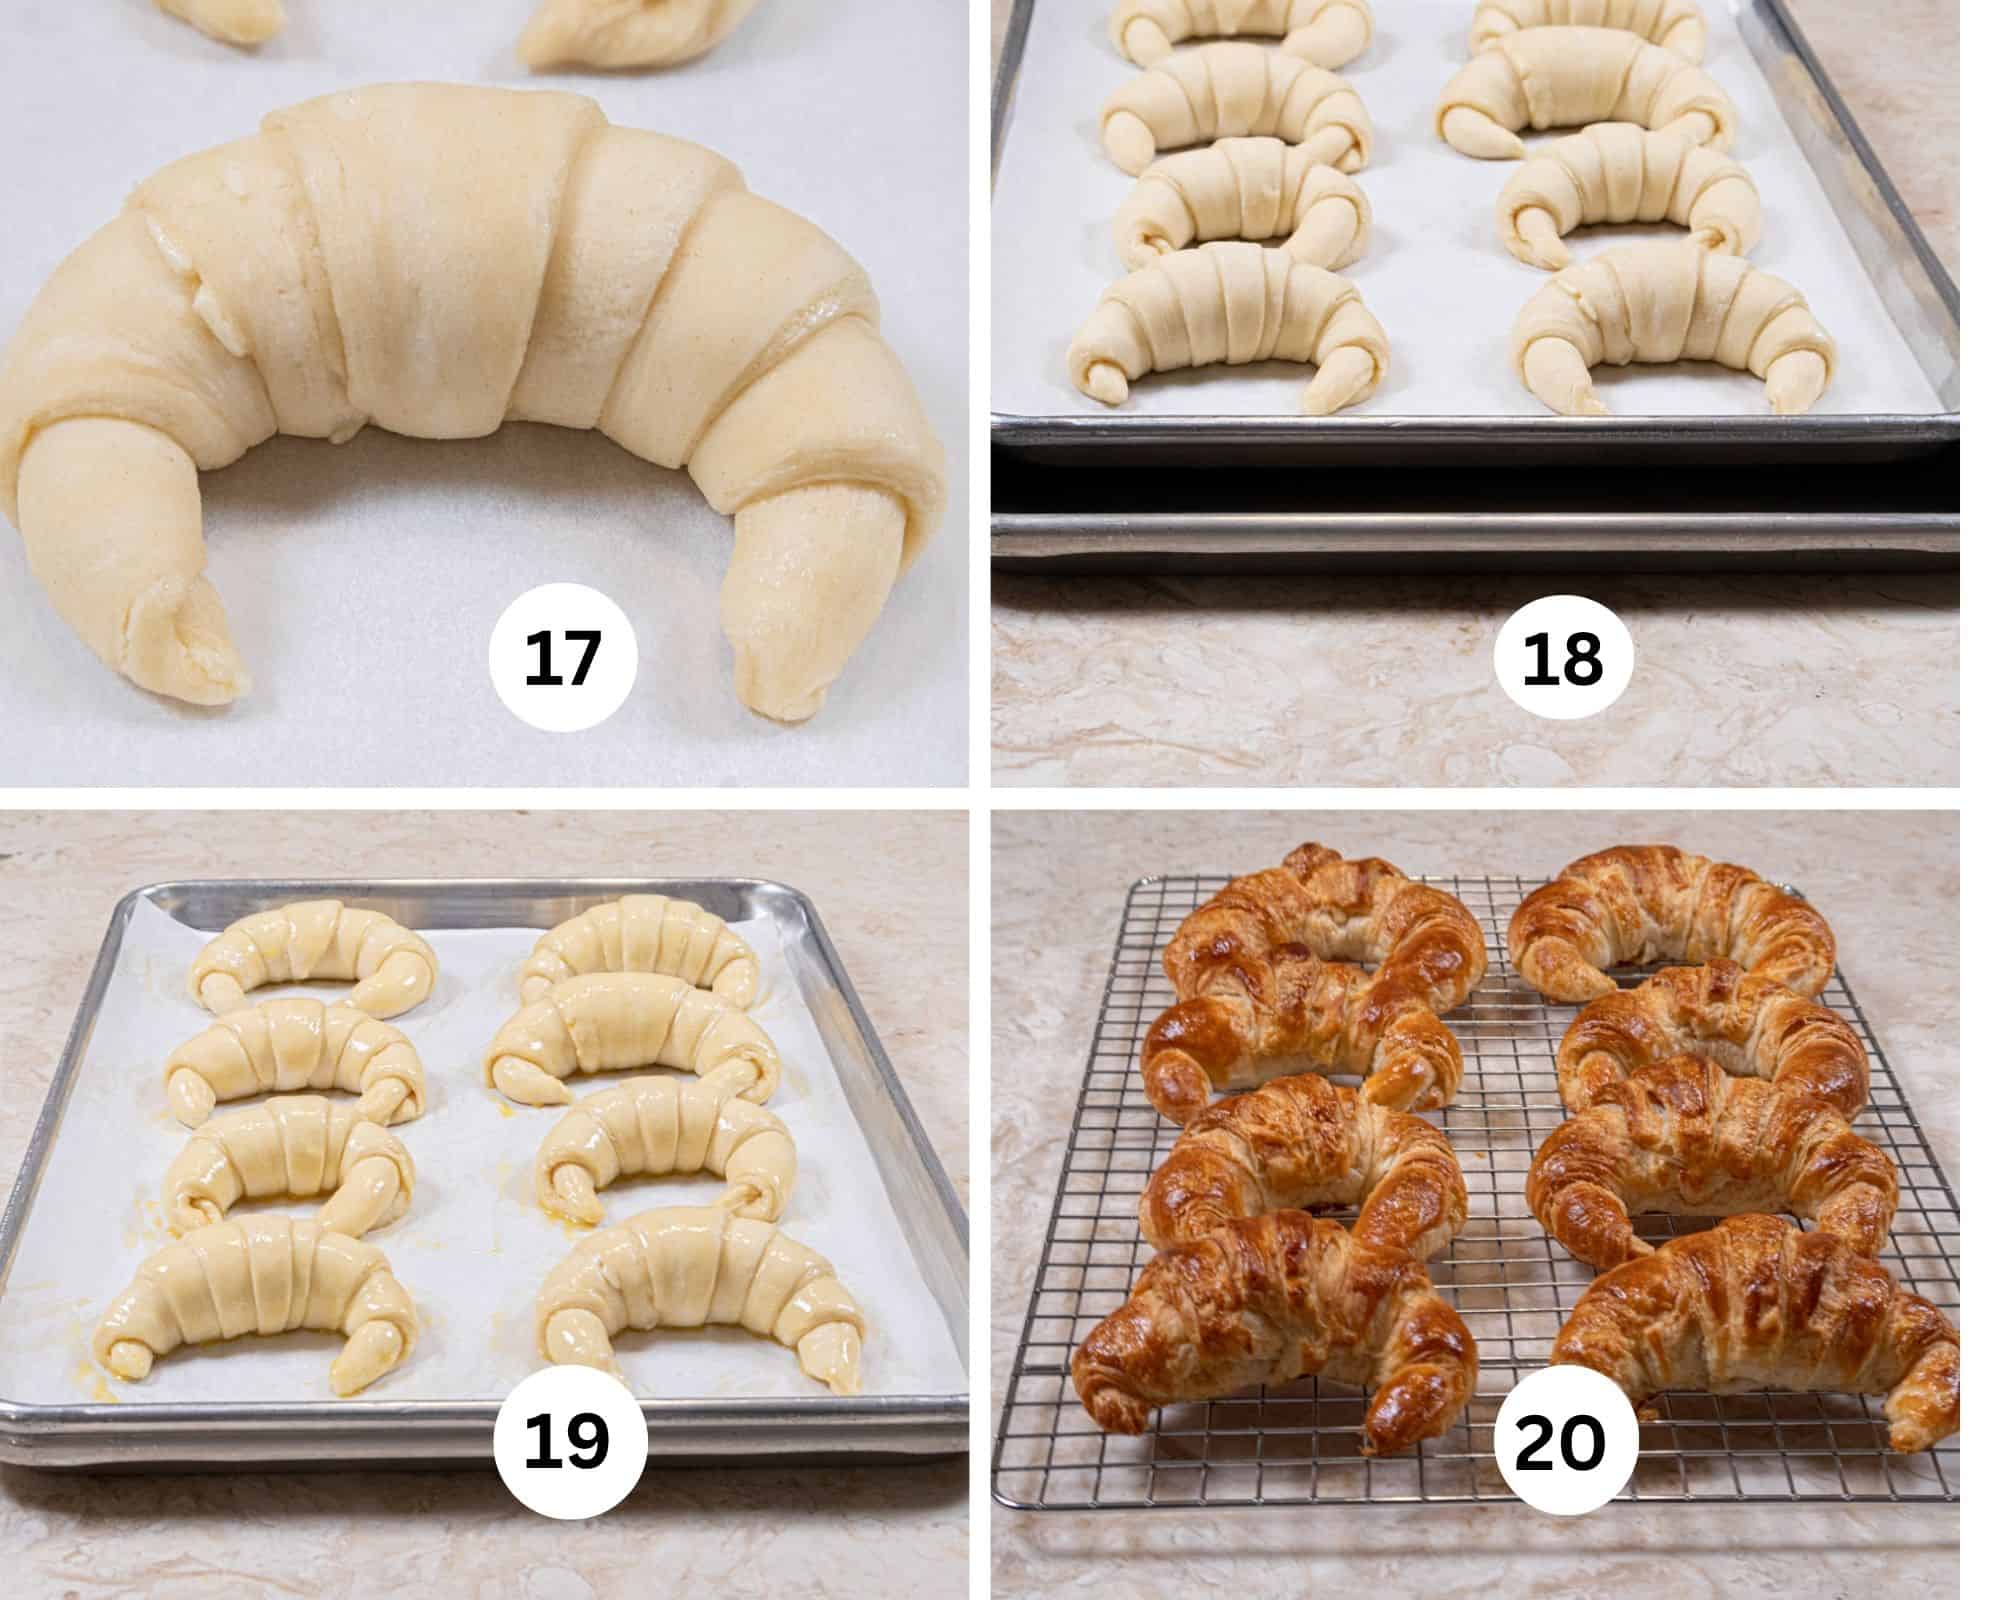
Step 17. After rising the croissant will be puffed and you can see a piece of the butter still intact. When it melts, it cause steam which makes the layers of the roll separate. Step 18. Double pan the croissants so the bottoms don't over brown or burn. Step 19. While the oven is preheating, egg wash the croissants. Just before putting them in the oven, egg wash them again for the deepest brown without over baking. Place them in the middle shelf of the oven. Bake as directed.
Recipe FAQ'S
Both the butter and the dough should be worked when cold. If the butter becomes mixed into the dough it will become a good roll but not a croissant. If the butter melts, the layers disappear. Keep the dough and butter cold but pliable. If the butter melts, the layers disappear; if it is too cold and hard, it can crack instead of spreading evenly.
Croissants are part of a technique called lamination where the dough and butter form thin, flaky layers that remain separate by folding the dough which increases the number of layers. When baked, the butter melts forming steam causing the dough to bake into separate layers. Croissant, puff pastry and danish pastry are part of this distinct technique.
Absolutely! They can be shaped and refrigerated overnight to be brought out in the morning where they can rise and be baked off. They can be shaped and frozen, thawed overnight in the refrigerator, let rise and baked off or they can be baked and frozen.
Storage and Freezing
- Croissant, like most yeasted breads, is best eaten the same day although these are good the next day also.
- Shape them and freeze them immediately unbaked until they are hard. Place them in a freezer proof container where they will last for several months. Thaw them overnight in the fridge and continue as in the instructions.
- Bake them completely, freeze until hard and place them in a freezer proof container. They can last several months. Thaw at room temperature and freshen in a preheated 350°F oven for about 10 minutes.
- Make the dough and cut the butter. Freeze these two items separately. Thaw the dough in the fridge overnight and continue with the instructions. Keep the butter frozen.
Expert Tips
Keep everything really cold. If anything starts warming, place it in the freezer or fridge to get it cold again.
For the best results use the ingredients listed without substitutions.
Despite the many pictures and text, these go together easily and quickly. Just follow the directions and pictures and you'll have croissants in no time.
Other Spectacular Laminated Doughs


A lot of work goes into each of my recipes and my only ask is that if you like the recipe or even the looks of it, please leave me a star rating to help me rank better. It’s important and I appreciate it and I appreciate you.
Modern French Croissants in 4 hours
Equipment
- Food Processor
Ingredients
Basic Croissant Dough
- 1/2 pound unsalted butter (225 grams or 2 sticks)
- 1 cup buttermilk*
- 1/4 cup water
- 2 tablespoons canola or vegetable oil
- 3 cups bread flour (420 grams)
- 2 tablespoons granulated sugar (25 grams)
- 1 tablespoon instant yeast
- 1 1/2 teaspoons table salt
- 1 egg for the egg wash
- * If using dry buttermilk powder use 1 cup of cold water + 1/4 cup powdered buttermilk (35 grams).
Instructions
Basic Croissant Dough
- There are two things that will ensure your success. Using a scale to weigh the flour and following the pictures.
- Cut each stick of butter in half lengthwise. Cross cut into 8 pieces. Repeat with the second stick of butter. Freeze until rock hard.
- Combine the buttermilk, water and oil. Set aside
- Place the bread flour, sugar, yeast and salt in the bowl of a processor. Process about 5 seconds to mix everything.
- Pour the wet ingredients over the dry ingredients in the processor and process until the dough comes together. Process another 30 seconds It should be soft and slightly sticky. If it is still firm, add another tablespoon of water as needed.
- Remove the dough from the bowl and knead it several times. Shape into a ball and then flatten to about an 8" circle. Place it on parchment paper in a tray and freeze for 60 to 90 minutes. It should be hard about 1/2" around the edge of the dough. Wipe the processor bowl out with a paper towel.
Cutting the Dough and Butter Together
- When the dough is ready, divide the disc into 4ths and each fourth into 3 pieces making a total of 12 pieces.
- Place 4 pieces of the dough in the process or with 1/3 of the frozen butter. (if you have a smaller processor use 3 pieces of dough and 1/4 of the butter.) Pulse the machine until the dough and butter are cut into various size pieces of each of them. Some butter and dough should remain larger, some medium. It is important to keep them large and medium size. Do not cut them in small pieces. Dump the mixture onto a work surface and continue with the remaining ingredients.
- Once everything is cut together, lightly flour the surface. Do not use a lot of flour as you don't want it incorporated into the dough. Push the mixture together into a rectangle 6" wide by 10" long.
- Lightly flour the top of the dough and roll it into an 18" x 6" rectangle. Keep the sides as straight as possible by placing one hand on each side of the dough and pressing in slightly towards the center. Square up the top and bottom also.
Making the Double Turns
- Brush the flour from the dough with a soft brush so the pastry will adhere properly. Fold into fourths by bringing the top and bottom ends of the dough to the center, leaving about a 3/4" empty channel.
- Brush any flour off again and then fold in half. Turn the dough 90° so the folded edge is to the right. This completes the first double turn.
- Repeat the rolling, folding and turning in this manner for two more times making 3 turns in total. Because the butter is frozen and the dough well chilled, it should be possible to complete all 3 turns without chilling the dough between turns. However, if at any point it starts to soften and the butter gets a bit melty, place it back in the freezer or fridge to firm it up again.
- After the 3rd turn, place the dough in a plastic bag and freeze it for about 90 minutes before shaping.
Shaping the Croissants
- It will be particularly helpful to view the step by step photos.
- Place parchment paper on two baking sheets and set aside.
- Divide the dough into quarters. Return 3 to the fridge.
- On a lightly floured surface, roll one piece of dough into an 8"x 12" rectangle. Cut into 2 pieces 6"x 8". Cut each of these rectangles in half on the diagonal from the 8" side. Each piece will have one square and two pointed corners. Gently pull the square corner to the side to even up the triangle somewhat. Chill the triangles but do not freeze them hard.
- Taking one triangle at a time, make a 5/8" cut in the center of the top of the triangle. Gently stretch the top sideways to widen the dough.
- Roll it up tightly lengthwise stretching the point at the bottom gently to lengthen it more once the initial roll is started. Place it on the baking sheet and tuck the "tail" well underneath so it doesn't unroll when baked.
- For the traditional crescent shape, bend the ends toward the center . Alternatively, the rolls can be left straight. Place on one of the parchment paper baking pans.
- Cover the rolls loosely with a tea towel and let rise until doubled.
- If the room is cold and to speed up the rising, place the rolls in the oven with the light on. This is the perfect proofer. Check it after about 30 minutes to make sure temperature is not so hot the butter is melting out of the rolls. Immediately, pull them from the oven if it is. If the oven is over 75° or 80°F, prop the door open with a wooden spoon. If you don't have an oven light, place a 9x13" pan of hot water in the bottom of the oven. Watch the oven temperature and proceed as above,
Baking
- Place the baking rack in the middle of the oven.
- Remove the croissant from the oven if they are in there. Preheat the oven to 350°F. While the oven is preheating, beat and egg until it is completely combined with no white showing. Brush the croissants with the egg. Try not let it run down the sides to the parchment as that can prevent them from rising as they should.
- Double pan them and bake for about 25 minutes until golden brown and firm to the touch, turning them if necessary about 1/2 to 2/3 through baking.. Cool on a rack.
To Make Ahead
- To freeze unbaked, place on a baking sheet and freeze solid. Transfer to a freezer proof container and keep frozen up to 2 months. Thaw overnight in the fridge and continue with the rising and baking instructions.
- Freeze after baking and cooling completely. Freeze until hard, transfer to a freezer container for a month to 6 weeks. To serve, thaw on a rack at room temperature. Refresh in a 350°F oven for 10 to 12 minutes.
- Yield: 16 croissants
Notes
Nutrition


Bruce says
I wanted to make small croissants for a brunch party, so I rolled each half of the dough to 12x16, then cut it in half to 6x16, then into fourths that were 6x4. This makes 32 little croissants that bake in about 15 minutes at 350°F. They're every bit as good as the full-sized croissants, of course, but they don't have as much of that fluffy center.
Helen S Fletcher says
Hi Bruce. This is fantastic. It brings back long ago memories of when I first created these and how they got me a position at Cusinarts. There was a huge food show at Moscony Center in CA (?). Cuisinart made a gazillion of these little ones like yours and shipped them out frozen to be baked off on site. They flew me out to talk about them and attend the show. It was the beginning of my career in food. Thanks for bringing back such a wonderful time. I agree - every bit as good.
Bruce says
I made these for Christmas Eve Dinner, as I usually do. I forgot to get bread flour, so I made them with AP. To develop some gluten, I ran the food processor a few seconds longer, then kneaded the dough on the counter for about 30 seconds.
I let them rise, coverer, on top of the stove, because the oven was in use, which worked very well. I forgot to change the temperature from 300° when I put them in. I turned it up when I remembered, and they were not harmed at all by this. They were amazing, as always.
I love to eat these from the inside out. I pull off an end an sort of unwind the wonderfully fluffy, buttery inside in strands. Then I eat the crunchy crust of that end, and repeat with the other end. Then I unwind the center of the roll, and finally enjoy the crust. I think I could spend an evening doing this with a big plate of these.
It's a good thing that the beginning of the recipe is a bit of work, or I'd probably make these once a week. The great thing is that that work pays off a thousandfold!
Helen S Fletcher says
Hi Bruce - you are the best! I eat the soft center first also. Thank you so much for sending this. It was a perfect gift. Happy New Year to you. I wish you the best.
Bruce says
I just whipped up a batch, since today is National Croissant Day,a and they're wonderful, of course. I only shaped and baked half of the dough, so I'm thinking about getting some Quark, which I hav e alocal source for in Cincinnati, and making some German Quarktaschen (a special cheese danish).
Helen S Fletcher says
Hi Bruce, Did you get the quark? There is nothing like cheese Danish. So good to hear from you and know you are still baking. Thanks for sharing.
Jennifer says
Hi!!!!! What an amazing resouce!! I am wonderingif you rolled to about 1/2" when doing your folds? Thanks in advance..
Helen S Fletcher says
Hi Jennifer, I just roll to a size but I haven't measured the depth. Sorry to be of not help here.
Jay Launerts. says
Good morning Helen,WOW..real Croissants,..It's funny I have been dreaming of Croissants lately .Because I enjoy chocolate Croissant For breakfast ,with my coffee,( I'm an AUSIE and live on the Gold Coast) ..My wife has been buying me chock croissants ,from the supermarket .! .BUT.,!..They are no croissant ,more like a puff pastry bun..The last time I. Made real croissants was in N.Z.while I was working in a French patisserie ,In Parnell village!Auckland ...That was gee,30 years ago..I can't remember using yeast, but I can remember the butter oozing out,Paine in the bum. ..W e have a new kitchen with a stone top,and I think I still have my Marbell roller ,I will give it a bash....Thanks you bring back memories .Jay..
hfletcher says
Hi Jay - Thanks for the wonderful trip down memory lane. There are some smells, flavors that stick with you forever. Glad to help.
Jay Launerts says
Your on the mark there,Smells.!..And Flavours.!...YOU ARE THE BOMB.!!.Love Jay.
hfletcher says
You made my day Jay. Thanks!!!!
Jennifer says
Thank you for this recipe. I will try it out at home. I make all the croissant at work from scratch, and have made croissant dough from a poolish, which are great, but am looking forward to the 'tang' from the buttermilk.
hfletcher says
Hi Jennifer: As an accomplished croissant maker, please let me know what you think of these.
Sherry Murdock says
I've made Puff Pastry before, but not with a food processor. This looks like a great recipe! Thank you!!
hfletcher says
Hi Sherry: I also did a chapter on puff pastry made virtually the same way with the processor. I will post it one of these days. Like the croissants, it is much faster!
Alicia says
Wow...I cannot wait to try this method!!! I taught a croissant workshop two weekends ago and it took a day of prep before the class to ensure that the croissants would work on the day of the event. You are so amazing...thanks for sharing your years of knowledge!
hfletcher says
Hi Alicia: I know exactly what you mean. I used to make them the traditional way until I came up with this way. Thanks for letting me know.