
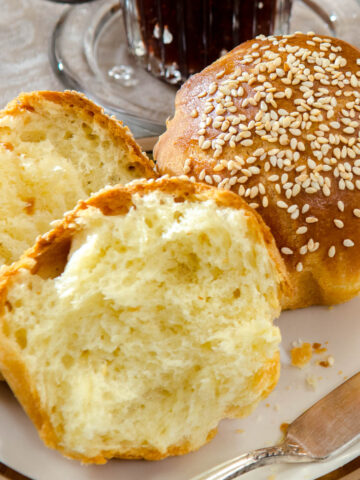
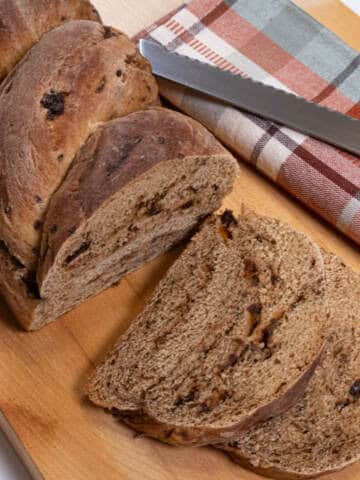
This incredibly easy Outback Steakhouse Bread dark with honey, molasses, whole wheat and bread flour has become a staple in my house due to its fantastic flavor and soft texture.
So often bread has a reputation of being finicky or difficult and this is anything but. In my experience, this bread is like no other and a great place to start if bread isn't your thing. Basically you just put everything in the mixing bowl, mix for 3 to 4 minutes and it's done. Bread doesn't get much easier.

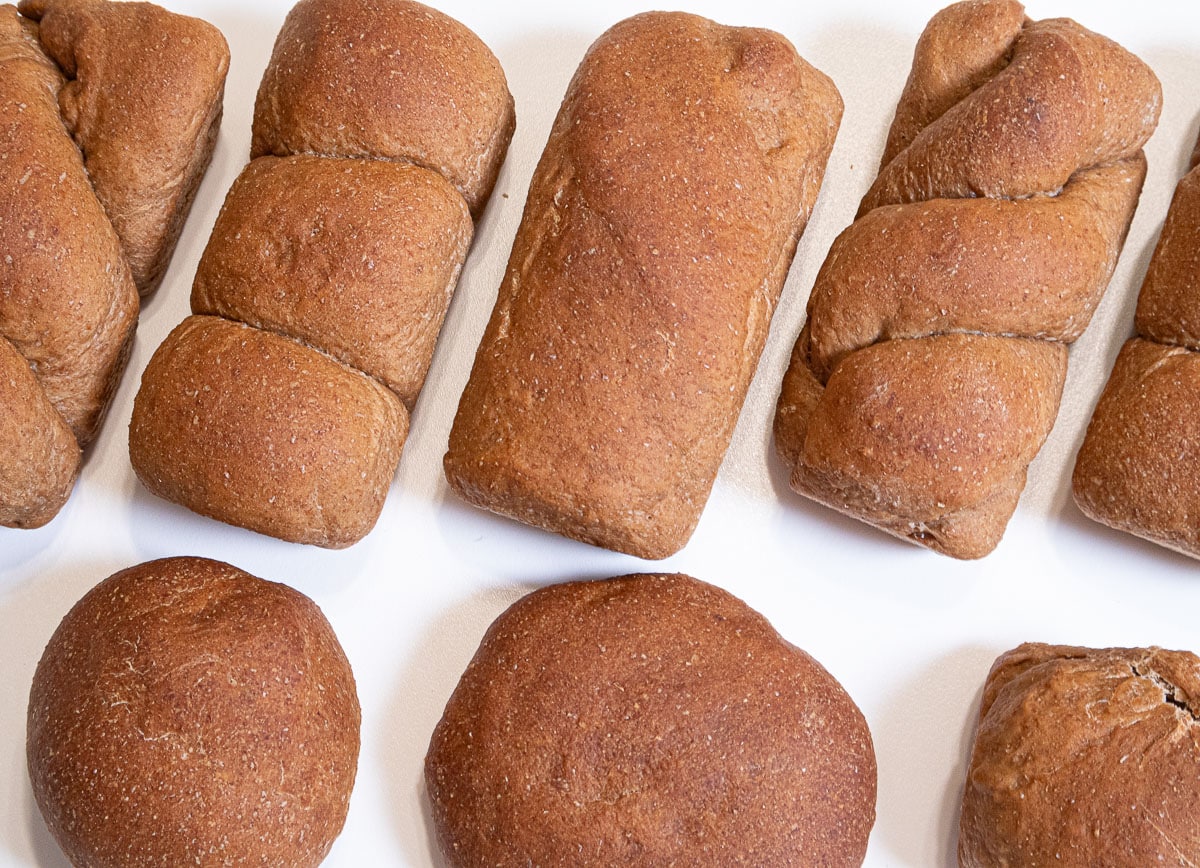
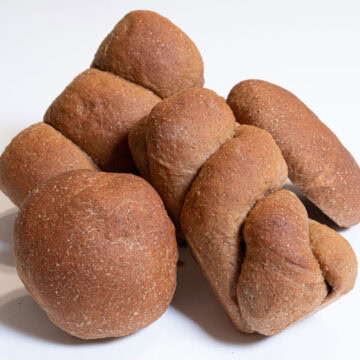
While I free formed the rolls and buns, I used small individual pans to shape the twisted bread and the triple roll bread. Individual bread loaves are a great accompaniment and who doesn't like their own loaf of bread? Before you ask, the pans are made by Tiawudi 6 Pack Mini Loaf Pans, Non-Stick Baking Bread Pan, Carbon Steel Bakeware and can be found online.
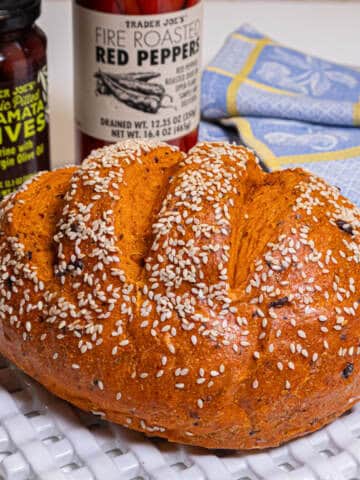
Some other favorite yeast breads include: Wine and Cheese Baguettes with their silky texture tasting of both wine and cheese, Sweet and Hot Red Pepper Bread, No Knead Bread, No Knead Sicilian Olive Bread, and Garlic Oregano Cracker Bread which is positively addictive and the Homemade Breakfast Stromboli which is a perfect stuffed bread as well as the Muffaletta Bread which includes a layered sandwich. For one of the fastest and most delicious breads around see English Muffin Bread. Another must try is Brazilian Cheese Bread Recipe.
Jump to:
Perfect for Experienced or Novice Bread Bakers
- This is an uncomplicated mix, rise, shape and bake recipe.
- The dough is flexible and can rest in the fridge for up to 3 days after rising before shaping and baking.
- Honey and molasses while imparting phenomenal flavor guarantee a soft dough that rises easily.
- Shaping it is easy and quick.
- Run out of time before shaping and baking? Simply freeze the dough after the first rise. Thaw in the refrigerator, shape and bake as desired.
Recipe Ingredients
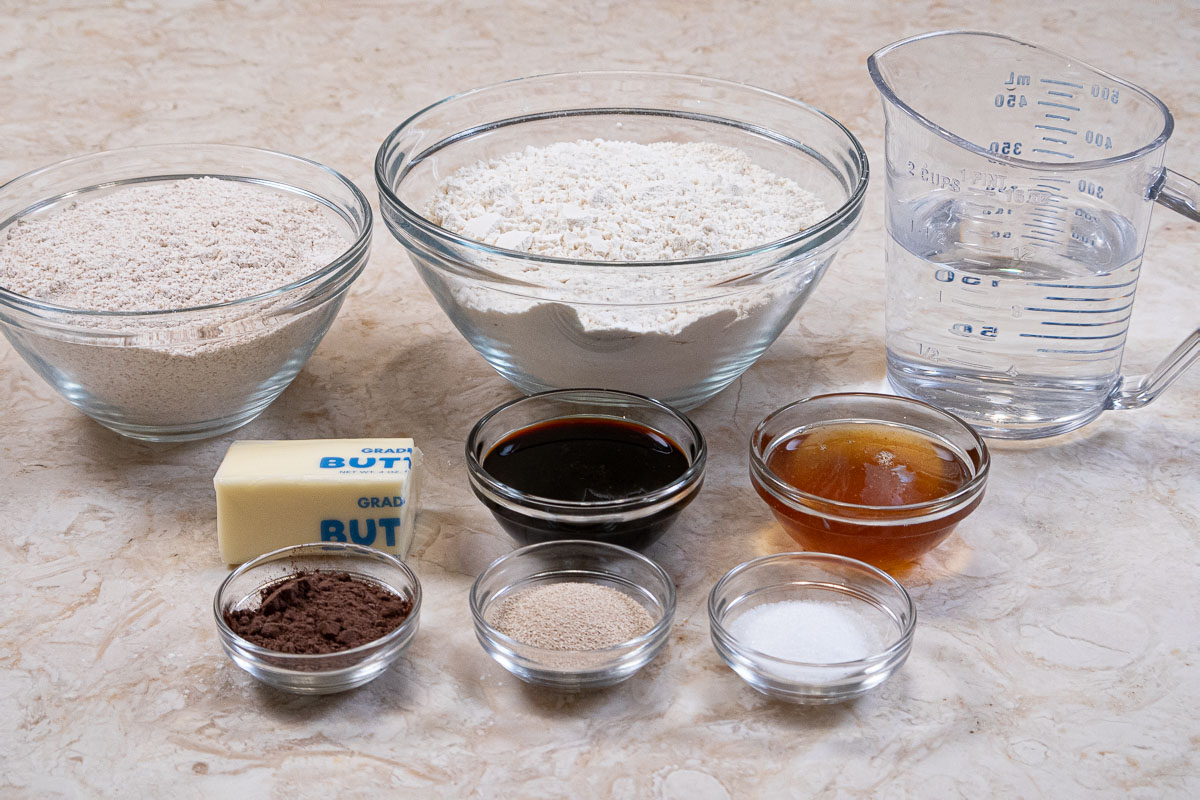
FRONT ROW: Cocoa, instant yeast, salt
MIDDLE ROW: Unsalted butter, molasses, honey
BACK ROW: Whole wheat flour, bread flour, water
Key Ingredients
Cocoa can be natural or Dutch process. While it is only used to deepen the color of the dough, it can omitted but the bread won't look as good. Dutch process cocoa will yield a darker color.
Whole Wheat Flour - Either regular or white whole wheat flour can be used. I prefer the regular for its stronger taste. If using the white cocoa is a must to color it.
Bread Flour is used with its higher gluten percentage that gives more lift to yeasted breads both sweet and non sweet.
Instant yeast is preferable but active dry may be substituted. The rising time will increase.
Be sure to see the recipe card below for the exact ingredients & instructions.
Step by Step Instructions
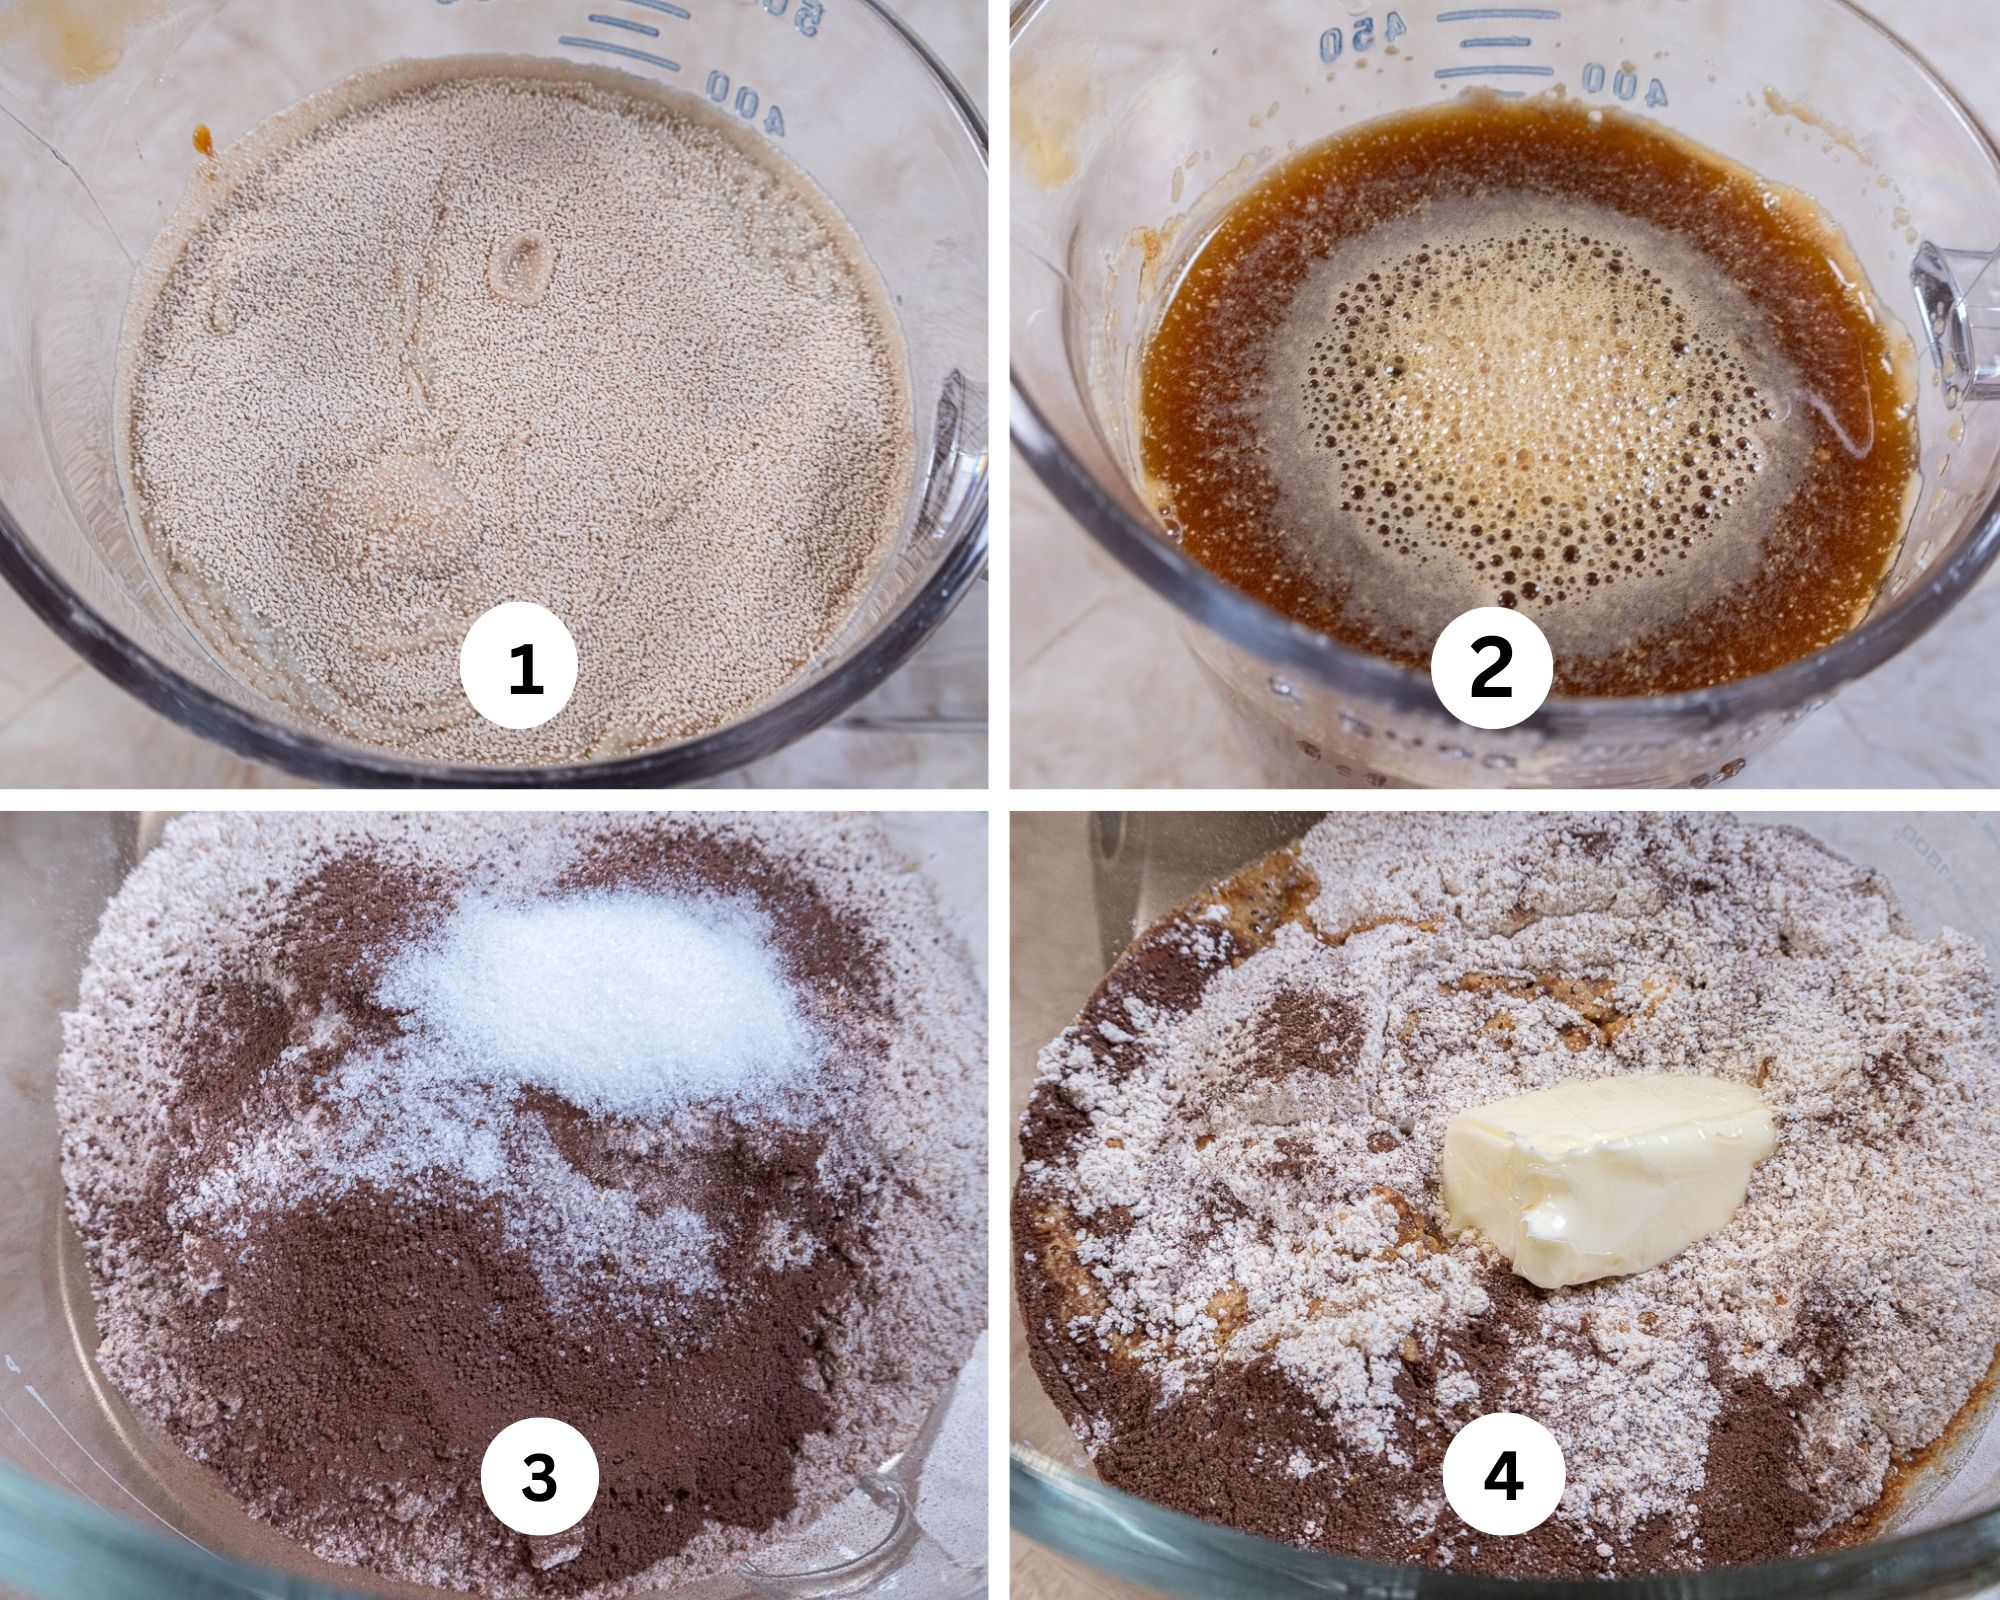
Step 1. Add the yeast to lukewarm water. I do this whether the yeast is instant or active dry yeast because I have found it incorporates better. There have been times I have seen the little yeast granules unincorporated. Step 2. Stir in the honey and molasses. Step 3. Add both flours, cocoa and salt to the mixing bowl. Step 4. Add the softened butter.
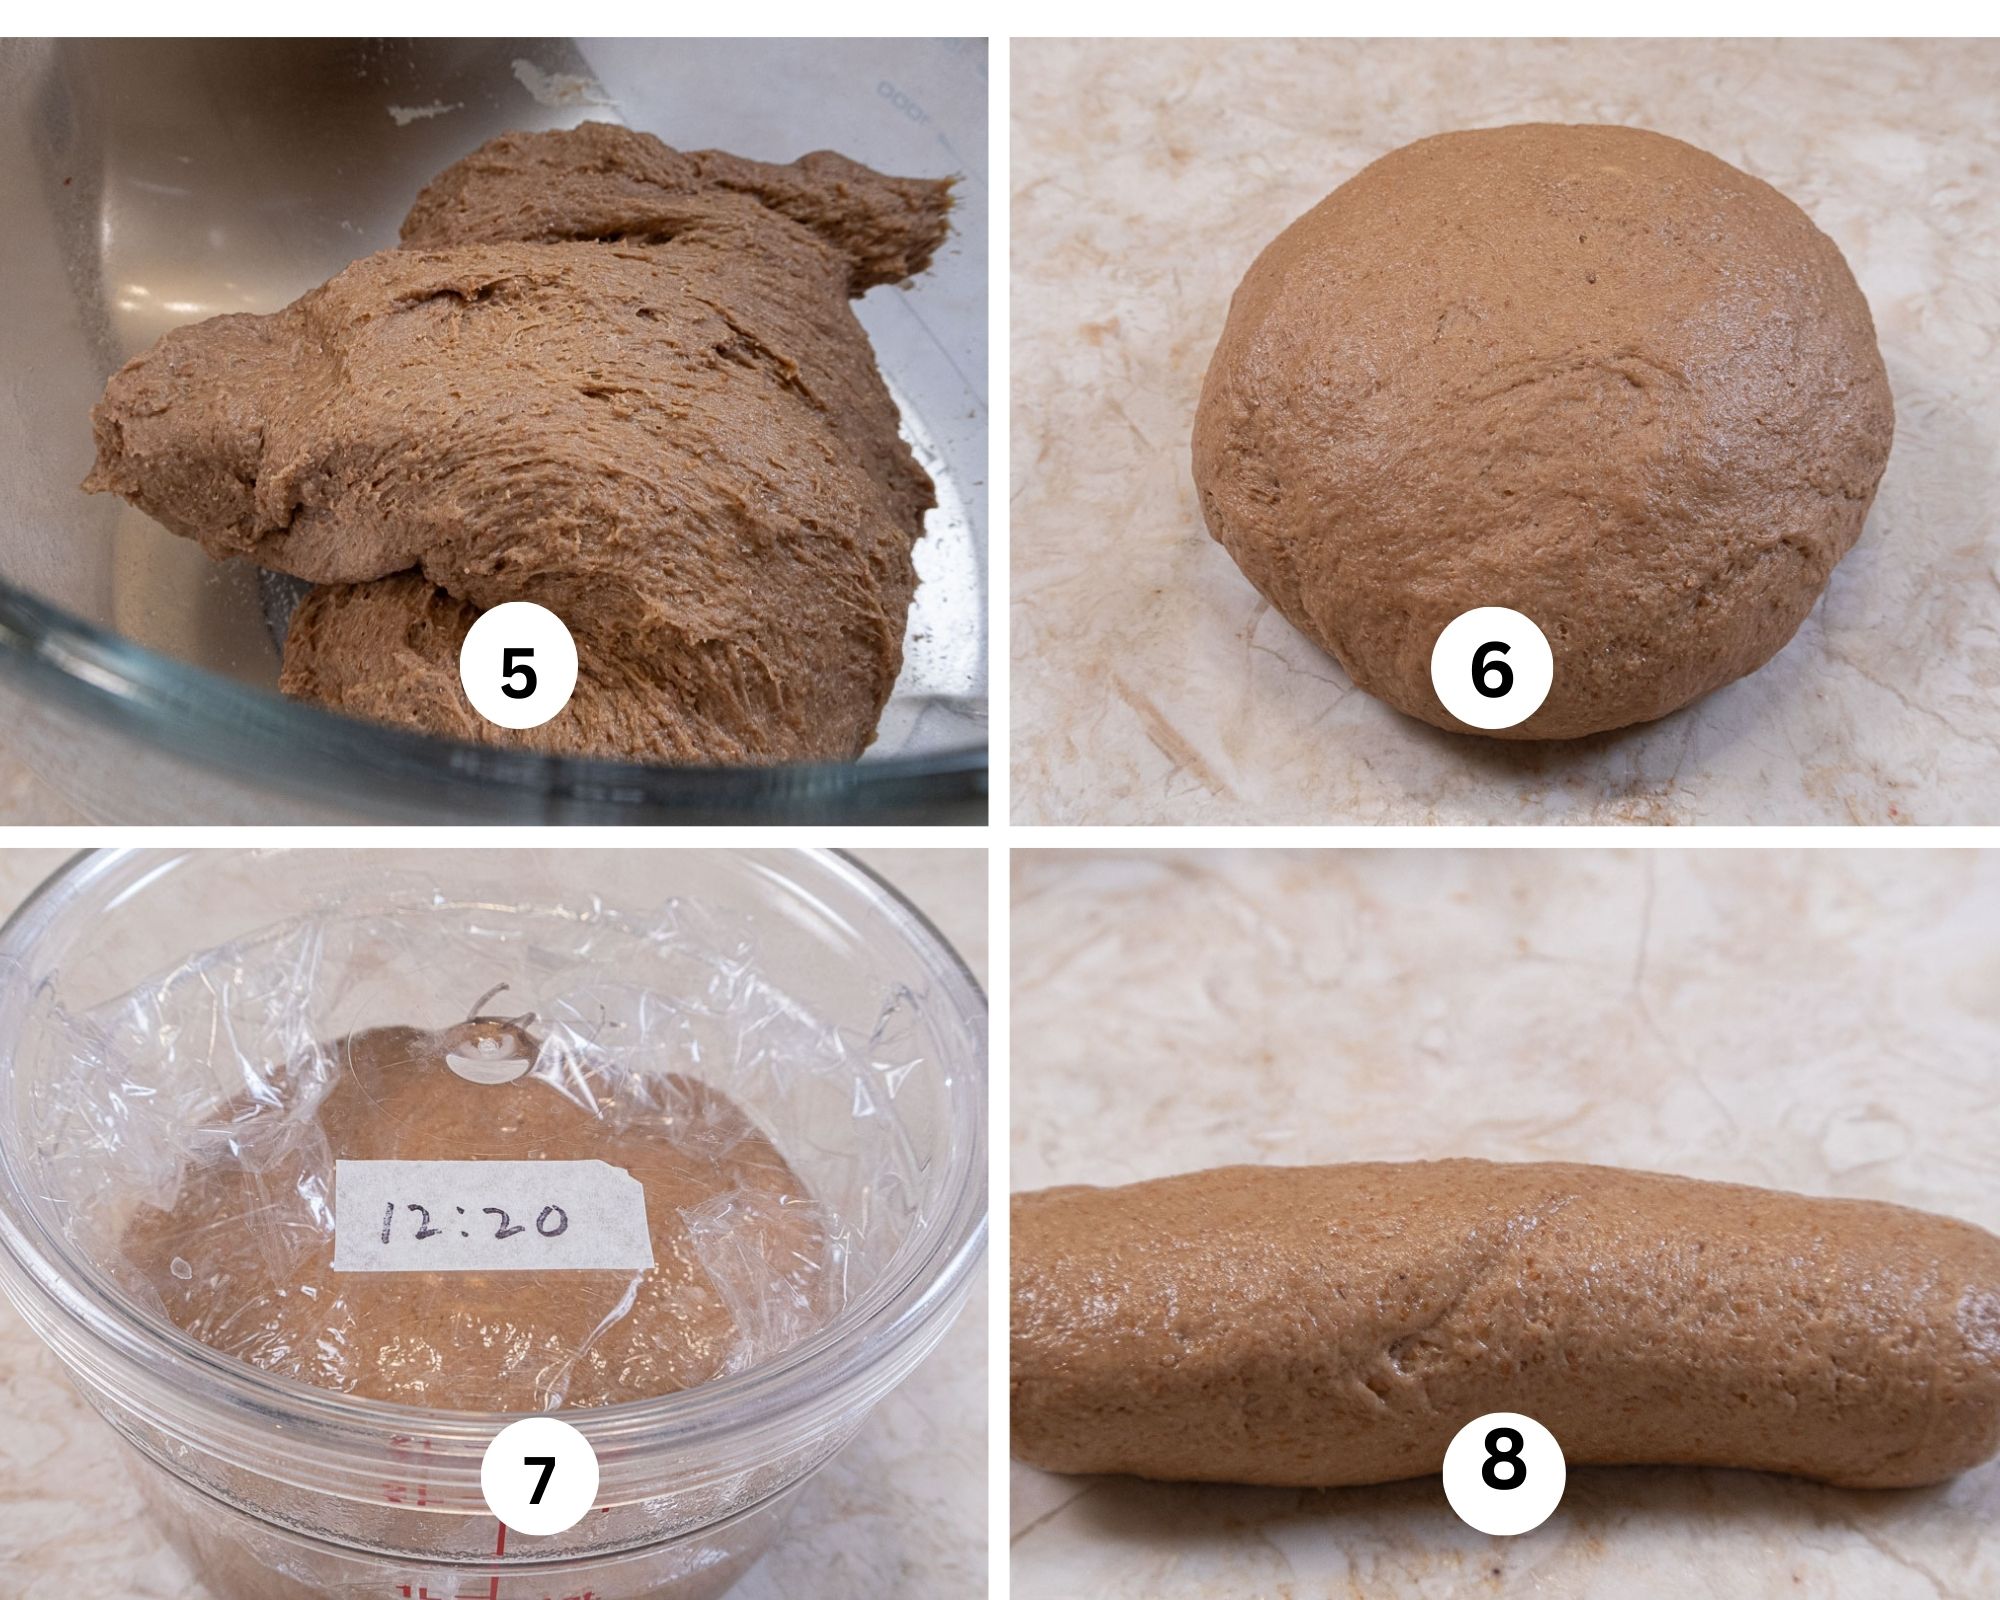
Step 5. Fit the mixer with a dough hook if possible. Mix on low until everything is moistened. Raise the speed of the mixer as recommended by your machine and mix for 3 or 4 minutes until the dough forms. It will be soft and a bit sticky. That is how it should be. Step 6. Shape it into a ball. Step 7. Spray a container at least three times as big as the dough with a non-stick baking release and place the dough in the container. Cover directly with plastic wrap and place the lid on. Mark the time on the lid. Allow it to rise and either shape it at once or deflate the dough, recover and refrigerate for up to 3 days. Step 8. Divide the dough into 8 140 gram pieces if using the small individual pans. Shape 140 grams of dough into a log.
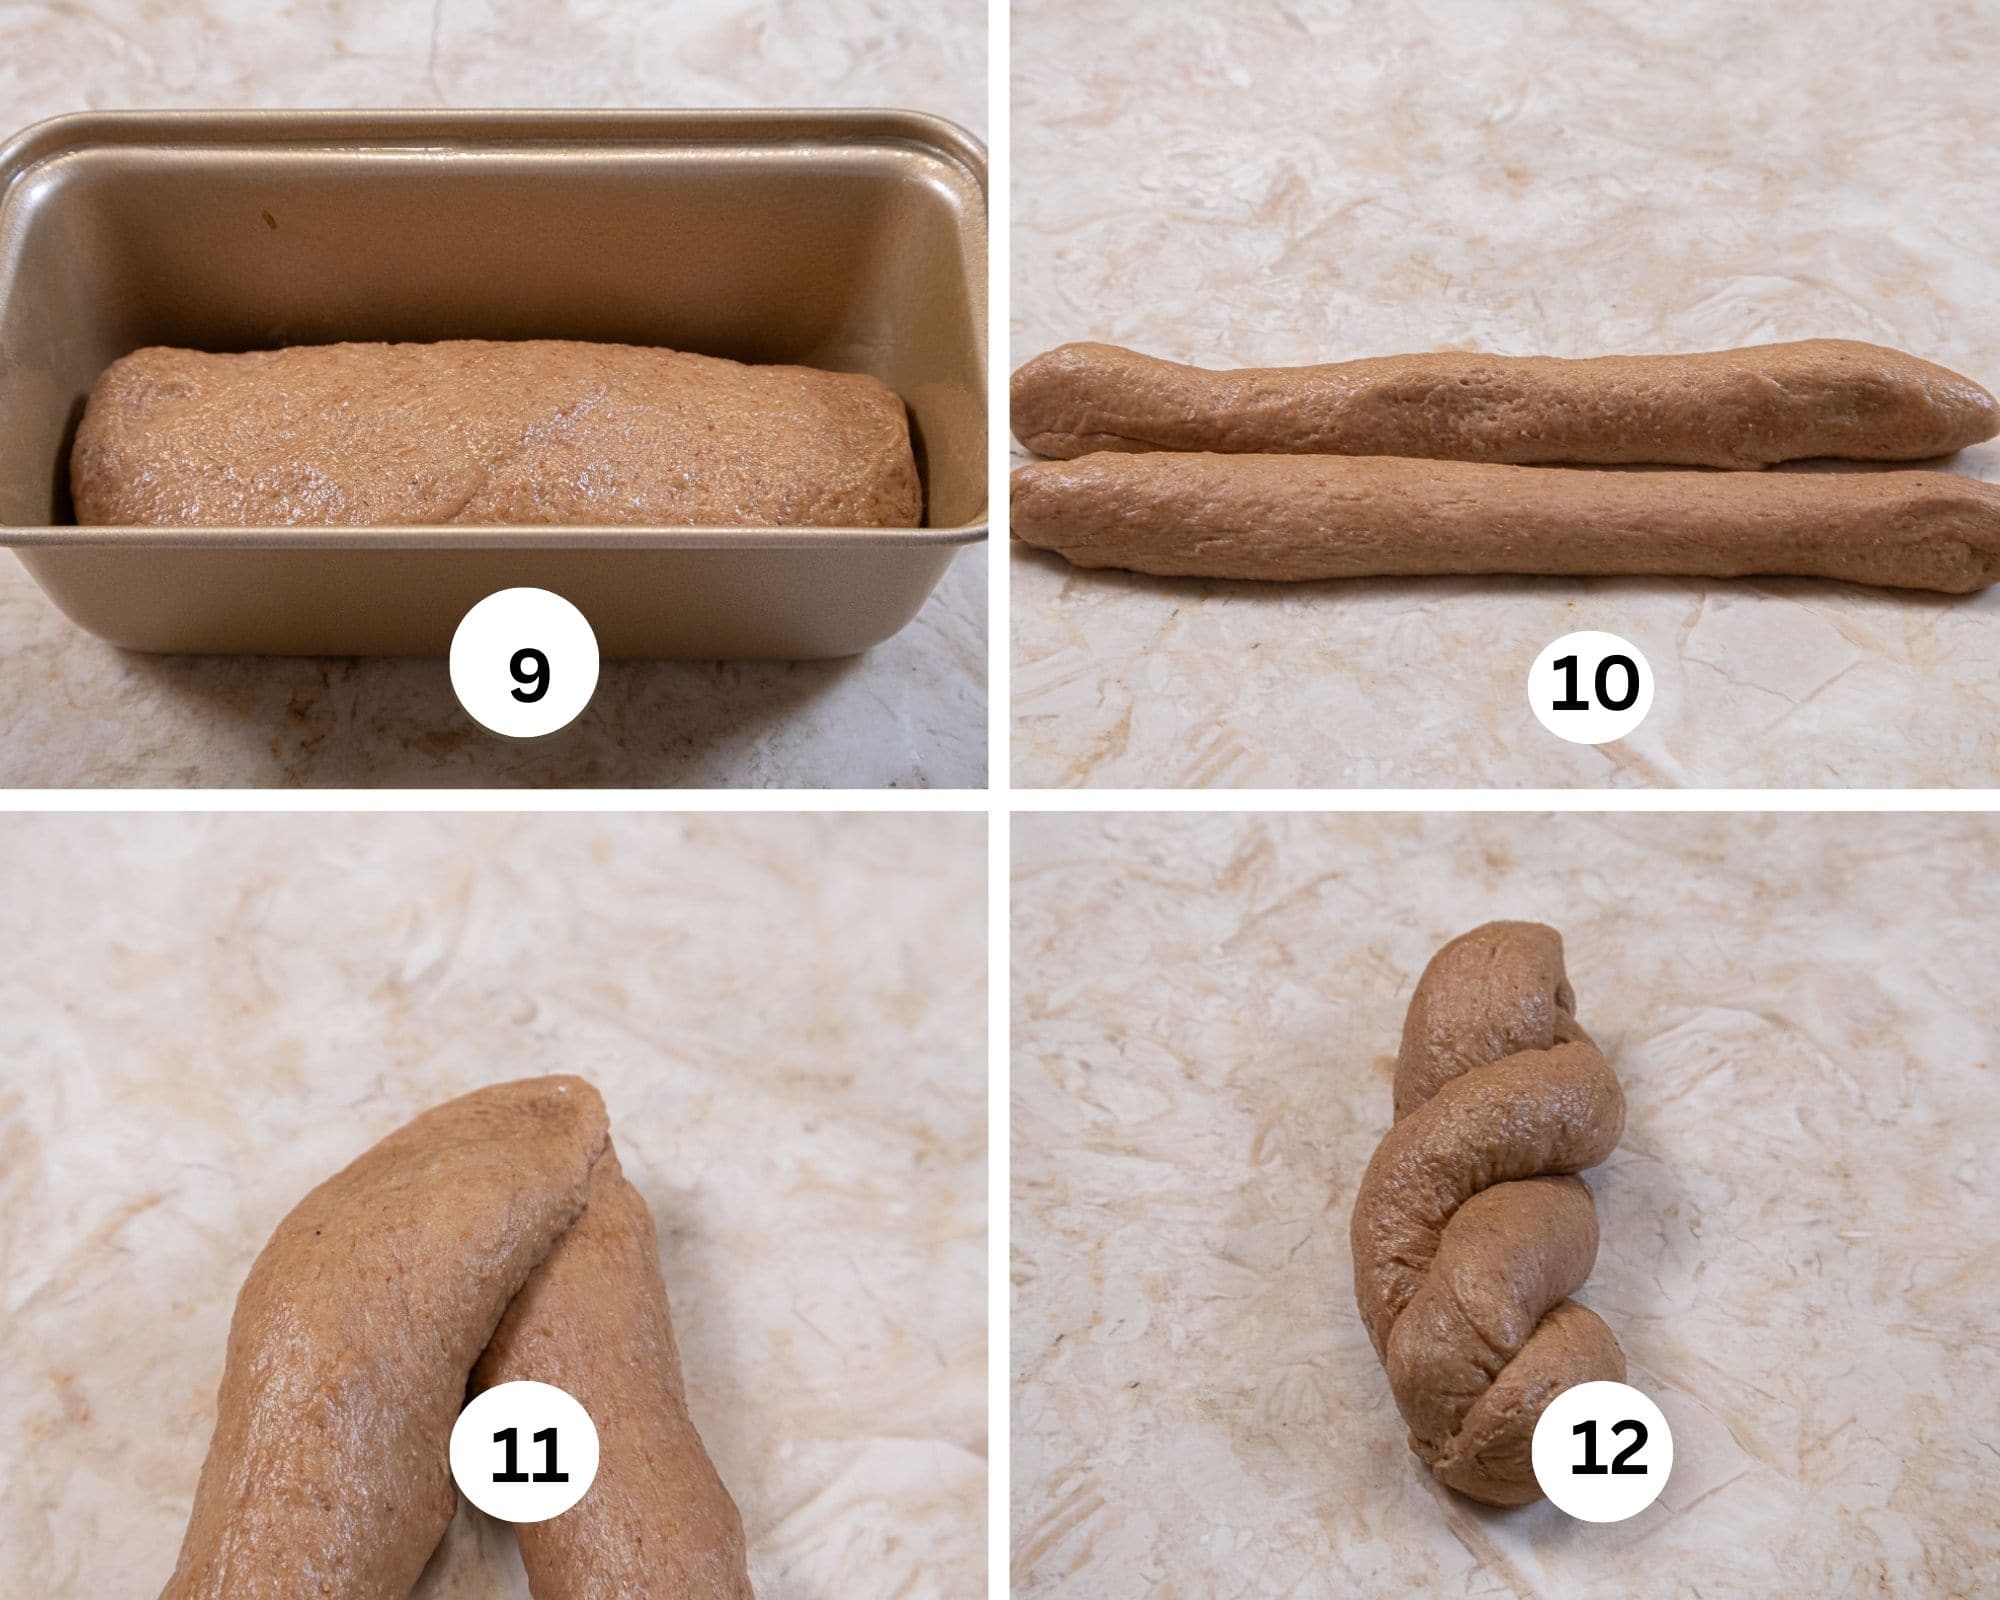
Step 9. Place the log of dough into a sprayed mini pan. Step 10. Divide another 140 gram piece of dough into two pieces of of dough (about 70 grams each) into ropes slightly longer than the pan ou are using. . Step 11. Pinch the ends together at the top. Step 12. Twist them together.
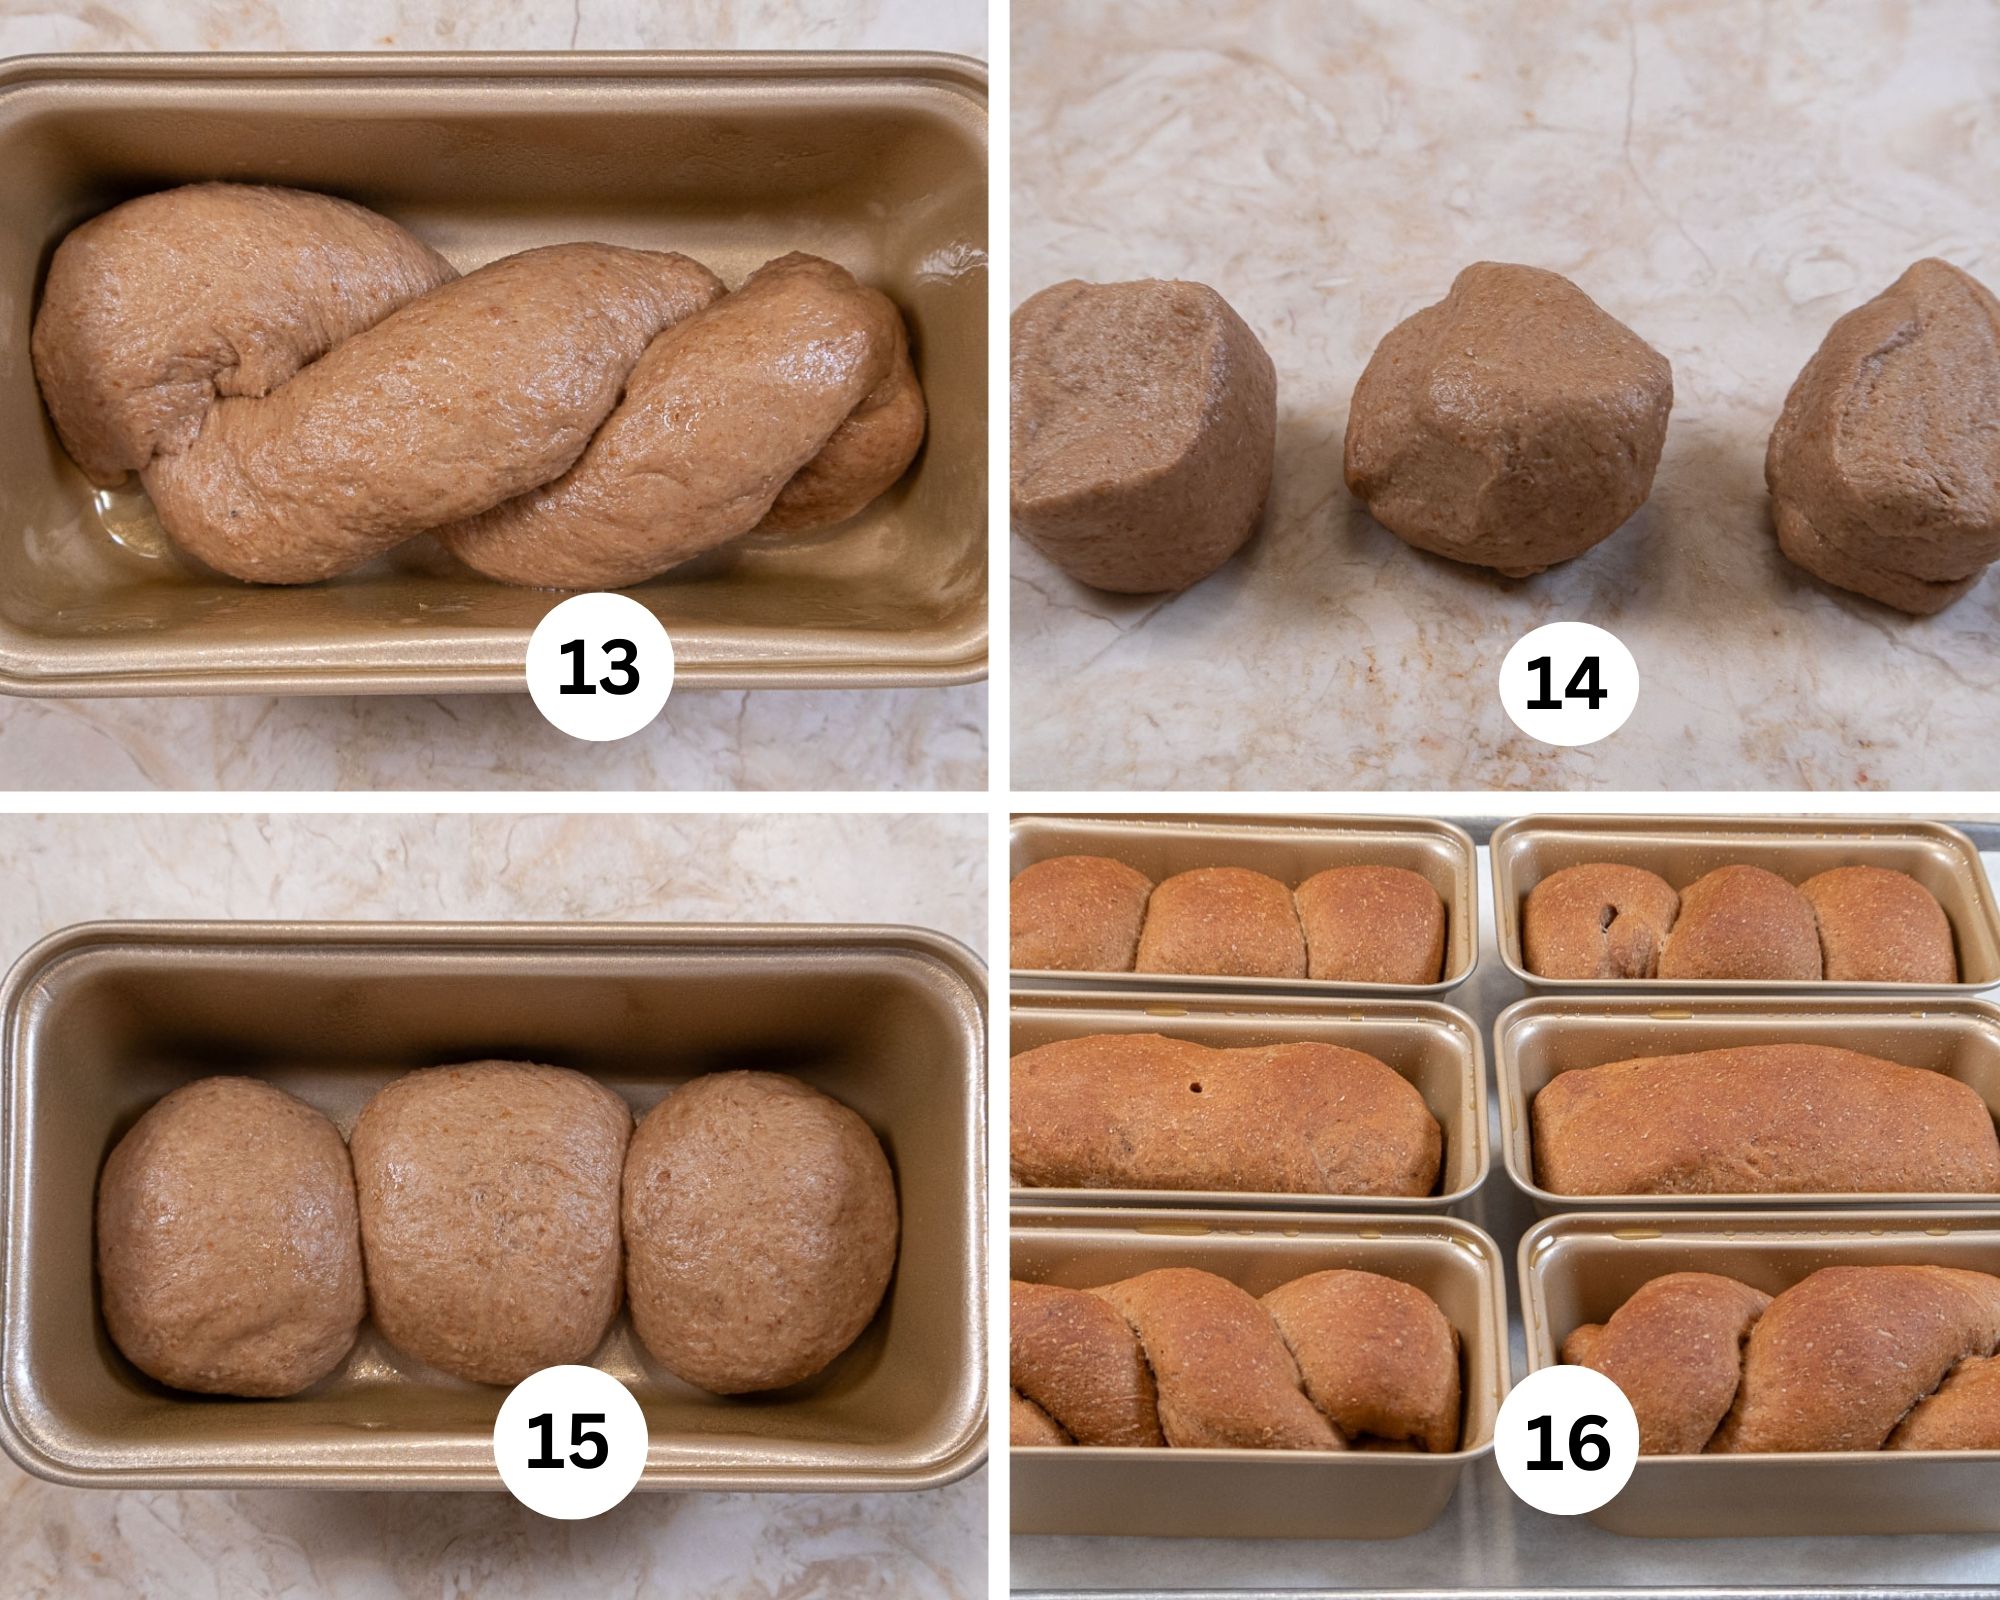
Step 13. Place the twisted loaf in an individual pan that has been sprayed with a non-stick baking release, tucking the ends underneath. Step 14. Divide the called for amount of dough into 3 equal pieces. Step 15. Shape them into balls and place them in a sprayed pan. Press them down to fill the pan. Step 16. Let the baked bread cool for about 10 minutes and then turn out of the pans onto a cooling rack.
Recipe FAQS
There are several things that can cause this. Not enough liquid. Tacky or slightly sticky doughs make a softer crumb. The second reason is the dough has not be beaten or kneaded enough resulting in under developed gluten in which the dough cannot rise enough. Last, old yeast that has lost some of it's power.
Stir a teaspoon of yeast and a pinch of sugar into ¼ cup lukewarm water. Let it sit for about 10 minutes. It should have lots of bubbles on top look foamy and frothy and smell a bit of wheat or beer.
After opening, keep yeast in the refrigerator for 4 to 6 months. It can also be kept in the freezer indefinitely.
Expert Tips
- This is a somewhat sticky dough. Don't add additional flour which will make it dense and not soft.
- Beat the dough at least 3 to 4 minutes if using a mixer. Do not under beat or the gluten won't be developed enough and the dough will not be as soft.
- I have started adding instant yeast to my water or liquid even though I know most people don't. I notice every once in a while, small granules of instant yeast were showing in risen dough.
- I use Grandma's Molasses because it isn't sulphured. If using another, use the dark molasses but not blackstrap.
- To make it even tastier, refrigerate the dough at least overnight or up to 3 days. The cold dough is also easier to shape.
- Double Pan the rolls when baking to prevent over browning of the bottoms.
Sweet and Savory Yeast Breads
Outback Steakhouse Bread
Ingredients
- 1 ⅓ cups water, warm
- 2 ½ teaspoons instant yeast
- ¼ cup dark molasses
- ¼ cup honey
- 2 ⅓ cups bread flour (330 grams)
- 1 ½ cups whole wheat flour (220 grams)
- 1 tablespoon Dutch-process cocoa
- 2 teaspoons salt
- 4 tablespoons unsalted butter, softened (60 grams)
Instructions
- Spray pans or mold if using.
- Stir the yeast into the warm water. Add the molasses and honey, stir well. Let sit while you assemble the rest of the ingredients.
- Add the bread flour, whole wheat flour, cocoa and salt to a mixing bowl.
- Pour the liquid ingredients over the dry ingredients.
- Add the softened butter and mix on low until everything is moistened. Raise the speed of the mixer to whatever your machine calls for when kneading and beat for 3 to 4 minutes until the dough is completely mixed. It will be soft and a bit sticky.
- Spray a container at least twice the volume of the dough and place the dough in it. Cover directly with plastic wrap and put a lid on it if there is one. Mark the time. Let it rise for about 2 hours until doubled in bulk. Either use it immediately or refrigerate for up to 3 days. It will be easier to shape if cold.
- To shape the dough into a plain loaf, weigh out 140 grams of dough and form it into a log shape. Roll it back and forth under you hands until it is smooth and slightly longer than the pan you are using. Place it in a sprayed pan and flatten it slightly.
- To shape the dough into a twist. Weight 140 grams of dough and divide it in half (70 grams each). Roll each piece into a rope, slightly longer than the pan. Pinch the two pieces of dough together at the top and twist the ropes together. Place in a sprayed pan, tucking the top and bottom under. Flatten slightly.
- To Shape the triple roll bread, divide the 140 grams into three balls (about 45 grams each). Roll each piece into a smooth ball and place them in a sprayed pan touching each other. Flatten slightly.
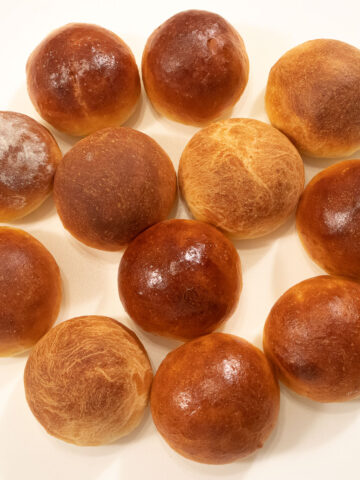
- If making plain rolls, divide the dough into 12 pieces of 85 grams each. Shape them into round rolls. Place them on a parchment lined baking sheet and let them rise for about 2 hours.
- Place the pans on a sheet pan and cover with a cloth. Allow to rise until doubled, about 2 hours. About 15 minutes before they are done, preheat the oven to 350°F. Bake about 20 to 25 minutes until lightly colored. A digital thermometer will read 200°F when done. The rolls should be double panned to prevent the bottoms from over browning.
Notes
Nutrition


Diane says
This bread is really yummy. And amazingly easy. I made the dough three days before Thanksgiving and baked it up as individual rolls that morning. Everyone loved them. Did I mention easy?
Catherine Cardelein says
I just baked this bread recipe and the bread has a very nice texture , I followed all the ingredients. the only thing I was wondering is how can I make it a little sweeter. Outbacks bread tastes sweet to me while this was not at all sweet. I left it in the frig overnight before baking . It took 3 hours to warm up out on the kitchen counter and the second rise in the pans took over 2 1/2 hours. I baked it for 30 minutes in 9 x 5 bread pans for it to reach 200 degrees. can I add some sugar to this recipe to sweeten it.
Helen S Fletcher says
Hi Catherine - Did you miss the 1/4 cup molasses and 1/4 cup of honey. That is 1/2 cup of sweetners. Even sweet breads don't usually have more. After the bread comes from the fridge, it is shaped. There is no need to let it rise before you shape it. It only takes about 2 hours from the fridge if the molasses and honey are used. If you didn't use the molasses and honey it would take a long time to rise. One of the reasons to add sweetners to dough, even a little, let alone 1/2 cup is to give the yeast something to feed it so it can grow.
Kathy says
Helen, I’m in my bread era, with my resolution to buy no store bread this year. Today, I made this bread. It was cooling when my husband sliced a bite, and said, “this is really good, tastes like outback bread.” Win for you and me!! It really is great tasting bread. I need to tell you that every one of your recipes I’ve tried has been delicious. And I do have all of your cookbooks.
Helen S Fletcher says
Hi Kathy - That makes my day and you my favorite person today. Thanks so much and this is one of my favorite breads. In fact, I making it tomorrow. I keep the rolls in the freezer for us. So convenient.
Tiffany Wong says
I just found you!! Lucky for me! I am an amateur so would like to ask about leaving it in fridge. So after the 1st rise, I will cover will cling wrap and leave in fridge overnight. The next day I shape and let it rise again? Am I correct? Thanks!
Helen S Fletcher says
Hi Tiffany and welcome. That is correct. The dough will develop more flavor in the fridge and when yeast doughs are cold they are easier to shape. They will take a bit longer to rise but I find that a good trade off.
Sandra says
The molasses flavour is great! I’ve made this twice now in a bread machine but it would be easy as pie to make by hand, too. Thank you!
Helen S Fletcher says
I agree Sandra. This is one of the best breads I have ever made. I keep in in the freezer for a quick add on to a meal.
Pam McG says
My dough weighed over 1000 g so that’s a lot of 70 g ropes. I ended up making a 140 g loaf, a 150 g loaf, and a 500 g loaf (twists). Proofing now, we shall see! In the meantime did I miss something?
Helen S Fletcher says
Hi Pam - how much more did it weigh? According to the figures above you only had 790 grams of dough, less than the 1000 grams in the recipe. Since the recipe only makes about 7 rolls at 140 grams each, that's only 14 ropes short ropes, but that's why I gave a several versions of the final rolls.
Pam McG says
Ms Fletcher you are amazing to respond so quickly! Total weight was 1000+ g. It was unclear to me how many loaves/twists/rolls the recipe yields so I went with 2@ 140, then the balance as a third loaf.
Based on the results, next time I would divide in half and use 2 loaf pans. I also wonder if 12 buns in a 9x13” would work. Unless you suggest otherwise of course!
Thanks for your efforts and I’d love to get a copy of that pastry book of yours that is out of print; I looked a while ago but I think a new one from a third party reseller was prohibitively expensive. I’ll have to look again or maybe splurge. :)
Helen S Fletcher says
Hi Pam - In the recipe card I stated 8 servings if using the individual pans. That could be 8 of all one shape or mixed shapes - all 140 grams. That could change if larger or smaller pans were used. If making the rolls, the recipe again sates 12 rolls. I make them free form, but I suppose you can put them in a 9x13" pan. I haven't done it so I don't know if they need to be made smaller to fill out the pan. But free form you get 12 @ 85 grams each. I know the book goes for ridiculous amounts of money - I always marvel at it.
Hope this helps.
Catherine says
Looks/sounds delicious! Can hardly wait to try. Thank you!
Helen S Fletcher says
Hi Catherine - and easy! That's the best part.
Susan says
This bread is so delicious, Helen! Thank-you!
Helen S Fletcher says
Hi Susan - I couldn't agree more. I always keep the baked rolls in the freezer to augment a meal.
Karenb says
How would you adapt this recipe to make in a bread machine?
Helen S Fletcher says
I've never used a bread machine but my guess is to make it as you do in the recipe. Just put everything in and mix as you do any other bread you make in the machine
Susan says
My daughter recently bought a bread machine. I sent her this recipe. I don't have a bread maker, and that's okay, because I find kneading bread dough extremely therapeutic. :-)
Helen S Fletcher says
Hi Susan, this one will be a sticky knead. Don't add additional flour or the bread will not be soft. If you have a bench or bowl scraper, this would be the time to use it.
Sandra says
I made this recipe last night in my bread machine (‘cause I love waking up in the morning to the smell of fresh baking bread!). It came out beautifully and I’m having a slice now for breakfast. Do me a favor and give it a star rating. It is hugely helpful to me.
Helen S Fletcher says
Hi Sandra, Lucky you. I'm the bread machine around here! This is one of my absolute favorite breads.
maureen says
ThANK YOU FOR YOU YUMMY RECIPES !
Helen S Fletcher says
You are very welcome Maureen.