
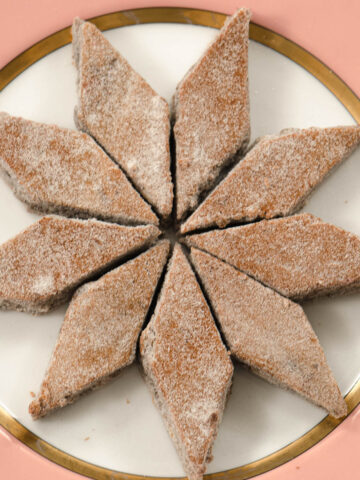
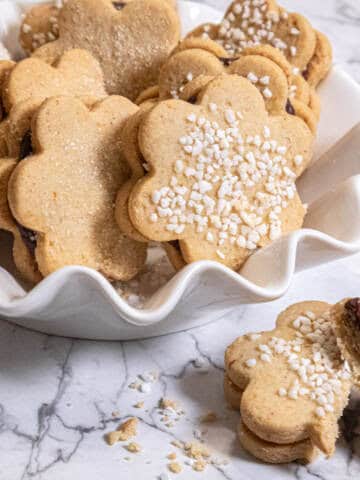
Pryaniki (pre-ah-nee-kee) are honey and spice Russian cookies traditionally served at teas and holidays. These cookies are more cake-like than their German cousins, Pfeffernusse and are finished with a white or chocolate glaze.
To make your life easier, these cookies can be made, shaped and frozen for up to a month or so before baking and glazing.
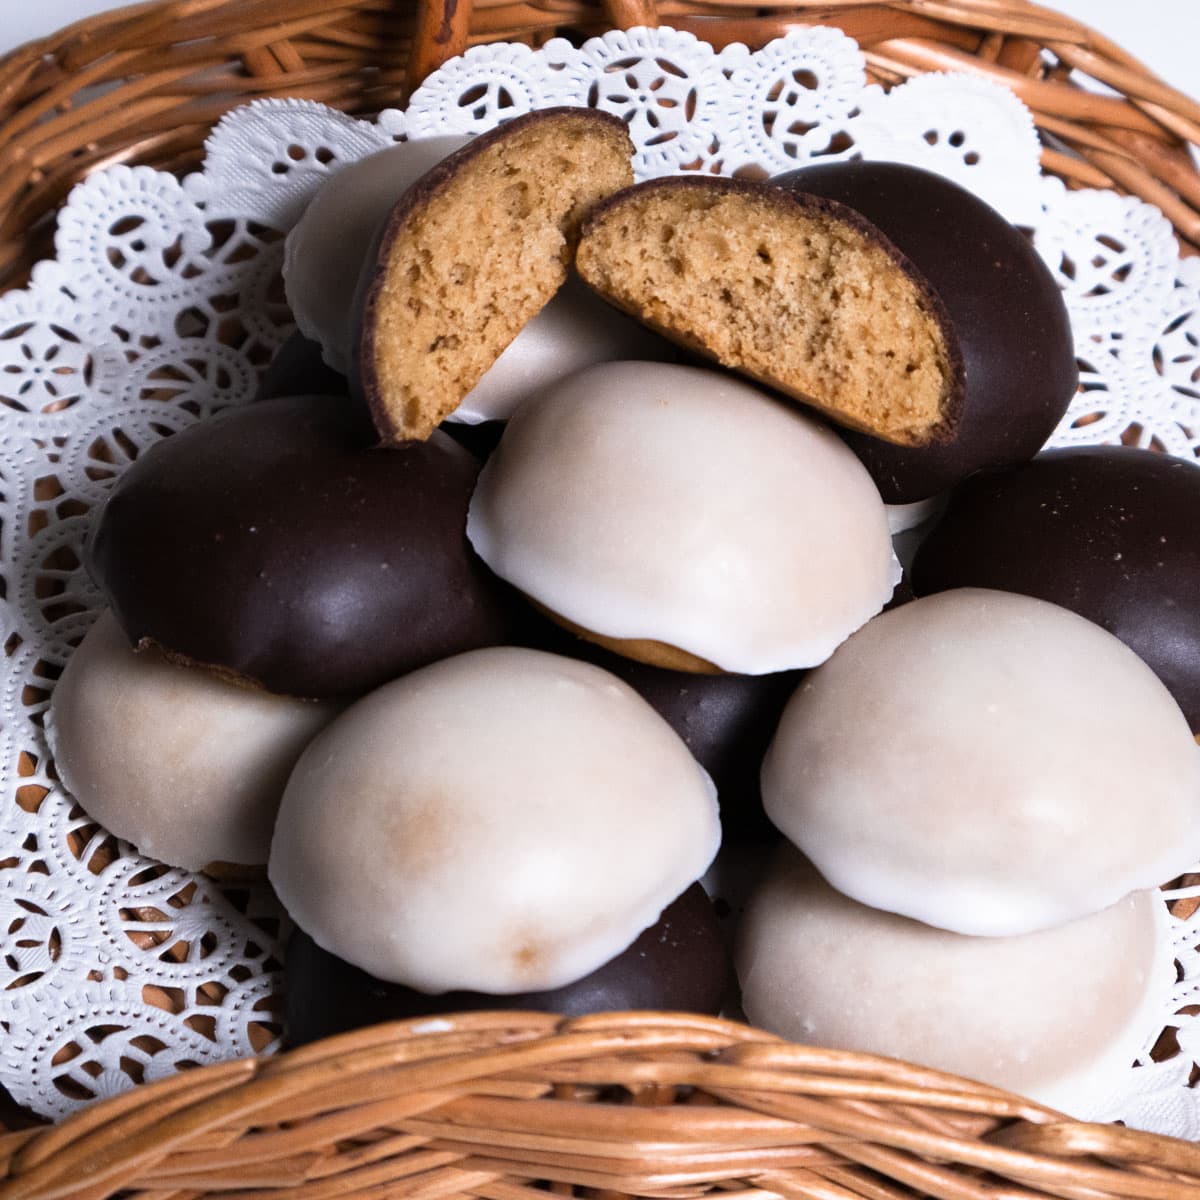
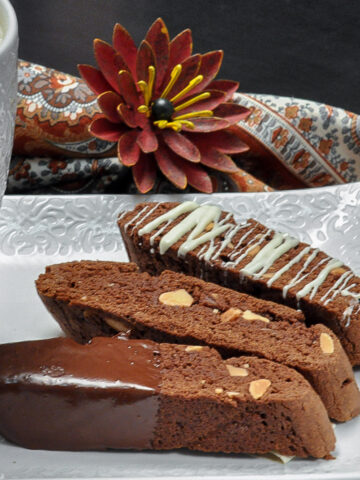
Redolent of honey and spices, these are an easily made cookie that only gets better with age. While the traditional finish is a white glaze, chocolate and spices have an affinity for each other that can't be beat. My Chocolate Spice Olive Oil Biscotti and Honey Diamonds are perfect examples of this.
Russian Spice cookies, also called honey bread, have been made since the 9th century. When trade began with the Middle East and India in the 12th and 13th centuries spices, many spices were added. As time went on, it seems every family had their special recipe, some highly secreted.
Typically, the cookies were graced with cloves, ginger, citrus fruits, pepper, nutmeg, mint, anise, ginger, and many other flavorings, giving them the name pryanosti or well-spiced. Many of those, along with the Russians love for honey, make up this cookie.
Looking for more festive cookie inspiration? Check out Kick-Start Your Holiday Spirit: Cookies & Breads to Bake Now.
Jump to:
Why You'll Want to Make Pryaniki
- Although this doesn't have just 5 ingredients, it is so simple to make. Basically it only requires, melting a few ingredients, adding all the ingredients to the mixing bowl, mixing and chilling. Which makes this ideal for a make ahead cookie.
- But there is more as the saying goes. These cookies need to be aged before finishing. So they can be made, stored and a week later glazed, after which they can be stored for weeks in an airtight container.
- The texture of the cookies makes them easier to eat than say Pfeffernusse or Springerle.
- These are so packed with flavor they taste incredible. Anyone who enjoys a spice cookie is going to ask for the recipe.
Recipe Ingredients
For the Cookies
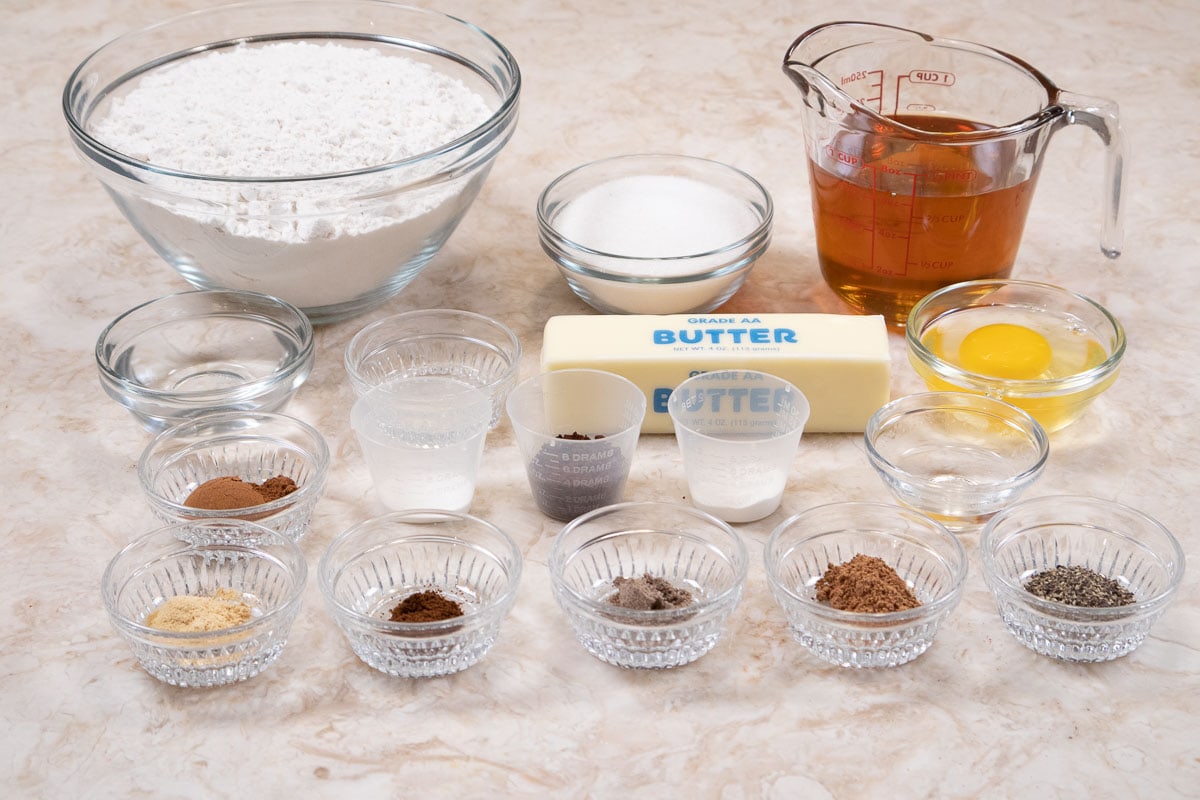
Ingredients read left to right.
FIRST ROW: Ginger, cloves, cardamom, nutmeg, black pepper
SECOND ROW: Cinnamon, baking soda, coffee, baking powder, anise extract
THIRD ROW: Water, white vinegar, butter, egg
FOURTH ROW: All-purpose flour, sugar, honey
Glaze
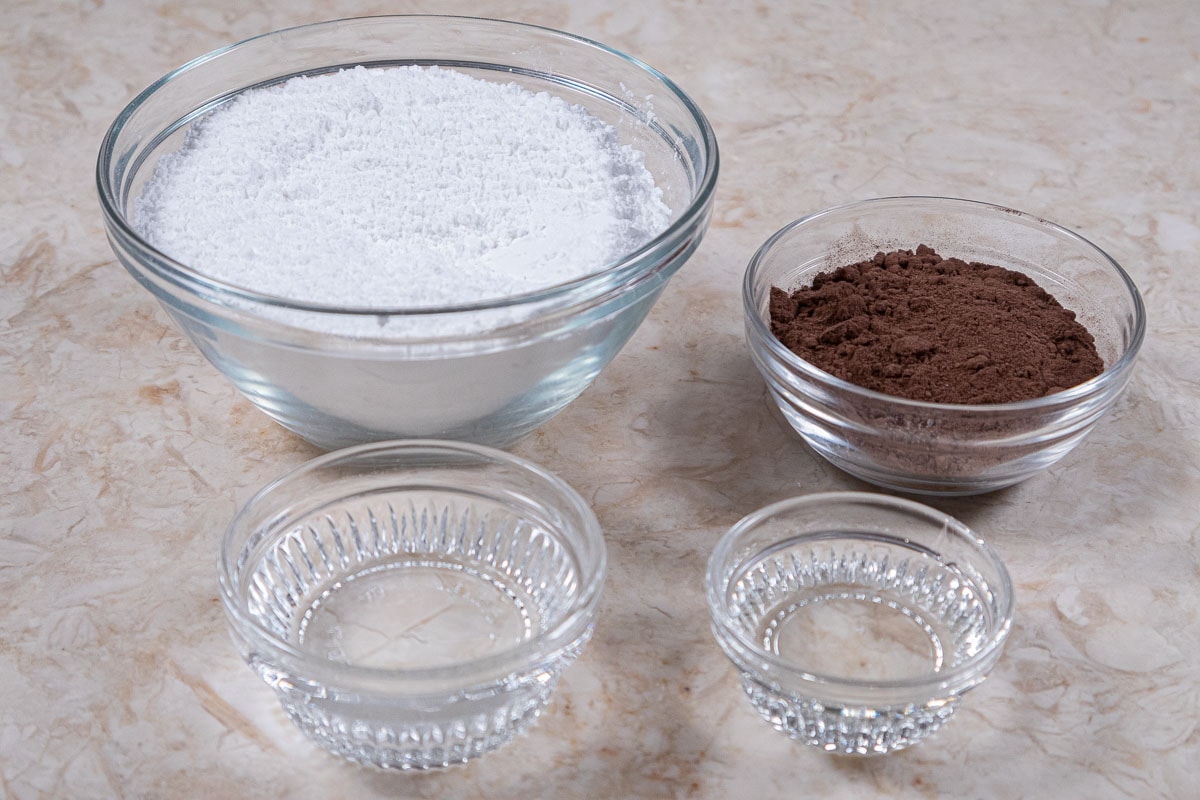
Left to Right:
FRONT ROW: Water, corn syrup
BACK ROW: Powdered sugar, cocoa
Cardamom is an expensive ingredient. Penzy's has it in tiny amounts. Keep it in the freezer when not using. I keep all of my seeds and expensive spices in the freezer where they will last forever.
Anise extract is a popular European flavoring. It is easily found in the spice department of most grocery stores.
The baking soda dissolved in vinegar is key to this cookie so don't skip it. There will be no taste of it in the cookies. By dissolving the baking soda in the vinegar, it produces carbon dioxide gas (C02), which is evident because of the formation of bubbles in the foaming mixture.
These allow for soft and airy baked goods such as cookies, pancakes, and cakes. Baking soda also increases pH levels while reducing gluten. This creates less chewy and more tender baked goods.
Corn syrup is used in the glaze to add sheen and help prevent cracking of the glaze. Corn syrup sold to consumers is not the high glucose variety used in commercial products.
Be sure to see the recipe card below for the full ingredients and instructions.
Step by Step Instructions
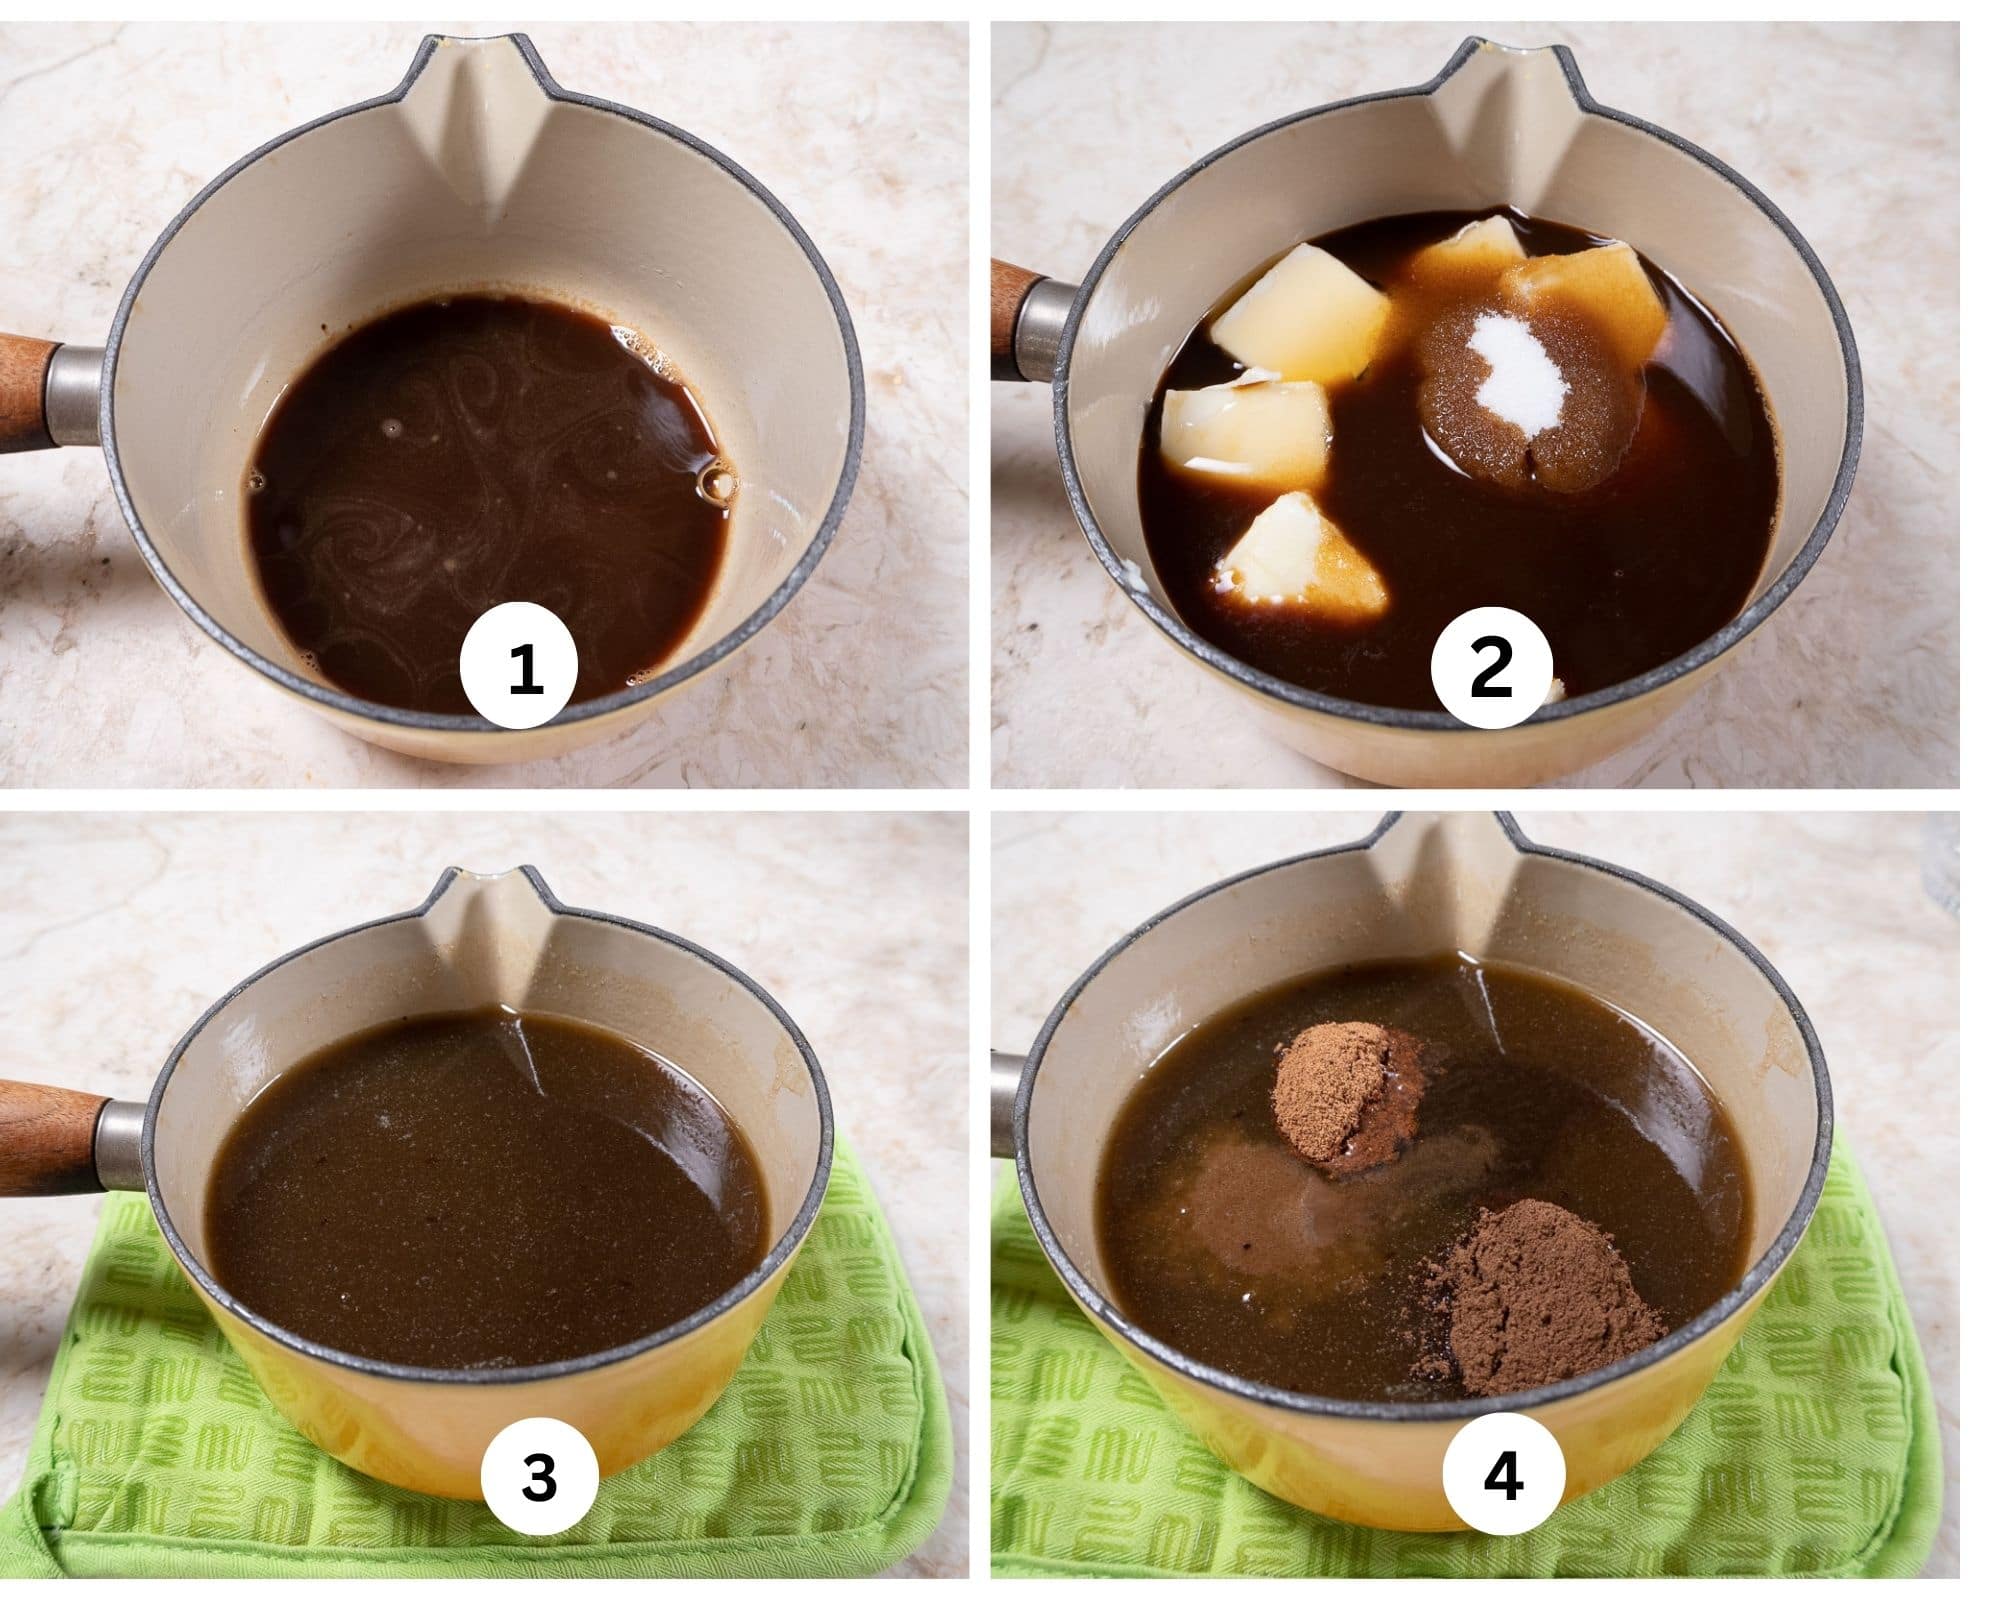
Step 1. Dissolve the coffee in the water in a small saucepan. Step 2. Add the butter, honey and sugar. Step 3. Heat to melt the butter and dissolve the sugar. Step 4. Whisk in the anise extract and all of the spices. Cool slightly. Place in the bowl of a mixer.

Step 6. Add the baking soda to the vinegar, mixing completely. It will bubble up. Step 6. Add the egg, the baking soda mixture and baking powder. Step 7. Pour all of the flour on top of the liquid. Step 8. Mix on low to medium low, scraping as necessary. The mixture will be a batter more than a dough. Refrigerate the batter overnight.
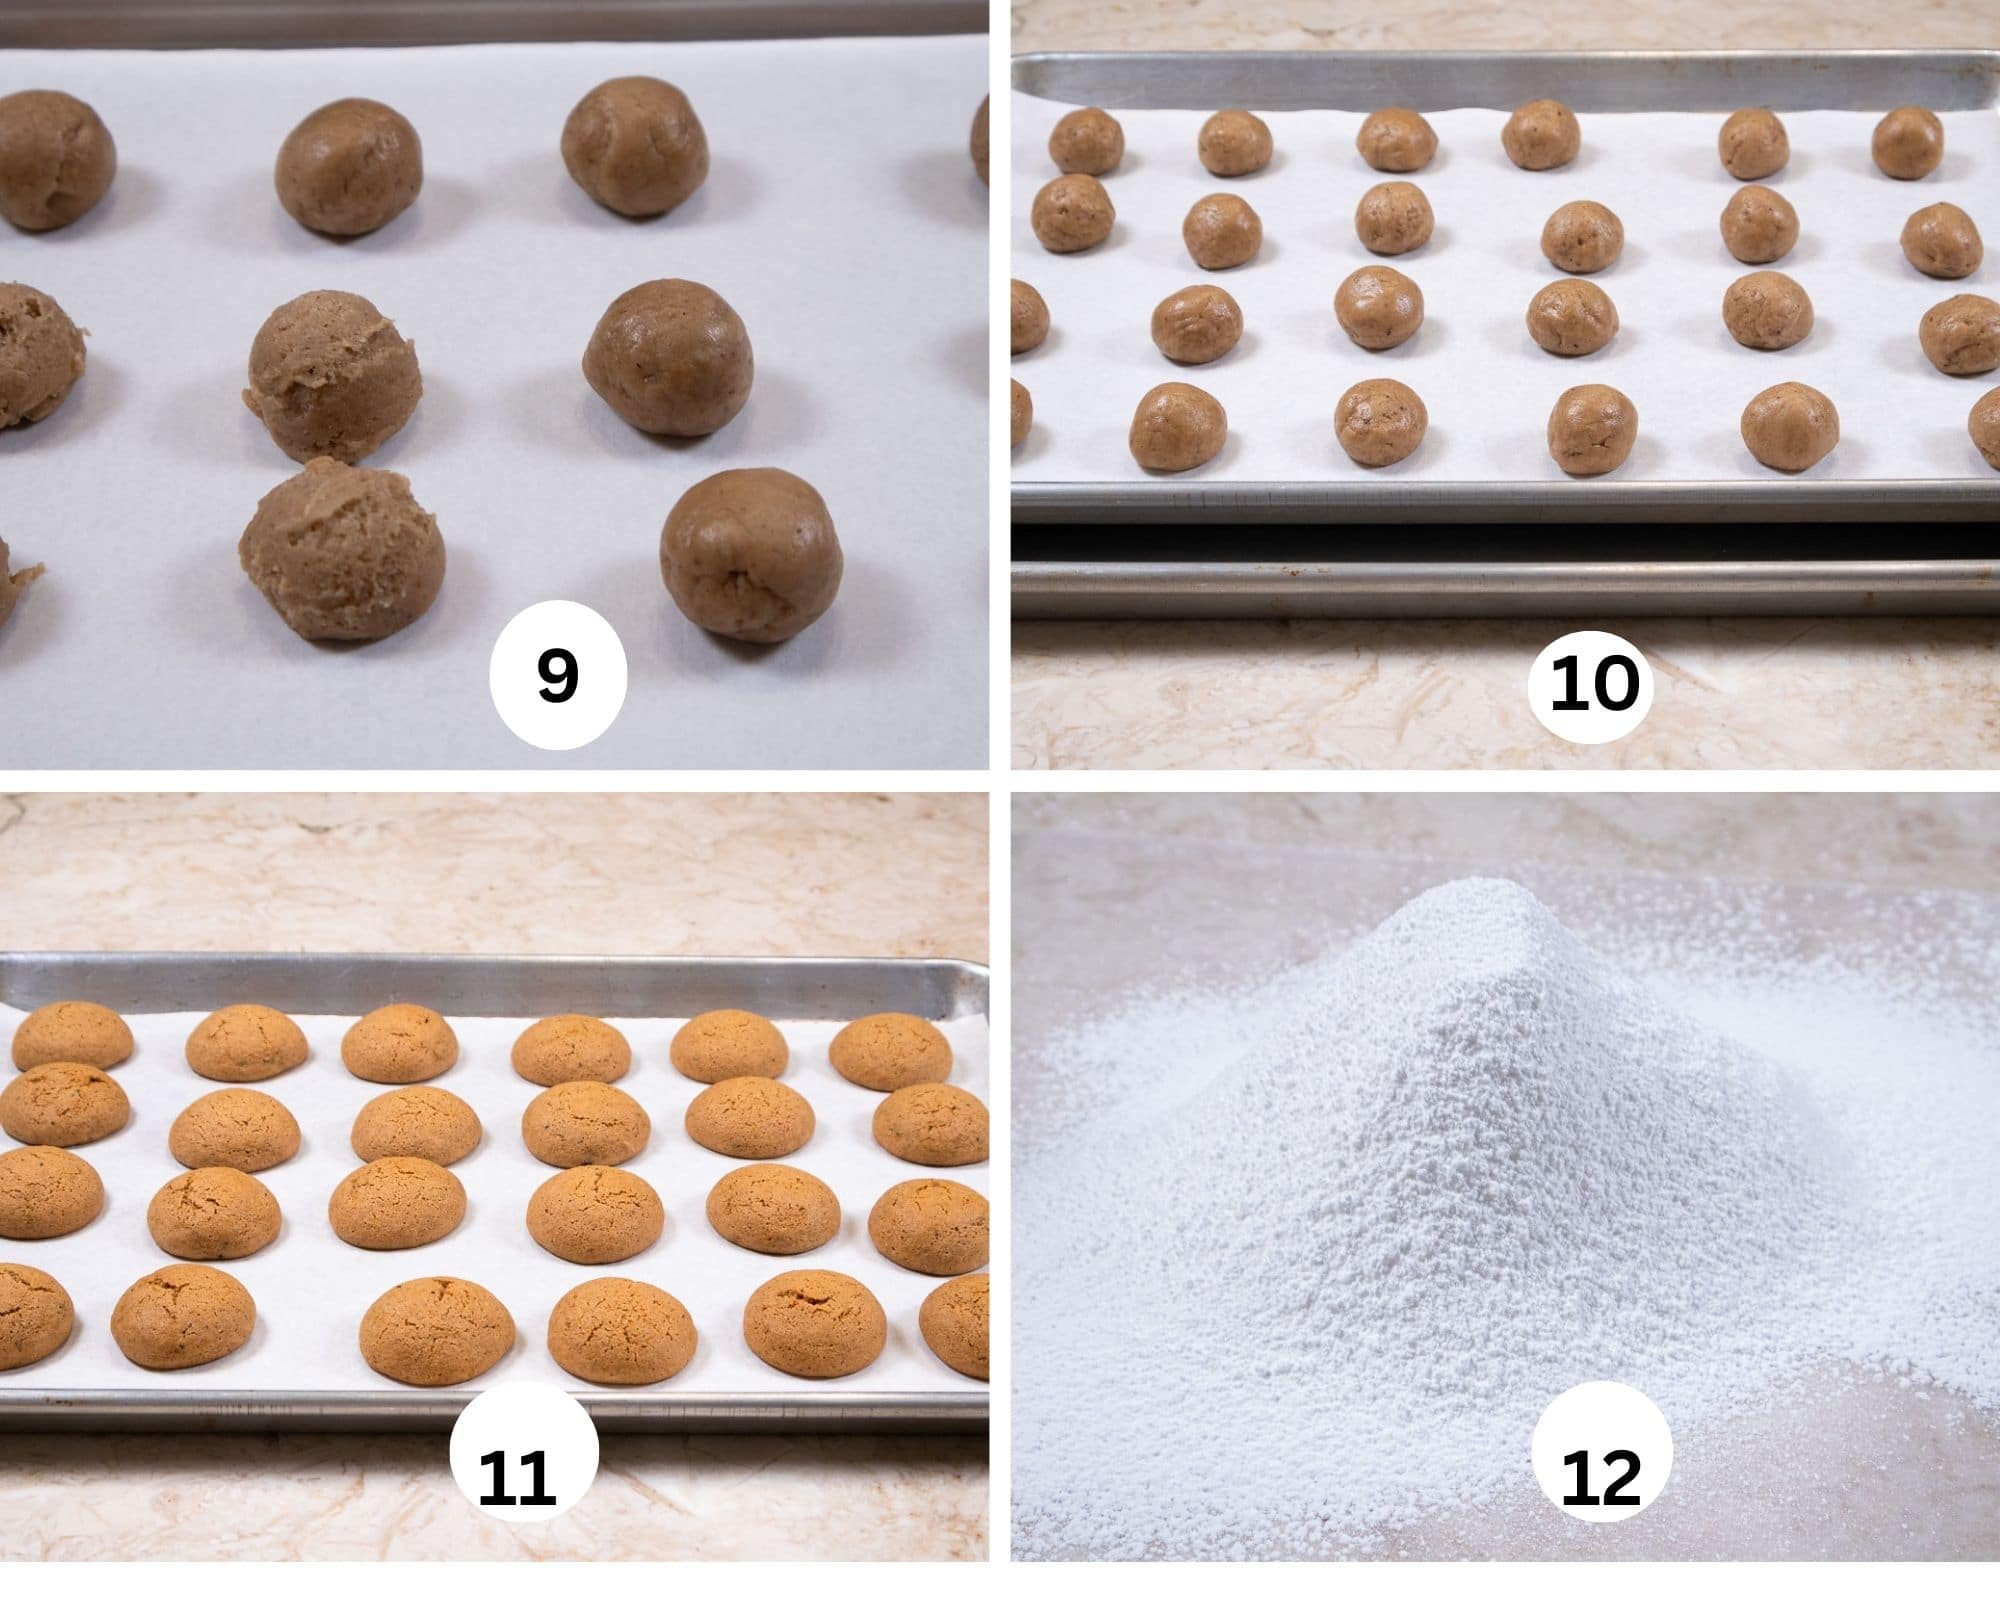
Step 9. The batter must be cold to scoop. Using a #70 disher/scooper or a tablespoon measure, scoop the cookies and line them up 4 across and 6 down on a parchment lined sheet pan. Roll them into smooth balls. Step 10. Double pan the Pryaniki before going into the oven. One pan is simply put on top of another pan. Step 11. Bake the cookies as called for. Step 12. Sift the powdered sugar for the glaze.
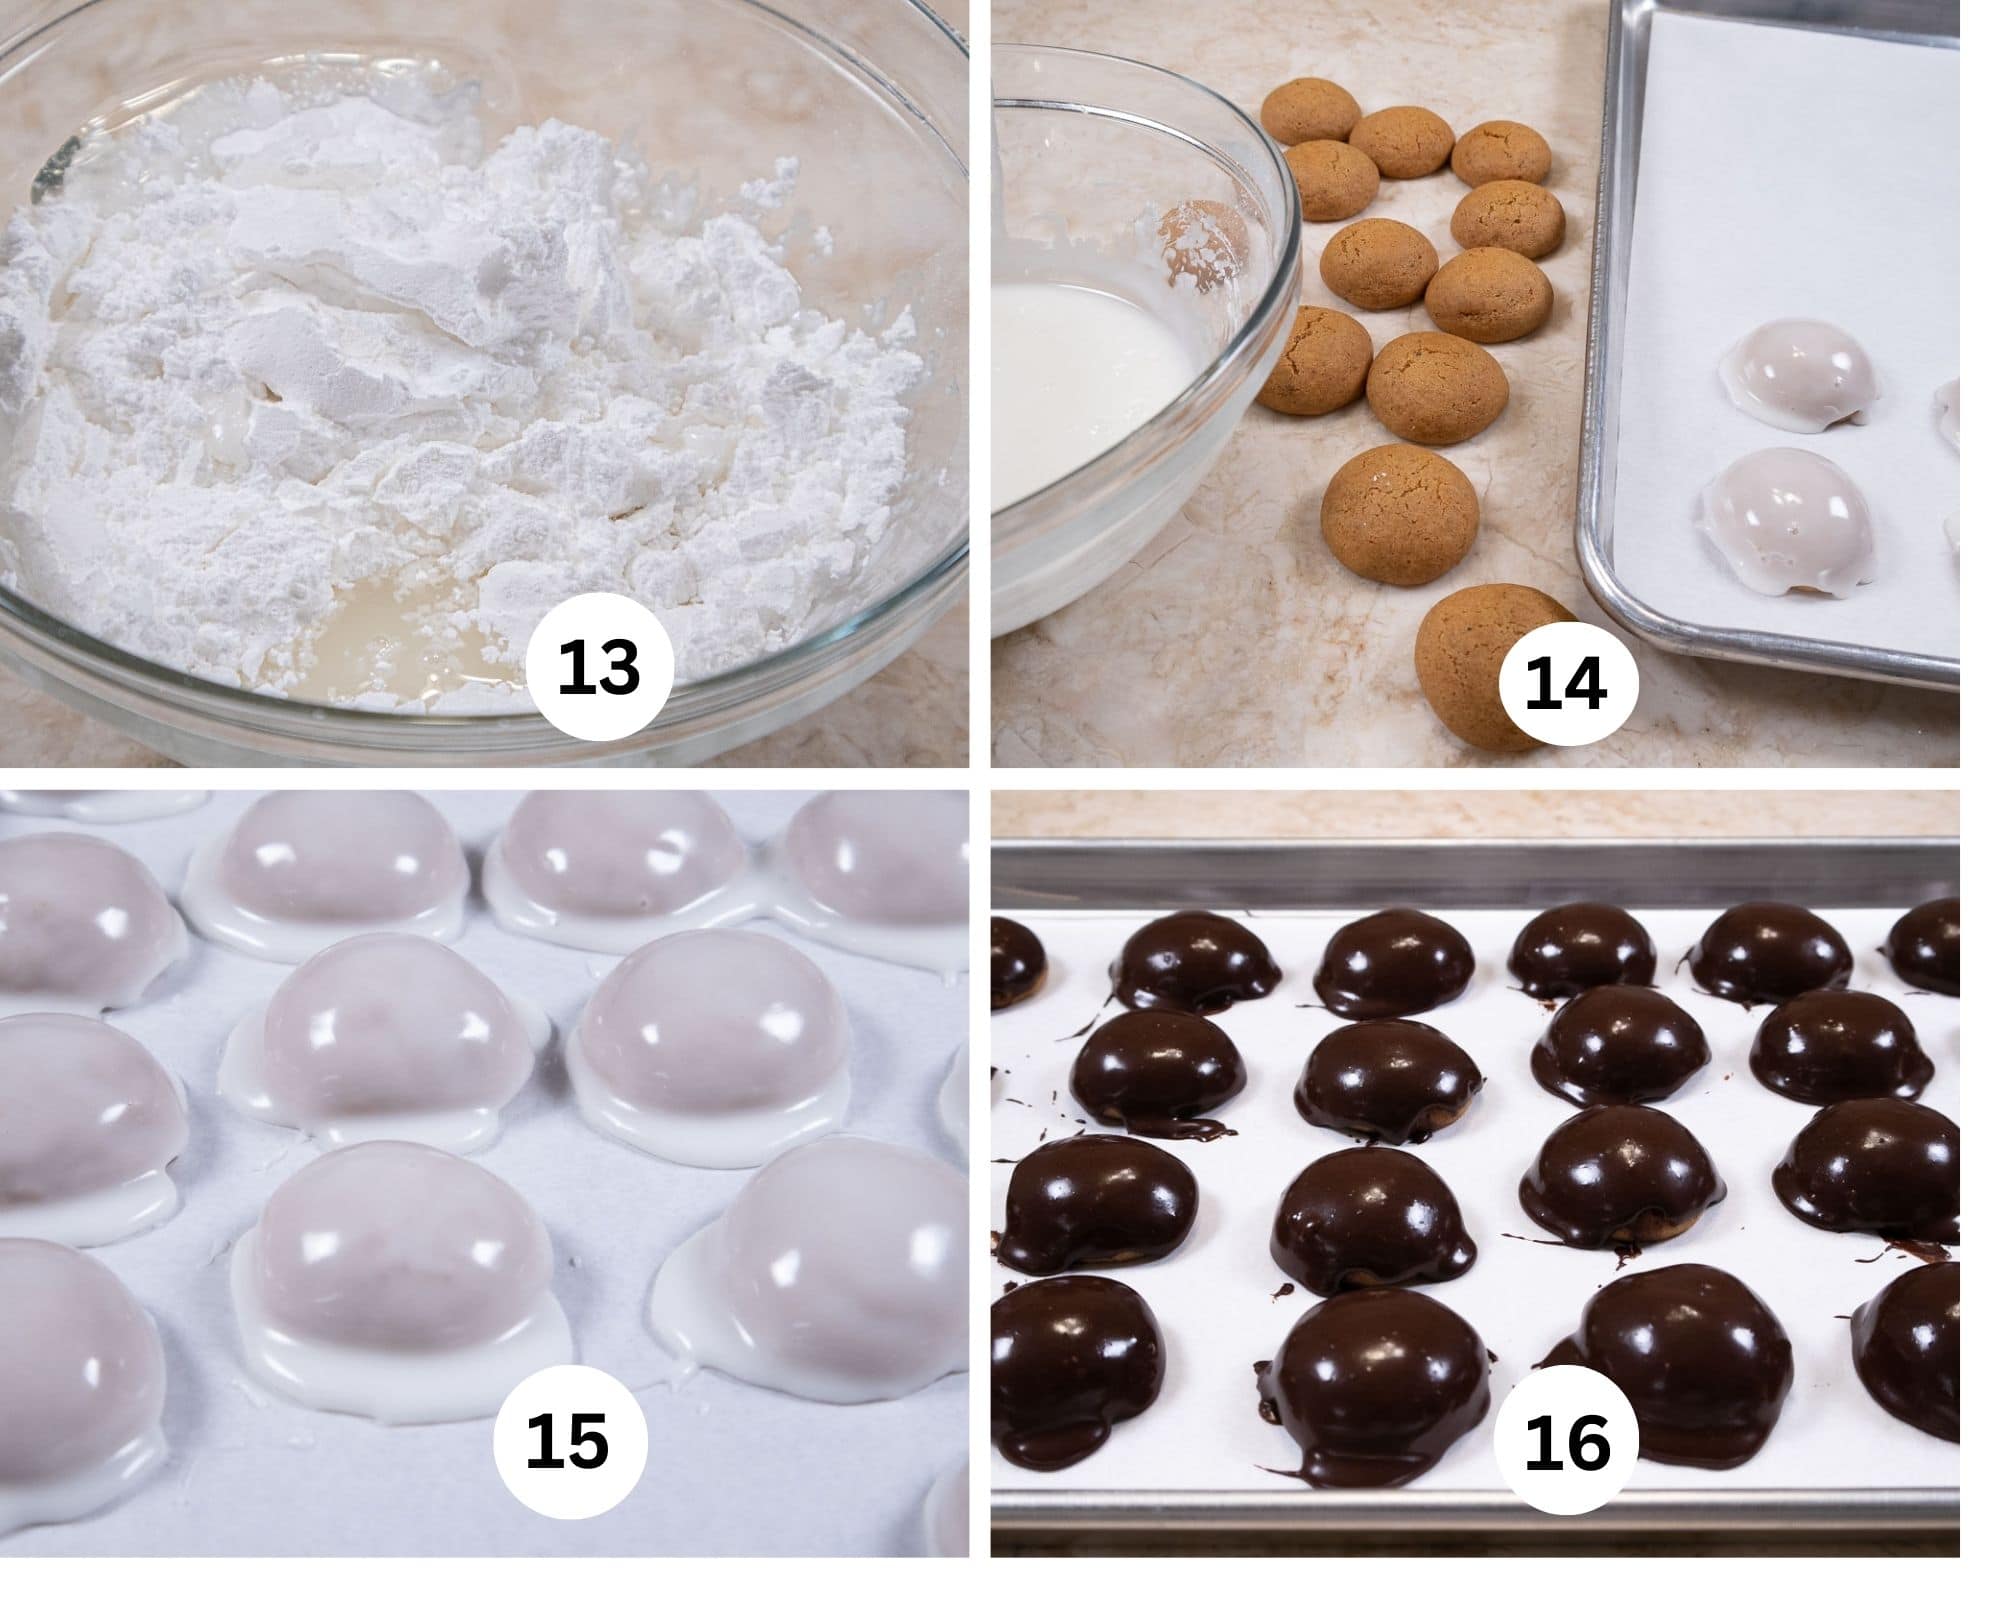
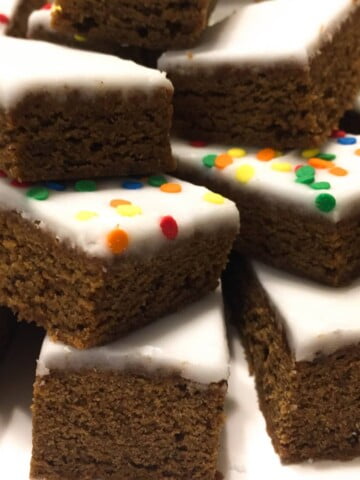
Step 13. Place all of the glaze ingredients in a bowl and stir until completely smooth. Do not use a whisk as it can make a lot of air bubbles that will show on the cookies. Step 14. Dip a cookie, top down, into the glaze. Dip up to the very edge. Place on a parchment lined tray to dry. Step 15. A tray of cookies with the glaze puddled. Step 16. A tray of chocolate glazed cookie. Let the glaze dry completely. This may take up to 48 hours. When completely dry, simply break off the puddled glaze.
Recipe FAQs
Pryaniki is the name of the Russian gingerbread and derives from the word 'pryany' which means 'spicy'. The first pryanik (singular cookie) appeared in Russia around the IX century and was called "honey bread". It was based on rye flour mixed with honey and berry juice.
They used to be served mostly at holidays such as Christmas and Easter, Weddings and Baptisms. Now they are commercially made and can be bought anytime.
Not at all. They are basically mixed in two steps and after chilling, shaped into balls and baked. The glazing takes a bit of time but is not at all difficult.
If you enjoy these, try out these Hello Dolly Cookies!
Expert Tips
- Sift the powdered sugar or the powdered sugar and cocoa together. Otherwise tiny bumps may show on the finished glazed cookies.
- Be sure to stir the glaze ingredients together. A whisk can incorporate air which can appear on the finished cookie.
- Plan ahead so you allow enough time to let the glaze dry completely.
- The cookies can be dipped in the glaze or they can be placed on a cooling rack and the glaze poured or spooned over them.
- After the cookies are finished, they can be stored in an airtight container for 7 to 10 days.
- These cookies mail well.

If you love these Pyraniki or any other recipe on my website, please leave a 🌟 star rating in the recipe card and let me know how it went the in 📝 comments below. I appreciate each of you being here!

Pryaniki - Russian Honey Spice Cookies
Ingredients
Cookies
- 2 teaspoons instant coffee
- ¼ cup water
- ½ cup unsalted butter
- ½ cup granulated sugar (100 grams)
- ¾ cup honey
- 2 teaspoons anise extract
- 1 teaspoon cinnamon
- ½ teaspoon nutmeg
- ½ teaspoon ginger
- ½ teaspoon cardamom
- ½ teaspoon coarse ground black pepper
- ¼ teaspoon cloves
- 1 large egg egg
- ¾ teaspoon baking soda
- ½ teaspoon white or cider vinegar
- ¾ teaspoon baking powder
- 3 cups all-purpose flour
White Glaze - This will coat about half of the cookies
- 1 ¾ cups powdered sugar (245 grams)
- 1 tablespoon light corn syrup
- 2 - 3 tablespoons water
Chocolate Glaze - This will coat about half of the cookies
- 1 ½ cups powdered sugar (200 grams)
- 6 tablespoons cocoa
- 1 tablespoon light corn syrup
- ¼ - ⅓ cup water
Instructions
- In a small saucepan, dissolve the instant coffee in the water. Add the butter, sugar and honey. Heat on medium until the butter is melted.
- Remove from the heat and whisk in the anise and all of the spices. Cool slightly. Place in the bowl of a mixer.
- Add the egg and baking powder.
- Dissolve the baking soda in the vinegar. It will bubble up and fizz. Add it to the ingredients in the mixer.
- Place the flour on top and beat on low to combine the ingredients, then on medium to mix them completely to make a batter.
- Place in a container with a lid and refrigerate at lease 6 hours or overnight. The batter must be completely cold to shape.
- When ready to shape, preheat the oven to 350°F. Line several baking sheets with parchment paper and set aside.
- With a #70 disher/scooper or a 1 tablespoon measure, scoop the cookies 4 across and 6 down on a half sheet pan. Roll them between our hands into smooth balls. If using another baking pan, be sure to leave at least 3" beween the cookies. They will at least double in size.
- Double Pan. Bake for 14 to 16 minutes. Do not overbake or they will become hard. Cool. At this point they can be glazed or held in an airtight container for a week or so before glazing.
- Another option is to shape the cookies, roll them into balls and freeze them for up to a month before baking and glazing. Thaw them at room temperature and bake as directed.
Glazing the Cookies
- Sift together the powdered sugar and cocoa or just powdered sugar.
- Add the corn syrup and the least amount of water. Stir with a spoon - do not whisk or air bubbles can form which will ruin the looks of the finished cookies.
- Dip the cookies top down into the glaze. Wipe the excess glaze that drips off on the side of the bowl or with your finger. Place, bottom down on parchment paper.
- Alternatively, place the cookies on a rack and spoon the glaze over the cookies to completely enrobe them. Move them with an offset spatula to parchment lined paper. The glaze will puddle around the bottom of the cookies. That is how it should be.
- Let them dry until the puddles are hard. It may take up to 48 hours depending upon the temperature of the room. Remove the excess glaze by simply breaking it off.
Notes
Nutrition


Eileen Murphy says
absolutely was the favorite 'new' cookie in our home this year.
Helen S Fletcher says
Hi Eileen - I admire their good taste. I could eat them all.
Eileen Murphy says
Hello Helen!
My DIL is from Russia. I made these for her Christmas visit. She told me they were better than the ones her mom brings when she comes for her annual visit.
Helen S Fletcher says
Yikes - don't let her tell her mom that Eileen. It won't go over well. My grandmother told my mother I made better Murbteig cookies than she did and to her dying day I don't think she forgave me. But I have to admit they are so good. Wonderful of you to make them for a friend. You are so thoughtful. Happy New Year to you.
David Darbyshire says
Hey Helen!
I made these last week for everyone, and they were a huge hit. I omitted the anise, and ground up the spices just before I threw them in. They're gentle and beautifully spiced. Definitely going to make them again. Thank you for this recipe. Greatly appreciated!
Also I really appreciate you offering different measurements for your ingredients, such as ounces, grams etc. Our volume measurements in Australia are different to yours, and those in the UK. An old friend of mine's mum used to have 3 sets of measuring cups and spoons for that purpose. I breathe a sigh of relief when I see measurements in grams.
Thank you once again for this recipe.
Helen S Fletcher says
Hi David, So happy you made one of my favorites. I found out years ago that the English have one set of measurements, the Australians another and we have another. In my first book, The New Pastry Cook, in 1986 I used grams and ounces then. Everyone in the US thought I was a bit on the nutty side. I pushed scales until they knew I was. I am so happy that both are being accepted now by Americans. It so easy to use a scale and so consistent. This week I start posting a new cookie recipe for the next 9 weeks. There will be more for you to make. Also, one of my favorites as well as my family's favorite recipes is the Spice Bars that comes from the Bourke Street Bakery from their book "All Things Sweet" They serve it as a cake, I cut it into bars. Really good.
Jan Greenwood says
I taste of this cookie is great. I followed the recipe exactly and my cookies are flatter.I don’t know why. Refrigerated overnight too. I like the looks of yours. Any suggestions?
Helen S Fletcher says
Hi Jan, did you weigh your flour? How did you shape them? With a #70 disher/scooper or the tablespoon>
Jan Greenwood says
I did weigh the flour and I used a tablespoon. The taste is great but I wanted them to look cute like yours. I’ll try again. I am make in all the cookies you are posting… just finished the Italian coolies and they turned out great. Your instructions were spot on; thank you.
Helen S Fletcher says
The scooper helps a lot and then rolling them between your hands into balls. But you're right, they taste good no matter what. If you got more with the tablespoon, try dividing the dough into as many cookies as I got out. That might make them a bit bigger.
David Darbyshire says
Hello Helen (and Jan),
I just saw this and can offer a possible solution. I've been baking Lebkuchen for years, mostly fashioned into little half-spheres such as these.
I always make sure the balls of dough are chilly before they go in the oven. This generally isn't an issue if it's winter (and you don't handle the balls too much), but in summer I refrigerate the balls for an additional 30-45 minutes before they go in the oven. This way the outside heats and sets faster than the inside, both retaining the shape and ensuring a crisp outside yet soft inside.
I hope this helps you end up with a 'cuter' cookie!
Helen S Fletcher says
Hi David, Thank you for your comment, but these are not meant to flatten. These baked exactly as they should. I do agree that some cookies need to be chilled before baking to ensure they don't spread. I've found Lebkuchen a challenge as the cookies often bake up really hard. Do yours?
David Darbyshire says
Hello Helen,
Replying to your message via an older one. Your last message didn't include a reply link.
I don't make my Lebkuchen flat, unless I'm doing a Lebkuchenhaus (gingerbread house). Mine are the same shape (though smaller) as your pryaniki.
Oof yeah I know what you mean. Lebkuchen always seems a minute in the oven between underdone and hard as stone. I find the key is strictly less time in the oven - pull them out at 13 minutes or when they've expanded slightly. 15 and they'll end up overdone, guaranteed.
Do you have the same problem with Pfeffernüße coming out hard?
I'll be baking your pryaniki in the next few weeks. Very much looking forward to test driving this recipe!
Helen S Fletcher says
Hi David - I haven't tried the soft Lebkuchen. I see recipes for the flat ones but not the soft ones. I'll have to look harder I guess. I absolutely do have a problem with over baking the Pfeffernuse and the Pryaniki. But they are so good! You're right, pull them early from the oven rather than later and make sure the oven is true in temperature or adjust one way or the other. Thanks for a good conversation.
Laurie Macrae says
Your post says "...But there is more as the saying goes. These cookies need to be aged before finishing..." My question is, why do the cookies need to be aged before finishing? I don't see instructions for this in the recipe. Thank you!
Helen S Fletcher says
Hi Laurie. In the notes on the recipe card it says, " These cookies need to be aged for a week or so for the spices to meld." Most cookies that are spice heavy need to be aged or the spices are sharp. This mellows them out so they all work together. Hope this helps.
Don says
Hi Helen -
Fantastic recipe to post and I cannot wait to try these. I love Pfeffernusse and cannot wait to give these a whirl. Thanks for your great posts. I love everyone of them - along with your commentary. I'm headed to the wineries this weekend and think this will be a perfect addition to share with friends. Best!
Helen S Fletcher says
Hi Don, OMG these would be great with a red wine or in my husband's case - a white wine. Enjoy the weekend.