
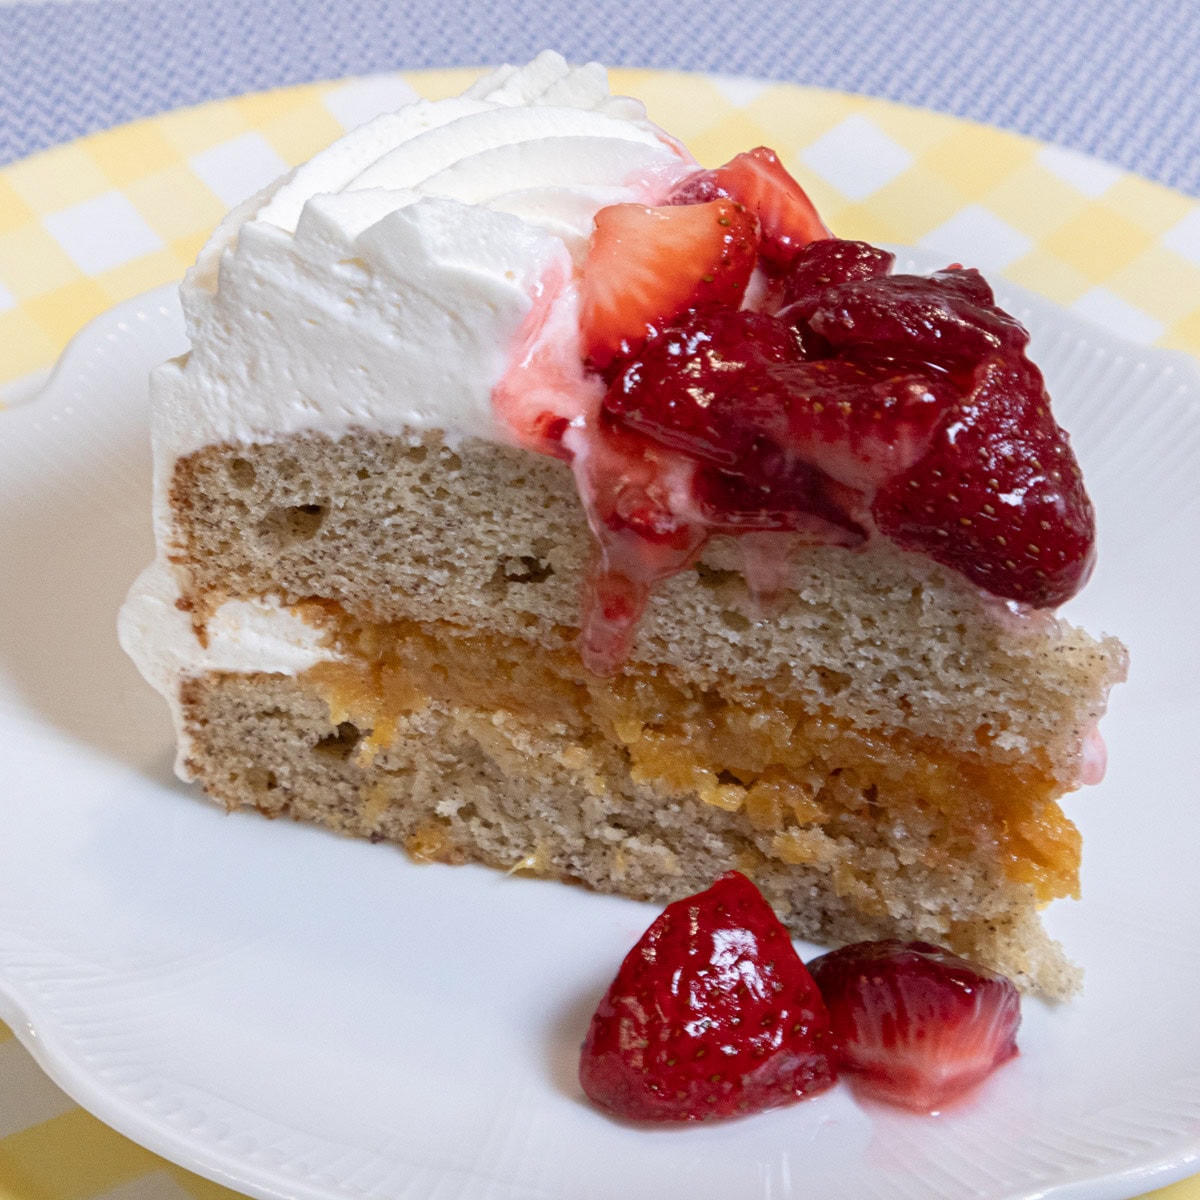
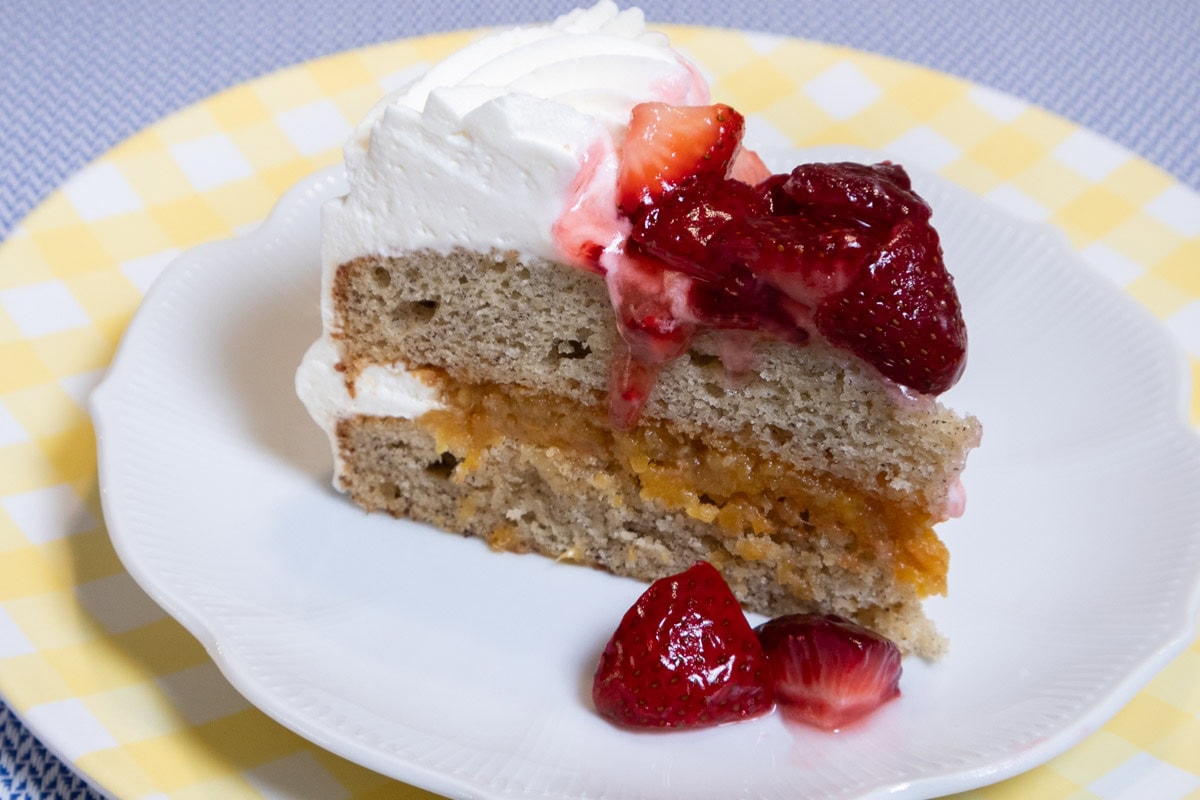
My Best Banana Cake Recipe forgoes the heavier banana cakes laden with substantial buttercreams in favor of a light cake filled with caramelized pineapple and topped with fresh strawberries and whipped cream. It's the perfect summer dessert. I have included a Make Ahead Schedule for your convenience.
This cake is unusual in that it uses both butter and oil, each one serving its own purpose. Although lighter in texture it is loaded with banana flavor.
A few other great lighter cakes include: A Quick and Easy Summer Tea Cake, Strawberry Cake - A Little Slice of Heaven, Lemonade Cake with Blueberry Sauce, Mini Pineapple Upside Down Cakes, and one of the quickest, easiest cakes ever the Orange Almond Teacake. You might also want to take a look at my Two Step Banana Bread. It is truly the easiest and the best.
Looking for a delicious fruity cupcake recipe? Try this Strawberry Surprise Cupcake Recipe.
This post is a complete redo of the Fruit Basket Banana Cake originally posted on May 11, 2015. It features a completely updated recipe, new photography and ton of new information to ensure your success.
Jump to:
- Why Butter and Oil?
- The Caramelized Pineapple Filling
- The Uncooked Fresh Strawberry Topping
- My Mistake When Finishing the Cake
- What Makes this Banana Cake Special
- Make Ahead Schedule
- Recipe Ingredients
- Key Ingredients
- Step by Step Instructions
- Recipe FAQS
- Expert Tips
- More Fruit Oriented Recipes
- My Best Banana Cake Recipe
Why Butter and Oil?
While most cakes use one or the other there are definite benefits to using both. The butter is used for flavor while the oil is used to keep the cake moist.
When I had my bakery, I thought I had to use butter cakes since we were upscale. The problem was they dry out faster than those made with oil, such as chiffon cakes. However, combining the two makes a perfectly balanced cake - flavor and longevity.
The Caramelized Pineapple Filling
This recipe starts with fresh pineapple. I was astounded by the high price of fresh pineapple chunks at my grocery store and quickly switched to a whole fresh pineapple which was about a third of the price. I'm going to show you how easy it is to clean and cut the pineapple in just a few minutes.
It is important use underripe but not totally green pineapple because they don't exude as much juice as ripe pineapple when caramelized. Larger chunks are also recommended so they don't break down when caramelizing.
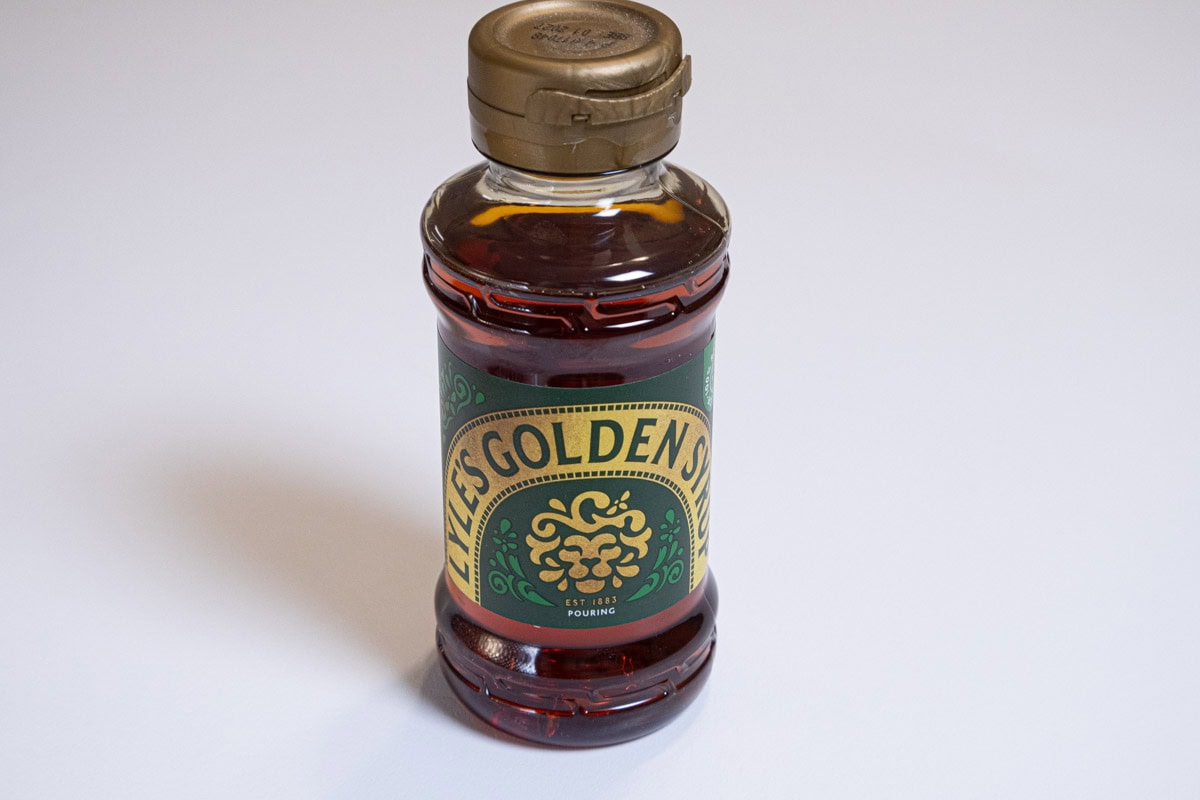
One of my favorite ingredients, Golden Syrup, is used to ensure the syrup doesn't granulate and become grainy as it can if just sugar is used. There are several brands of Golden Syrup but Lyle's Golden Syrup is the one I prefer and is easily found on Amazon or in International Food Stores.
The Uncooked Fresh Strawberry Topping
Have you ever marveled at the glossy fresh fruit toppings in stores and wondered how they did it? It's Instant Clearjel! Using Instant Clearjel is an easy way to thicken fresh fruit without cooking it which I believe changes its taste. I'm not a fan of using strawberry jello as it uses artificial flavors which tastes - well, artificial. While I usually go to Amazon for a lot of products, I find their offerings for this product confusing and use Nuts.com to purchase this. Whatever you decide to use make sure it is INSTANT.
There are two types of Clearjel so it is important to use the correct one. Clearjel has to be cooked to gel and breaks down if frozen and thawed, Instant clear gel does not. It can be frozen and thawed with the item kept in tact. I have used it in several recipes including: Almost No Bake Strawberry Pie which has detailed information on the two types of gel, and the naturally gluten free Lemon Strawberry Cake.
My Mistake When Finishing the Cake
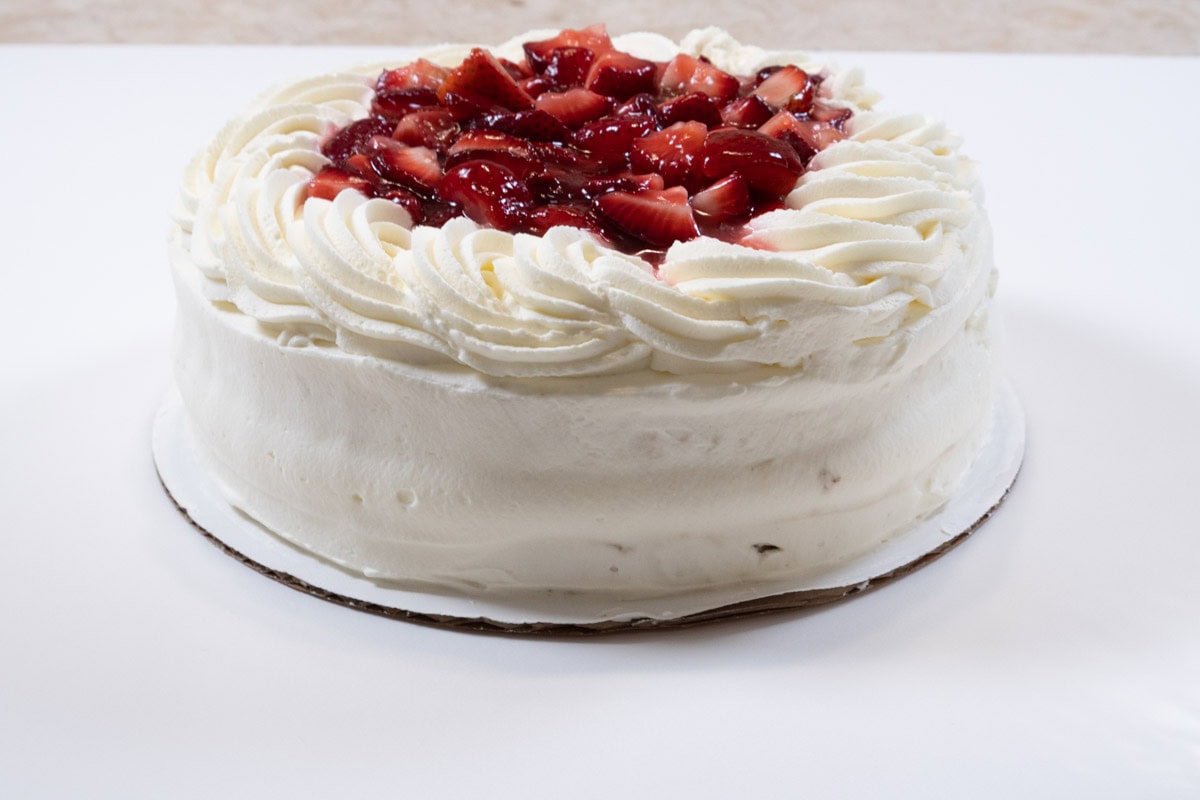
I made a rookie mistake and should have known better. I often freeze the layers of a cake before assembling to make it easier or when made ahead. However, they should be thawed to where only the edges remain a bit firm. Consequently, after the cake was assembled the top layer of whipped cream poked out because the cake settled when thawed. So the lesson here is don't do this.
Also, if making this the day before, the strawberries can bleed into the whipped cream. So finish the cake with whipped cream. Then make the strawberries as called for, putting them in a bowl and covering with plastic wrap. Add to the middle of the cake shortly before serving if you don't want them to bleed.
What Makes this Banana Cake Special
- It's such a great combination of flavors - bananas, strawberries and pineapple - it's hard to go wrong.
- The cake is light and very easy to make
- The cake layers can be made ahead of time and frozen for several months, well wrapped,
- Caramelized Pineapple can be made a week ahead and refrigerated - ready when you are.
- The fresh strawberry topping requires no cooking.
- Assembly is simple.
Make Ahead Schedule
- Make the caramelized pineapple up to a week ahead and refrigerate. It must be made at least the day before using.
- Bake the banana cake layers, freeze them, wrap the well in foil and freeze for up to two months.
- Make the strawberry filling the day ahead of assembling the cake. Place it in a covered container and refrigerate.
- Whip the cream and refrigerate up to a day ahead of assembling.
- Fill the cake with the caramelized pineapple.
- Frost and edge it with the whipped cream. Refrigerate overnight.
- Several hours before serving, fill the center with the strawberries.
Recipe Ingredients
Caramelized Pineapple Filling
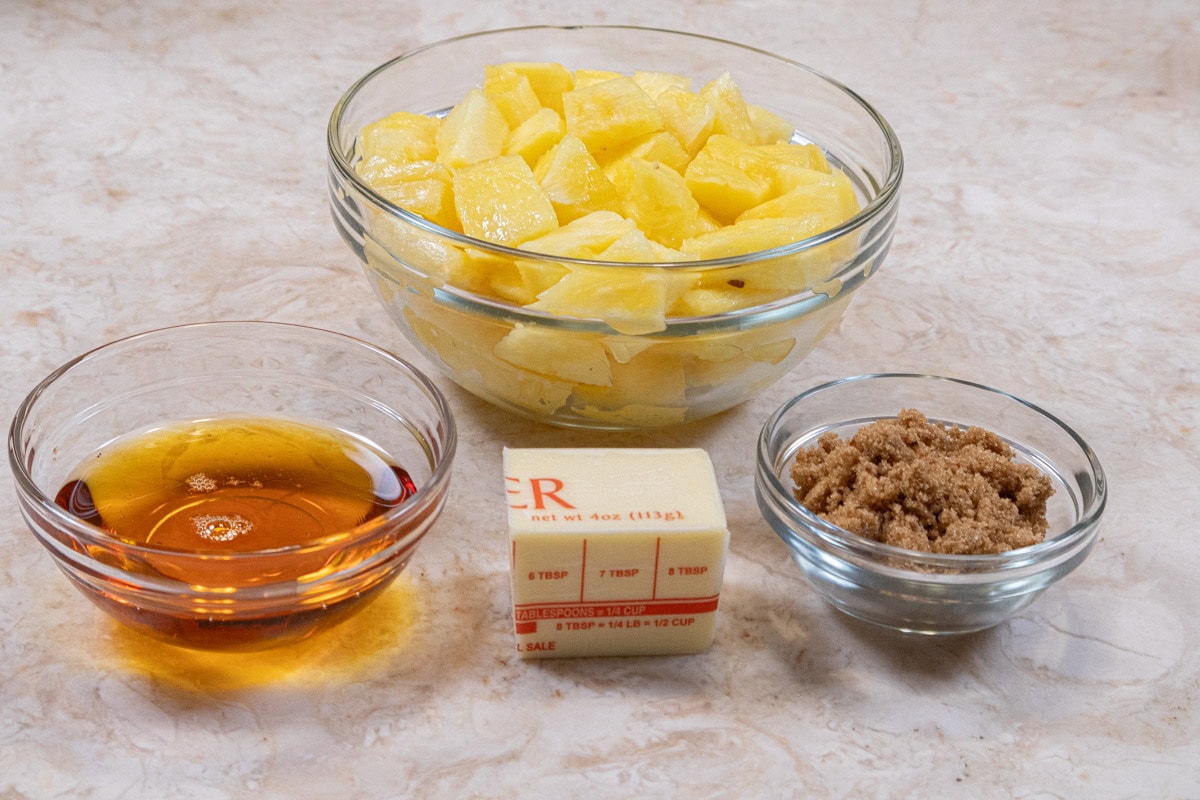
Ingredients are: Golden Syrup , unsalted butter, brown sugar, and fresh pineapple.
Banana Cake

Ingredients for the Banana Cake include: Cake Flour, granulated sugar, ripe bananas, oil, buttermilk, eggs, unsalted butter, baking powder, salt and baking powder.
Filling and Finishing the Banana Cake
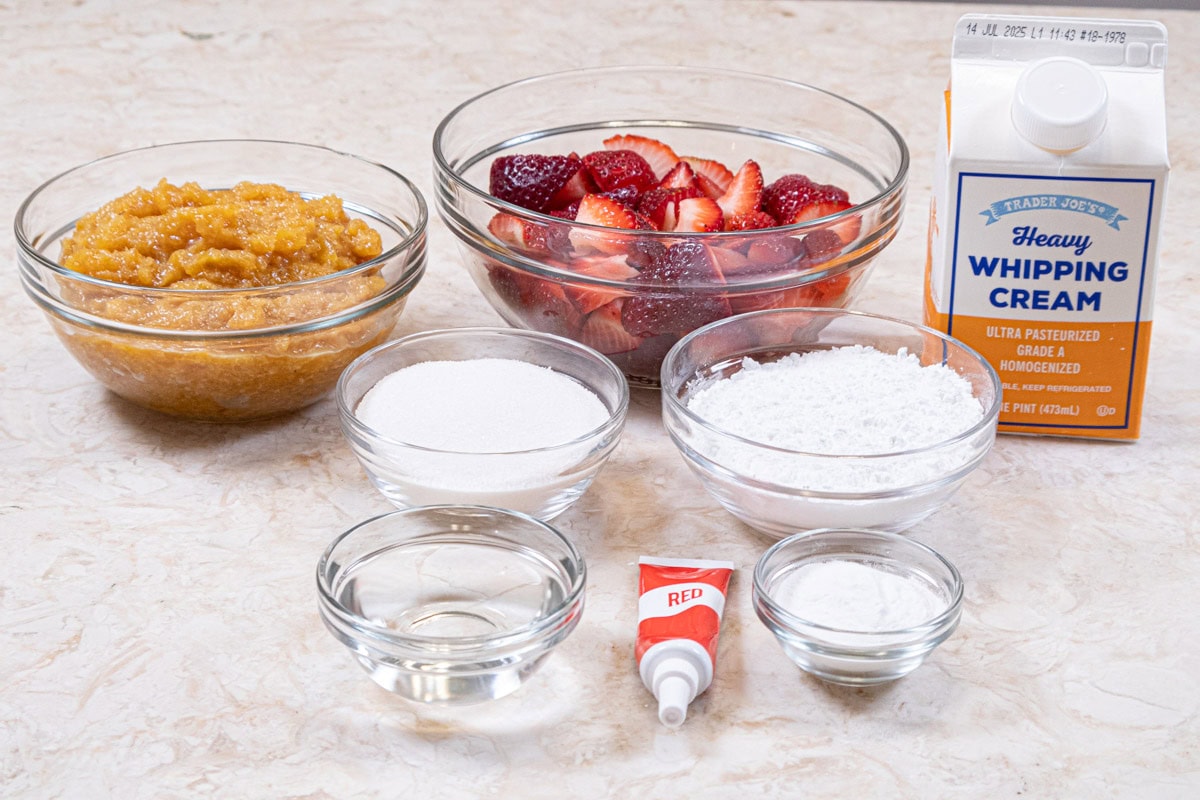
The ingredients are: Caramelized pineapple, fresh strawberries, heavy cream, granulated sugar, powdered sugar, water, red food coloring (optional) and clearjel.
Key Ingredients
- Under ripe fresh pineapple is a necessity for this recipe. Canned pineapple does not have the same flavor.
- Golden Syrup is recommended for the flavor it adds but corn syrup may be substituted.
- Dark Brown Sugar has a deeper flavor than light brown sugar.
- Cake Flour is used for its low protein count yielding a lighter cake than using all-purpose flour. I don't recommend using all-purpose flour.
- Make sure the bananas are ripe. The skins should be speckled or marked heavily with brown. However, do not let the skins become black.
- The oil can be canola oil or vegetable oil. Olive oil is too strong. The oil helps keep the cake moist.
- Buttermilk adds moisture to the cake batter.
- Instant Clearjel is used to set the strawberries and give them a glossy finish as well as sweeten them.
- Gel Food Coloring works better than the liquid food coloring. It doesn't add additional liquid into the recipe,
- Heavy Cream is used for its ability to hold its shape without stabilizing it in any way - no cornstarch, no gelatin, no anything. This is how we did it at the bakery.
Be sure to see the recipe card below for the full ingredients and instructions.
Step by Step Instructions
Preparing the Fresh Pineapple
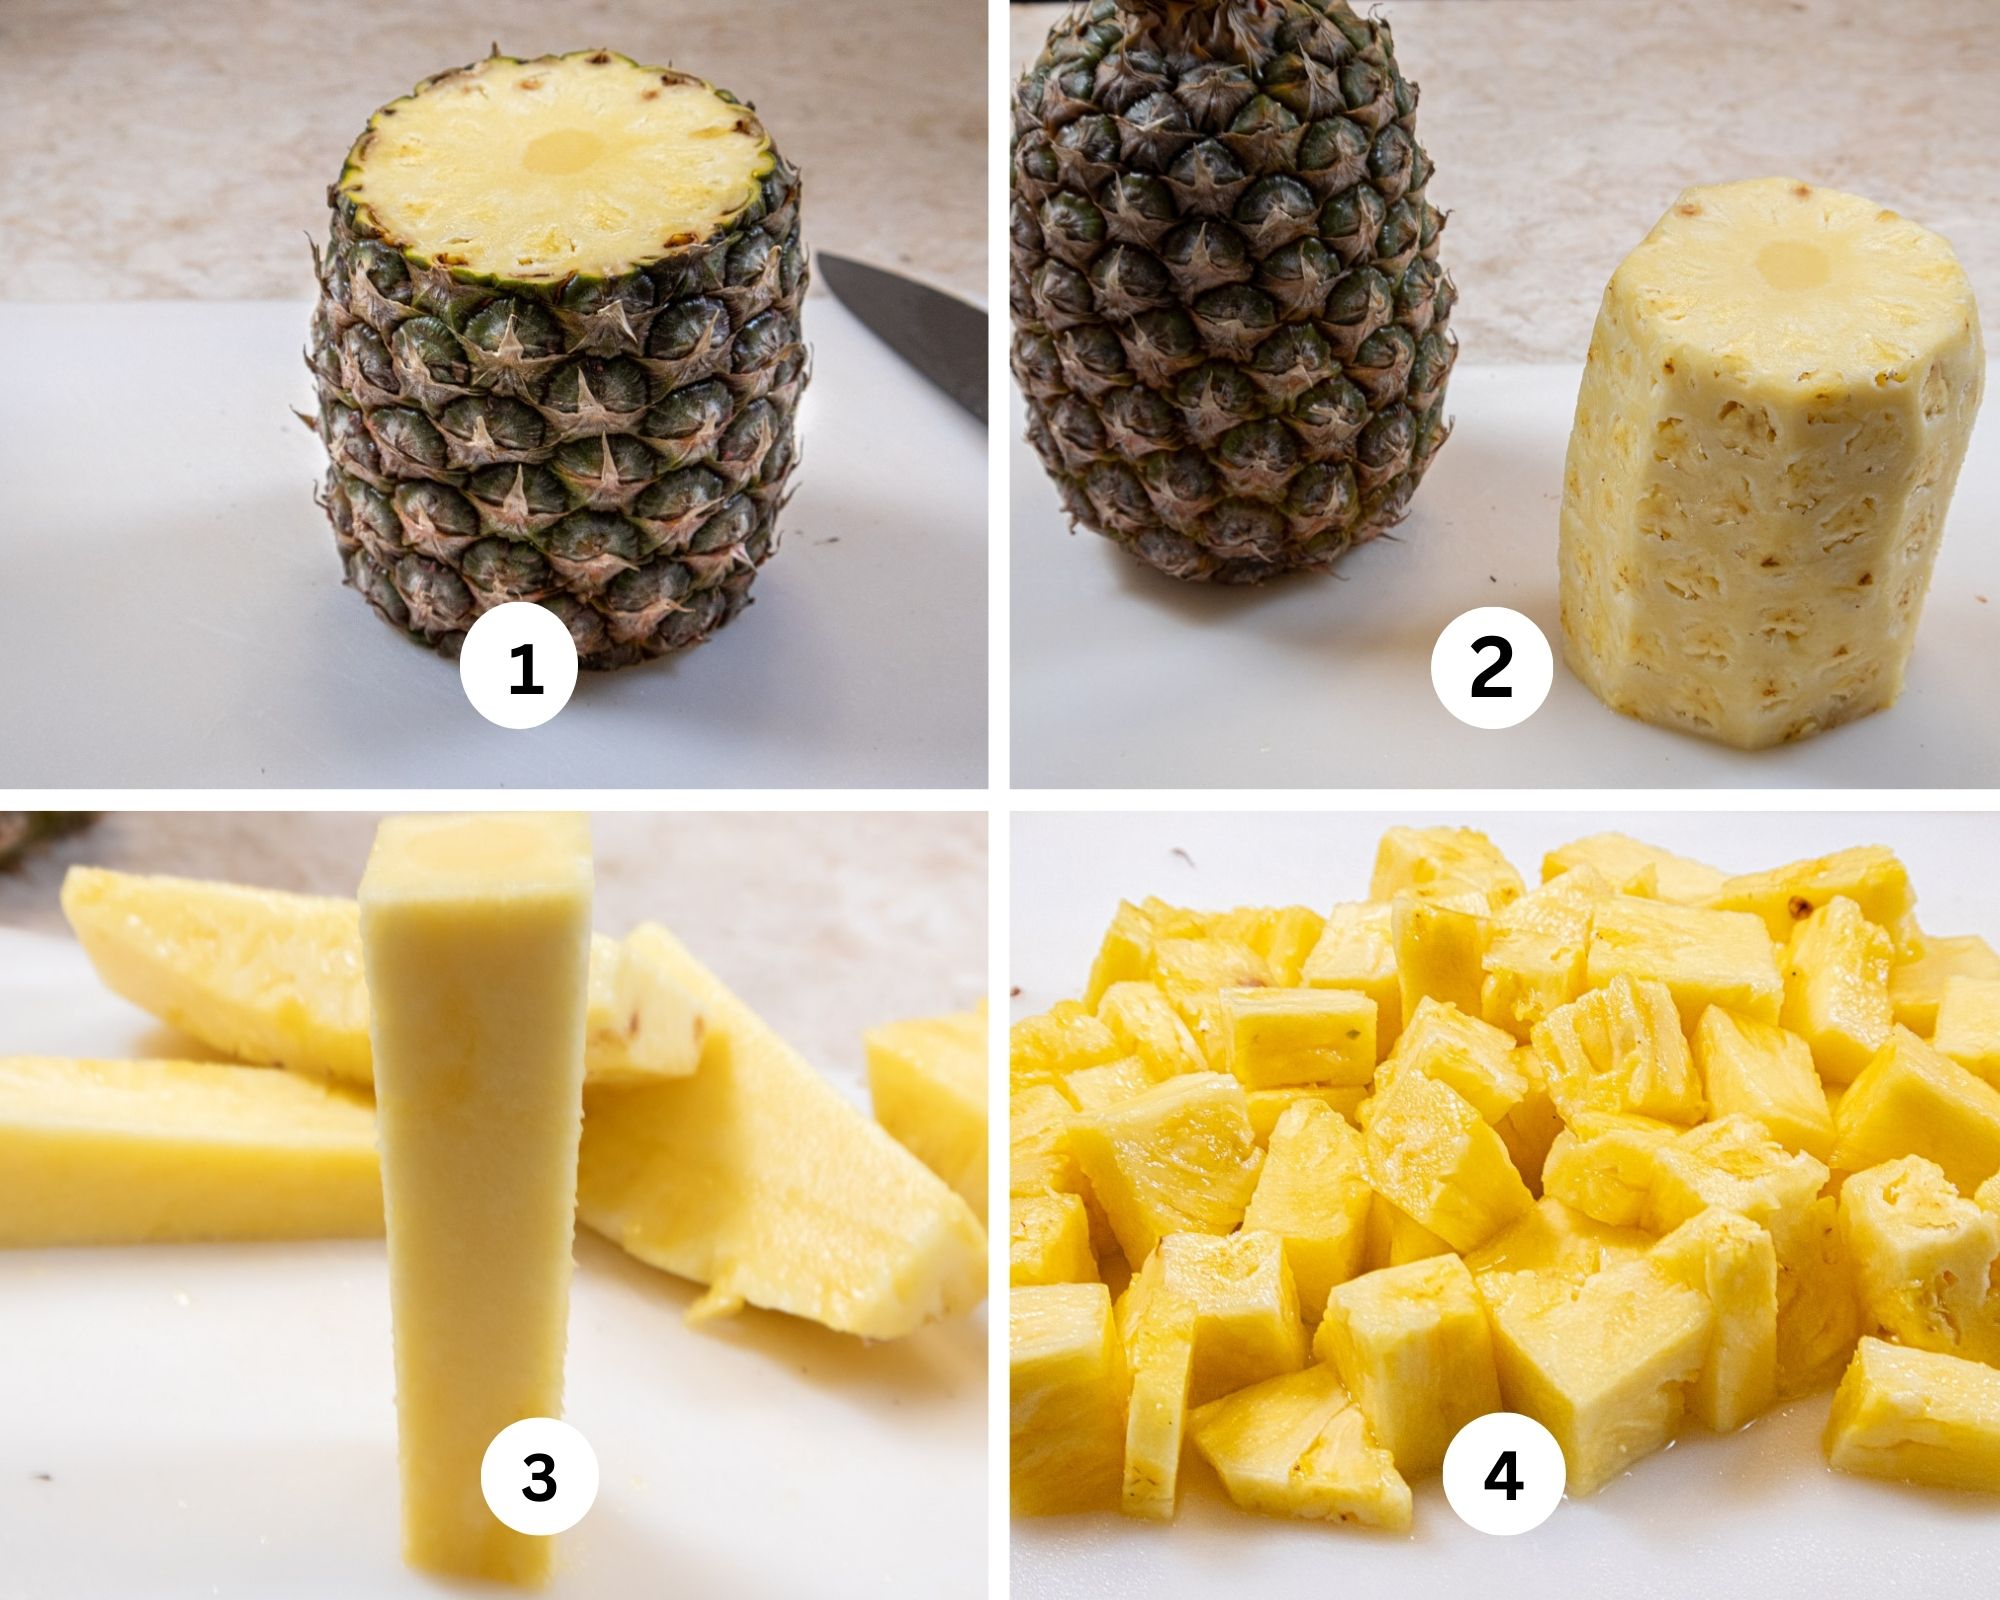
Step 1. Cut the top and bottom off the pineapple. Step 2. Stand the cleaned pineapple up. Step 3. Slice the pineapple away from the core one side at a time leaving only the hard core standing. Step 4. Cut the pineapple spears into large chunks. Set aside. This step can be done the day before if desired.
Caramelized Pineapple
This should be made at least a day before using so it can set up in the fridge.
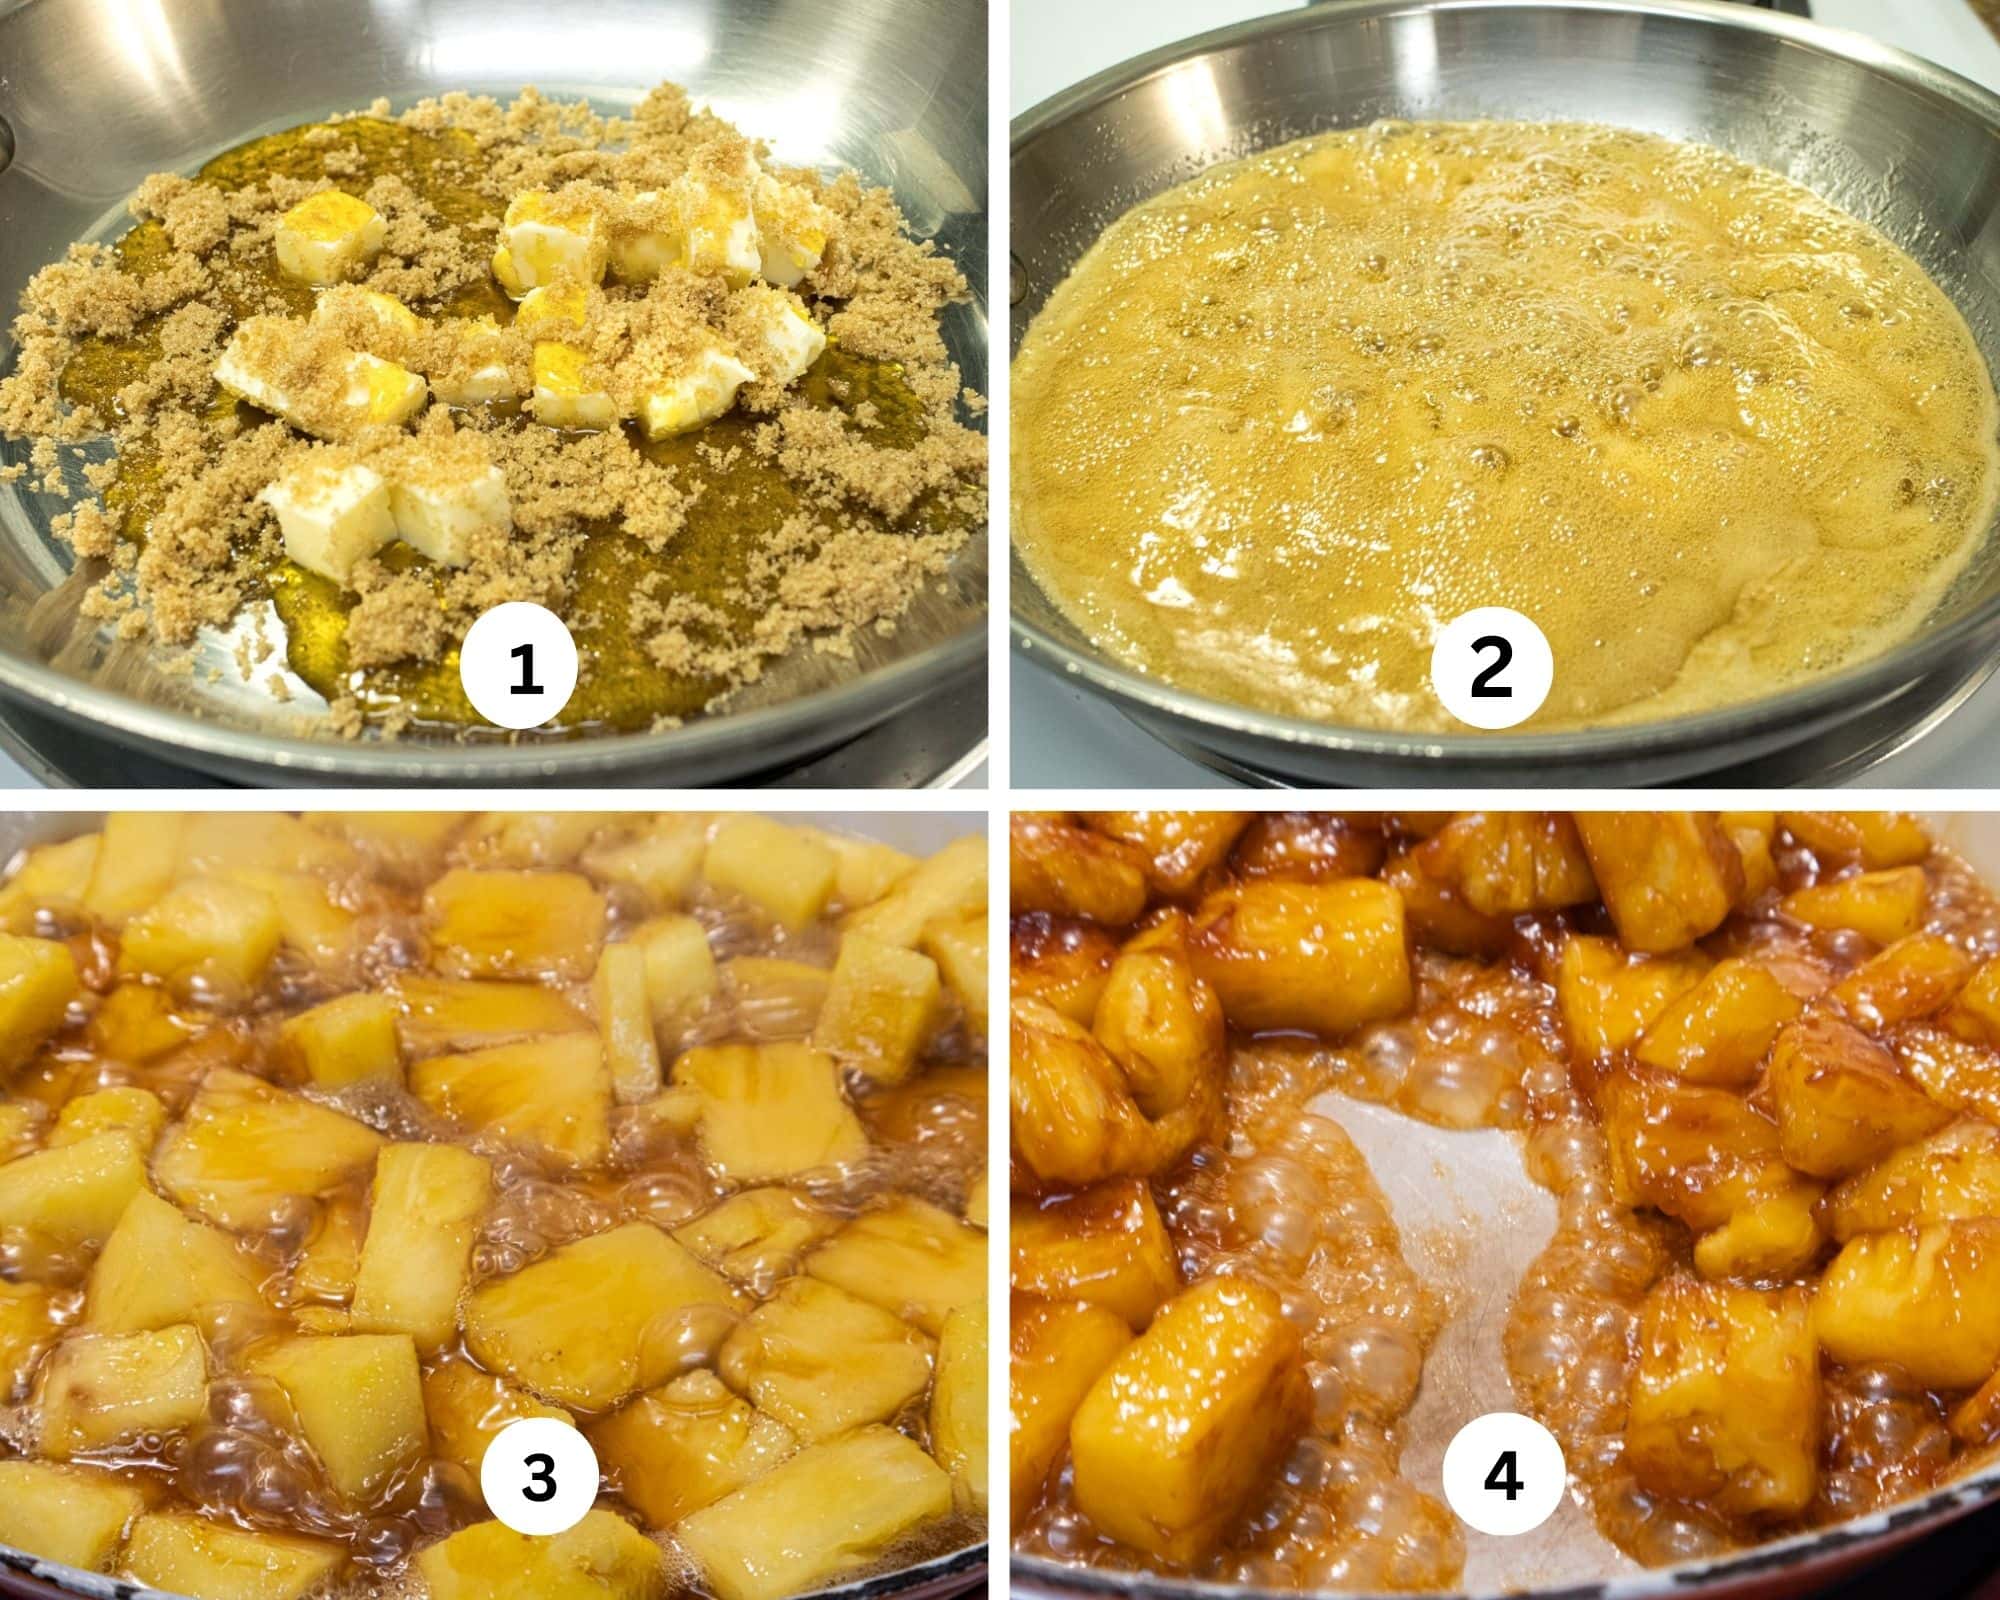
Step 1. Add the butter, brown sugar and golden syrup to a skillet large enough to hold all the pineapple in one layer. Step 2. Bring the mixture to a rolling boil. Step 3. Add the pineapple chunks. Step 4. Cook over medium heat until most the liquid of the syrup and juice from the pineapple are reduced to a thick syrup that stays apart briefly when separated with a spoon. Cool, place in a container and refrigerate until cold or up to a week ahead of time.
Banana Cake
The layers can be made ahead, wrapped and frozen for several months.
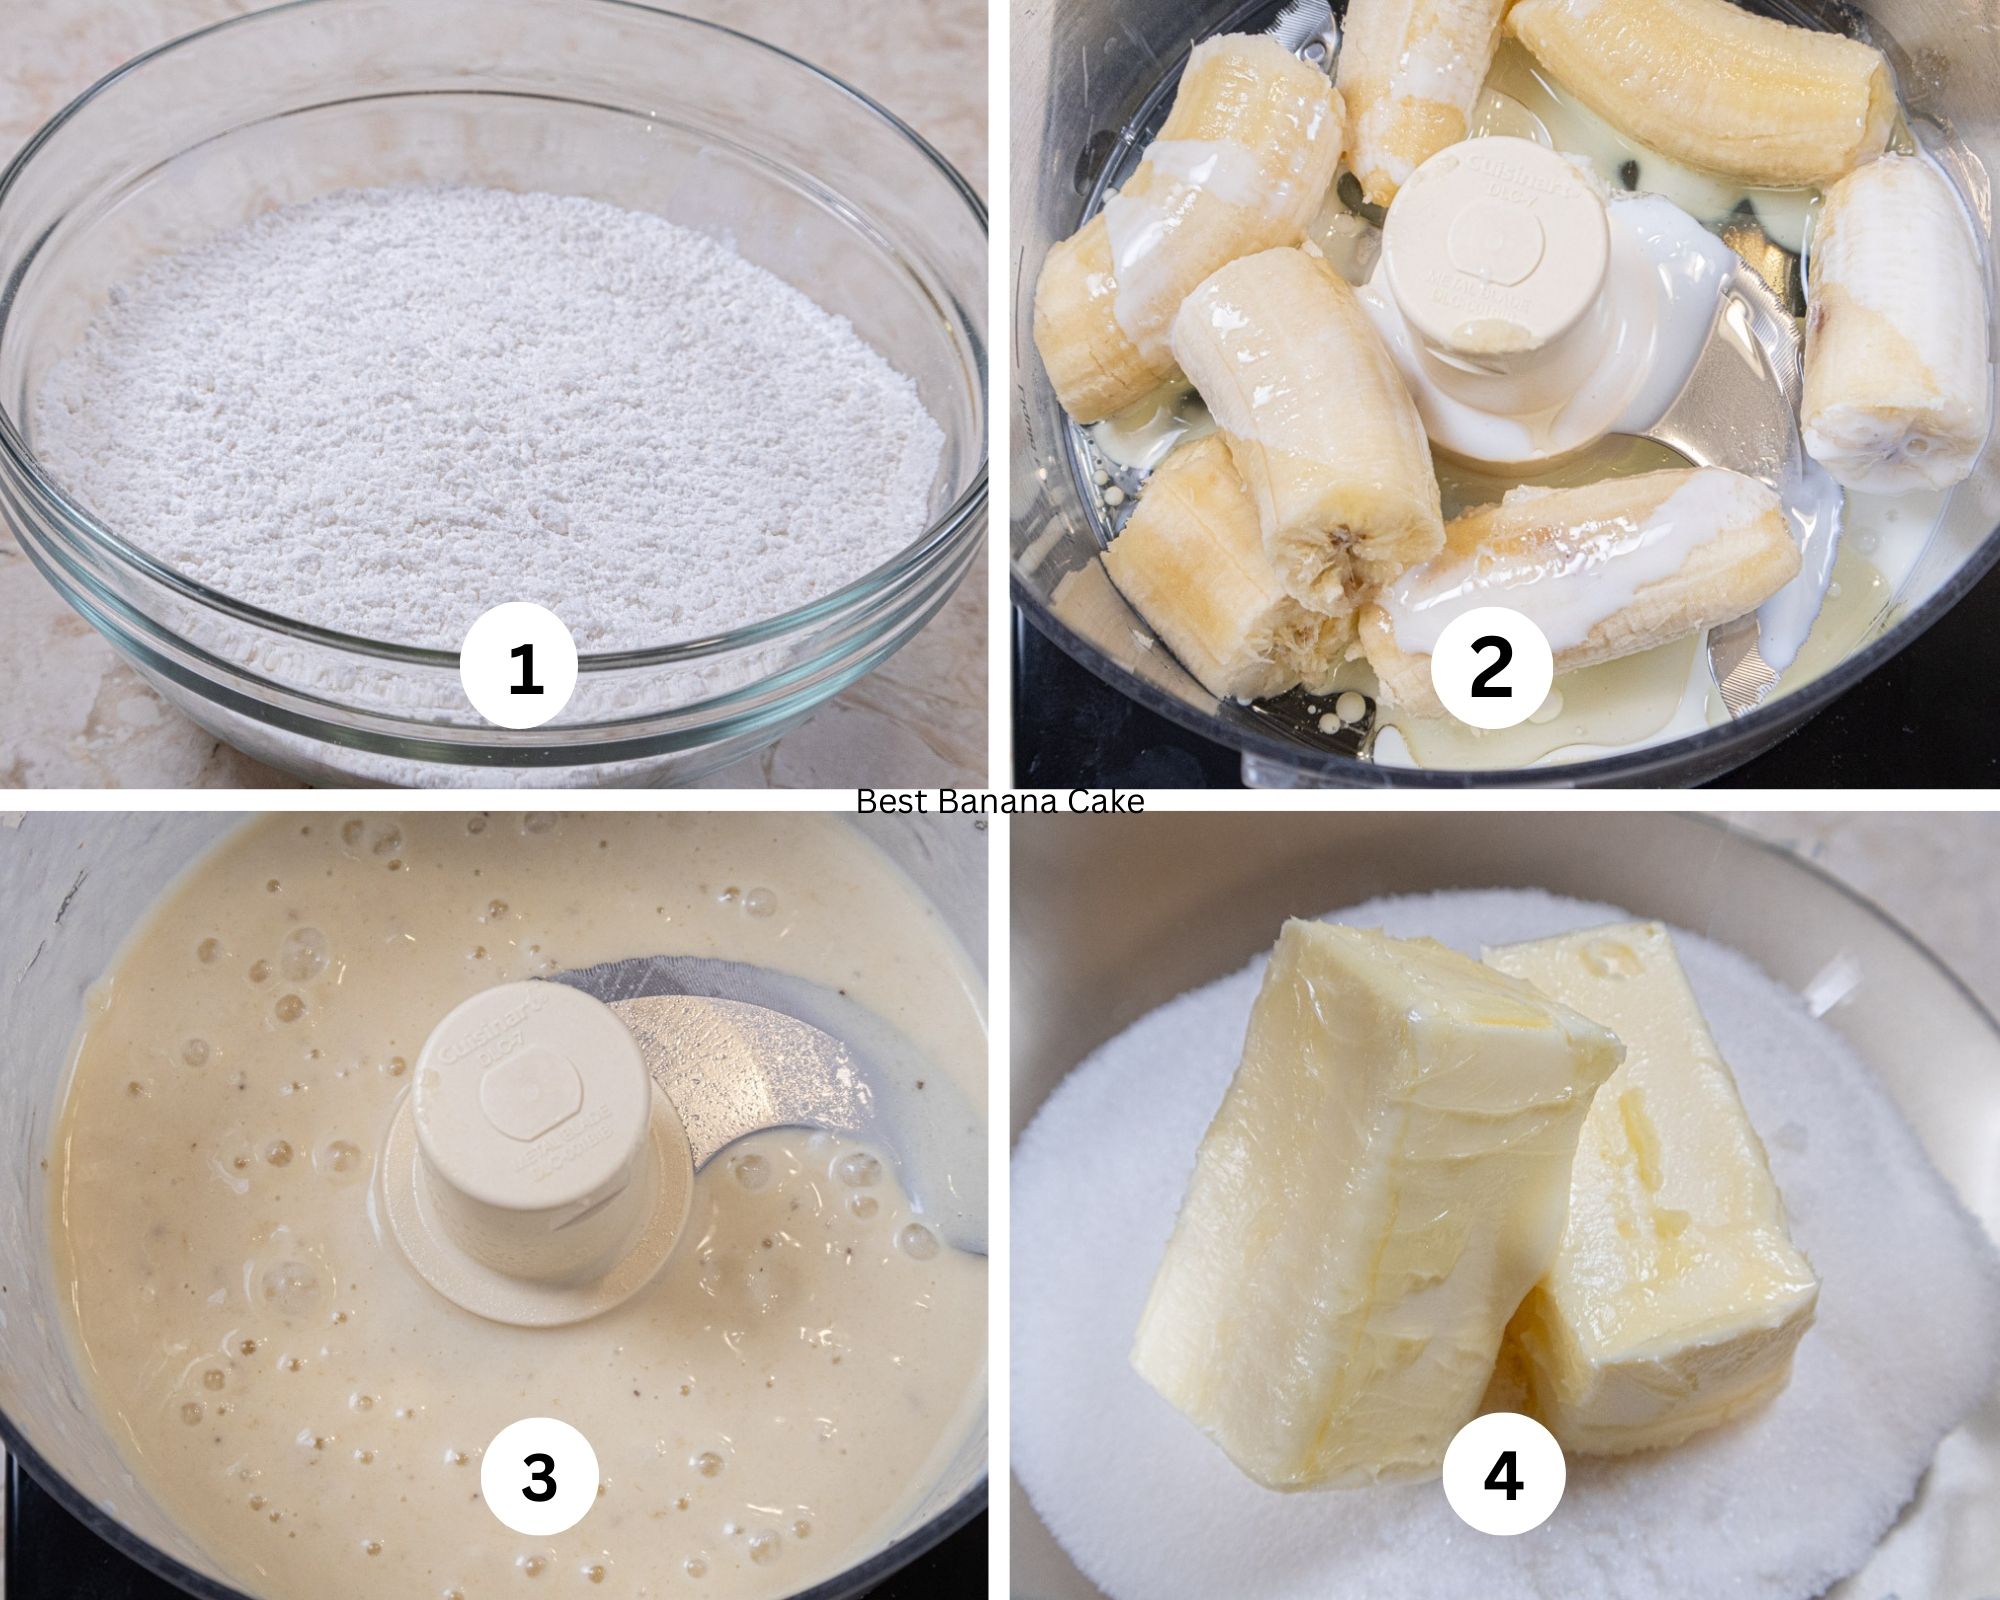
Step 1. Whisk together the dry ingredients - cake flour, baking powder, baking soda and salt. Set aside. Step 2. Break up the bananas and place in the food processor along with the buttermilk and oil. Step 3. Process until liquid. Step 4. Place the softened butter and sugar in the bowl of a mixer.
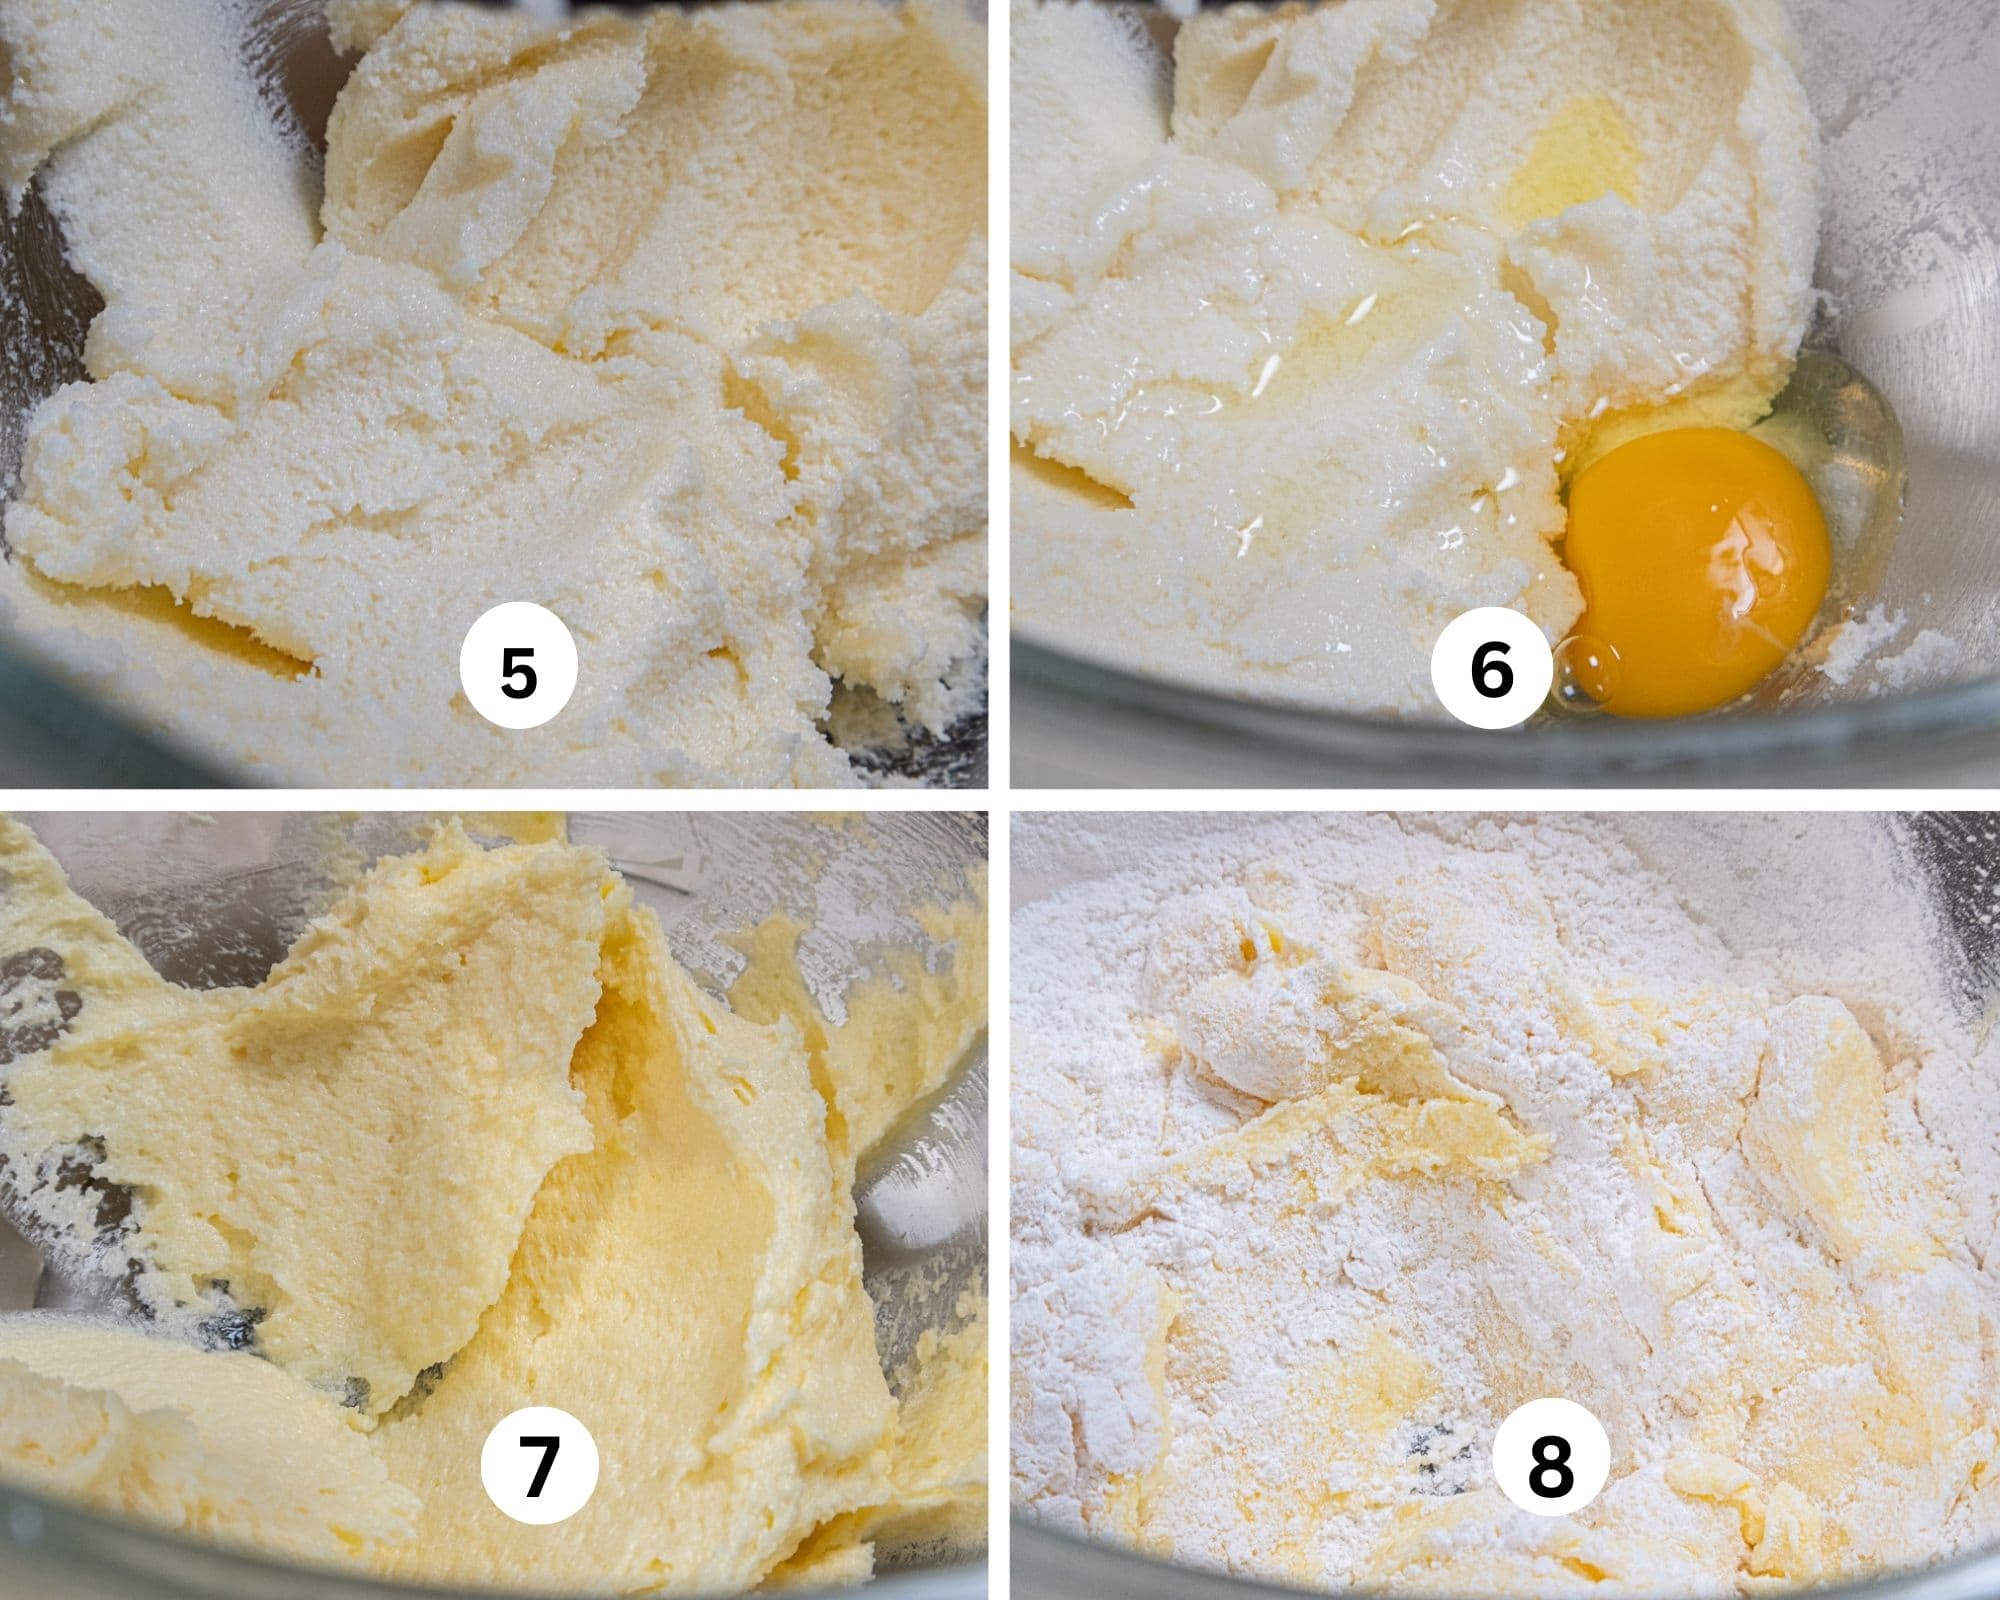
STep 5. Cream the butter and sugar together until light and fluffy Scrape the bowl as necessary. Step 6. Add the first egg. Step 7. Beat to combine. Add the second egg and beat to mix well. It may curdle at this point but it will be corrected in the next step. See my post, How to Avoid Curdled Batters for more information. Step 8. Add the first of 3 additions of the flour mixture.
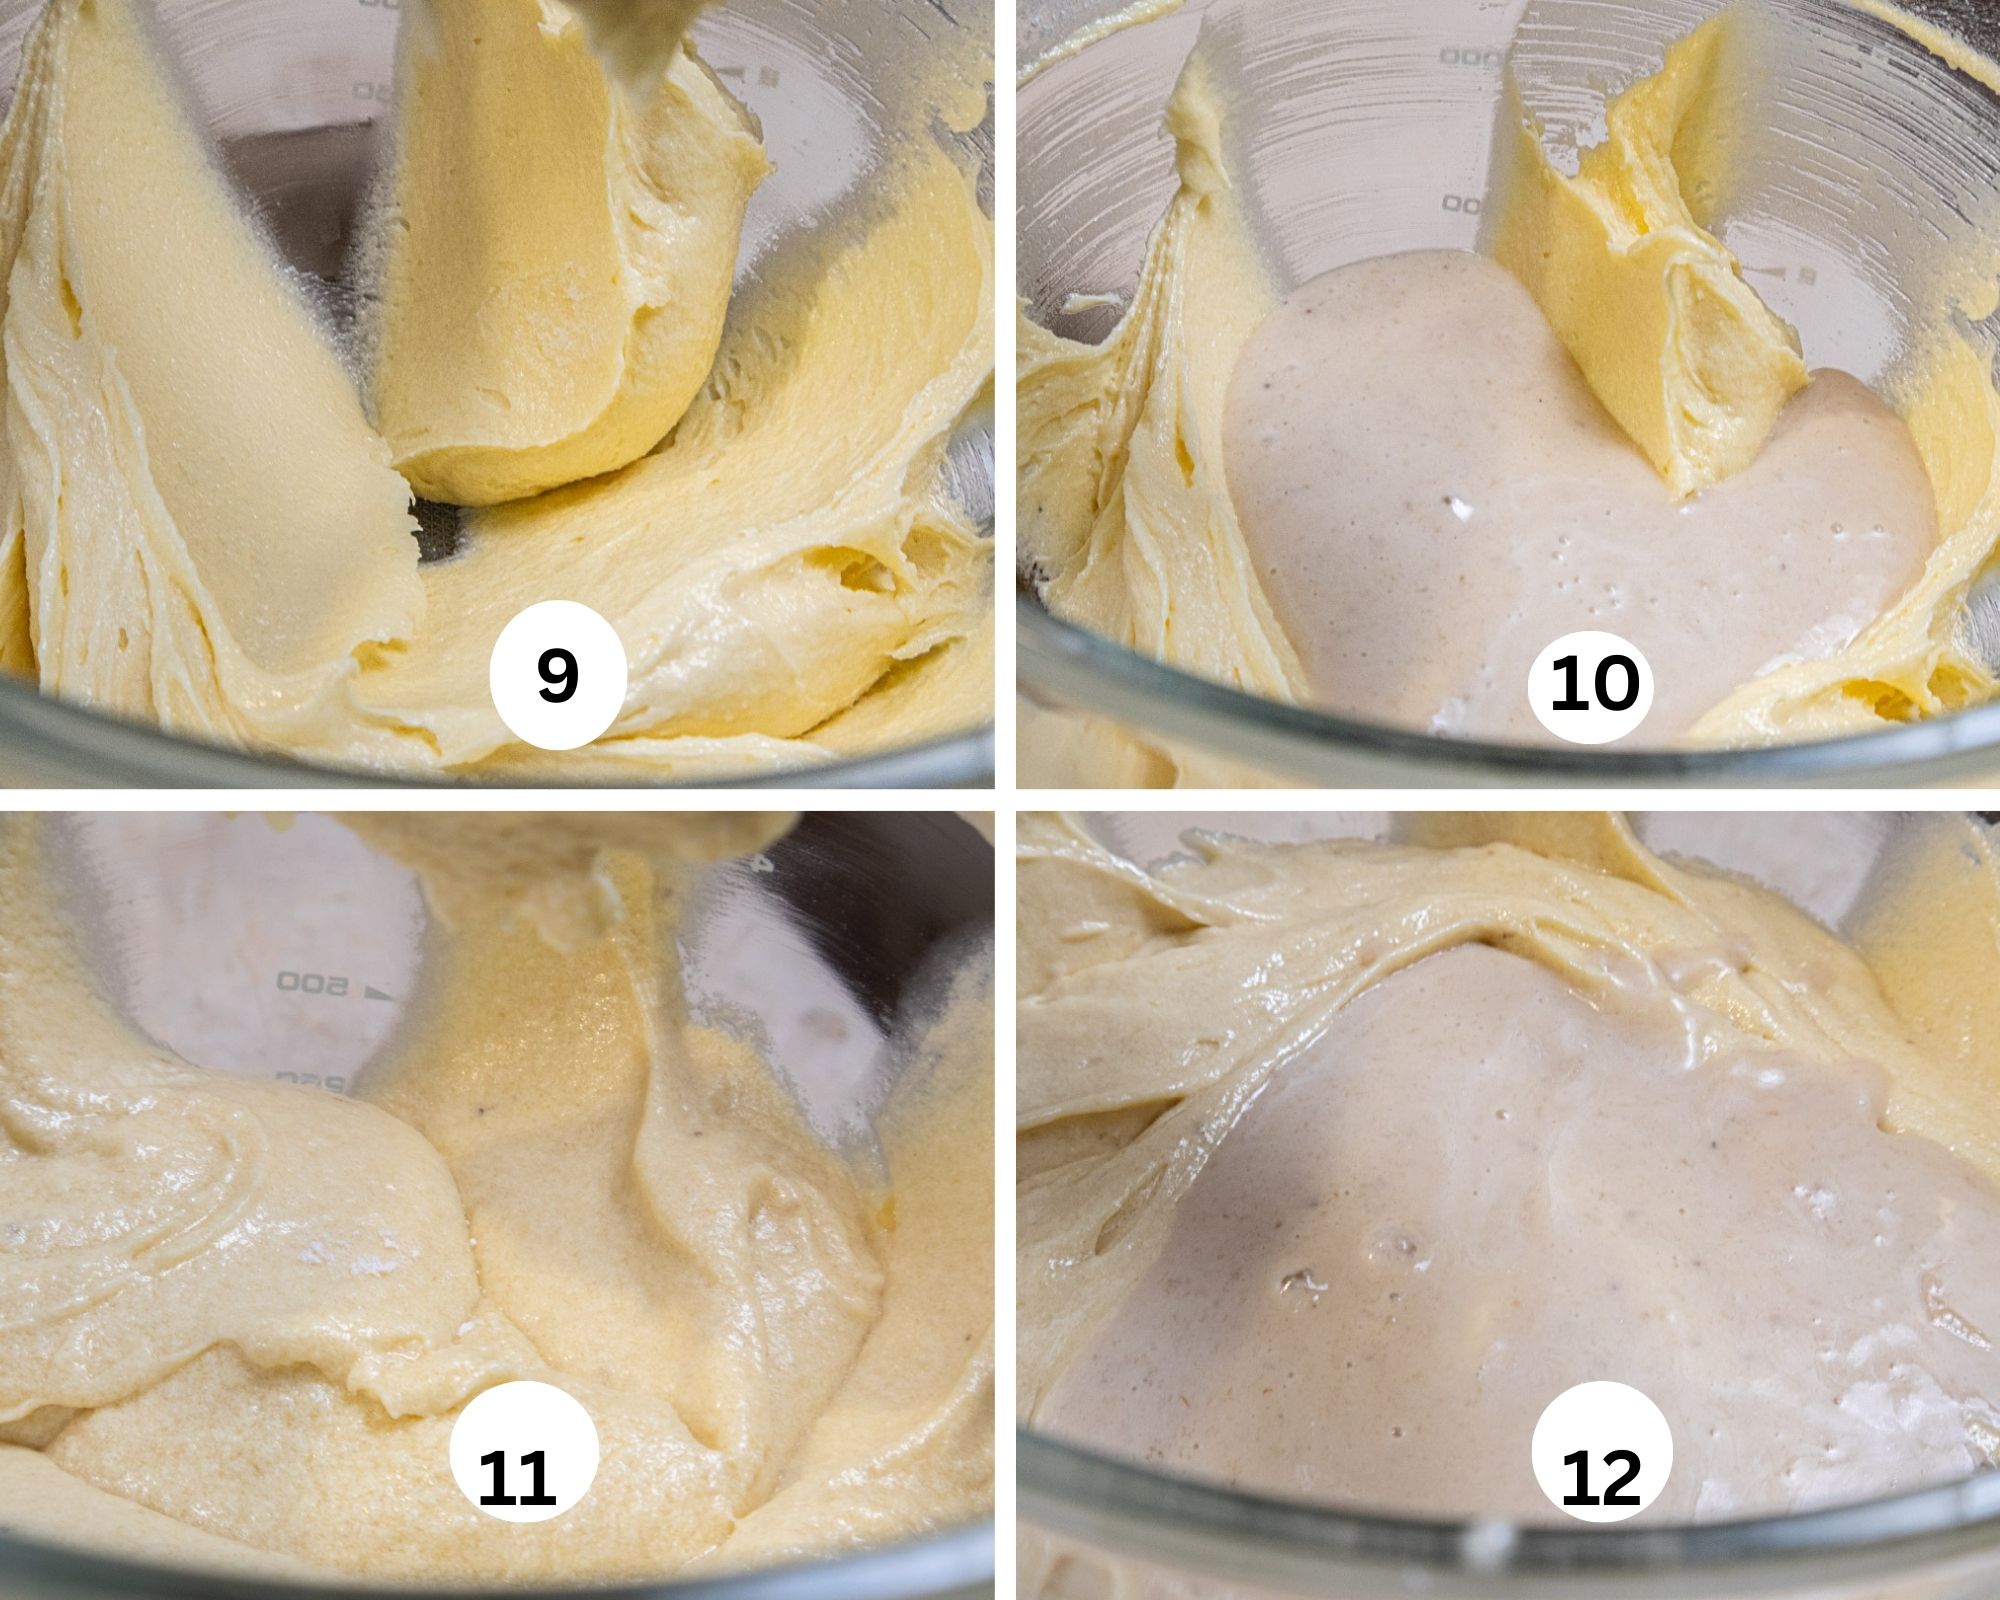
Step 9. Mix the flour in. Step 10. Add the first of two additions of the banana puree. Step 11. Blend completely. Add the second addition of flour and mix completely. Step 12. Add the last addition of banana puree on medium.
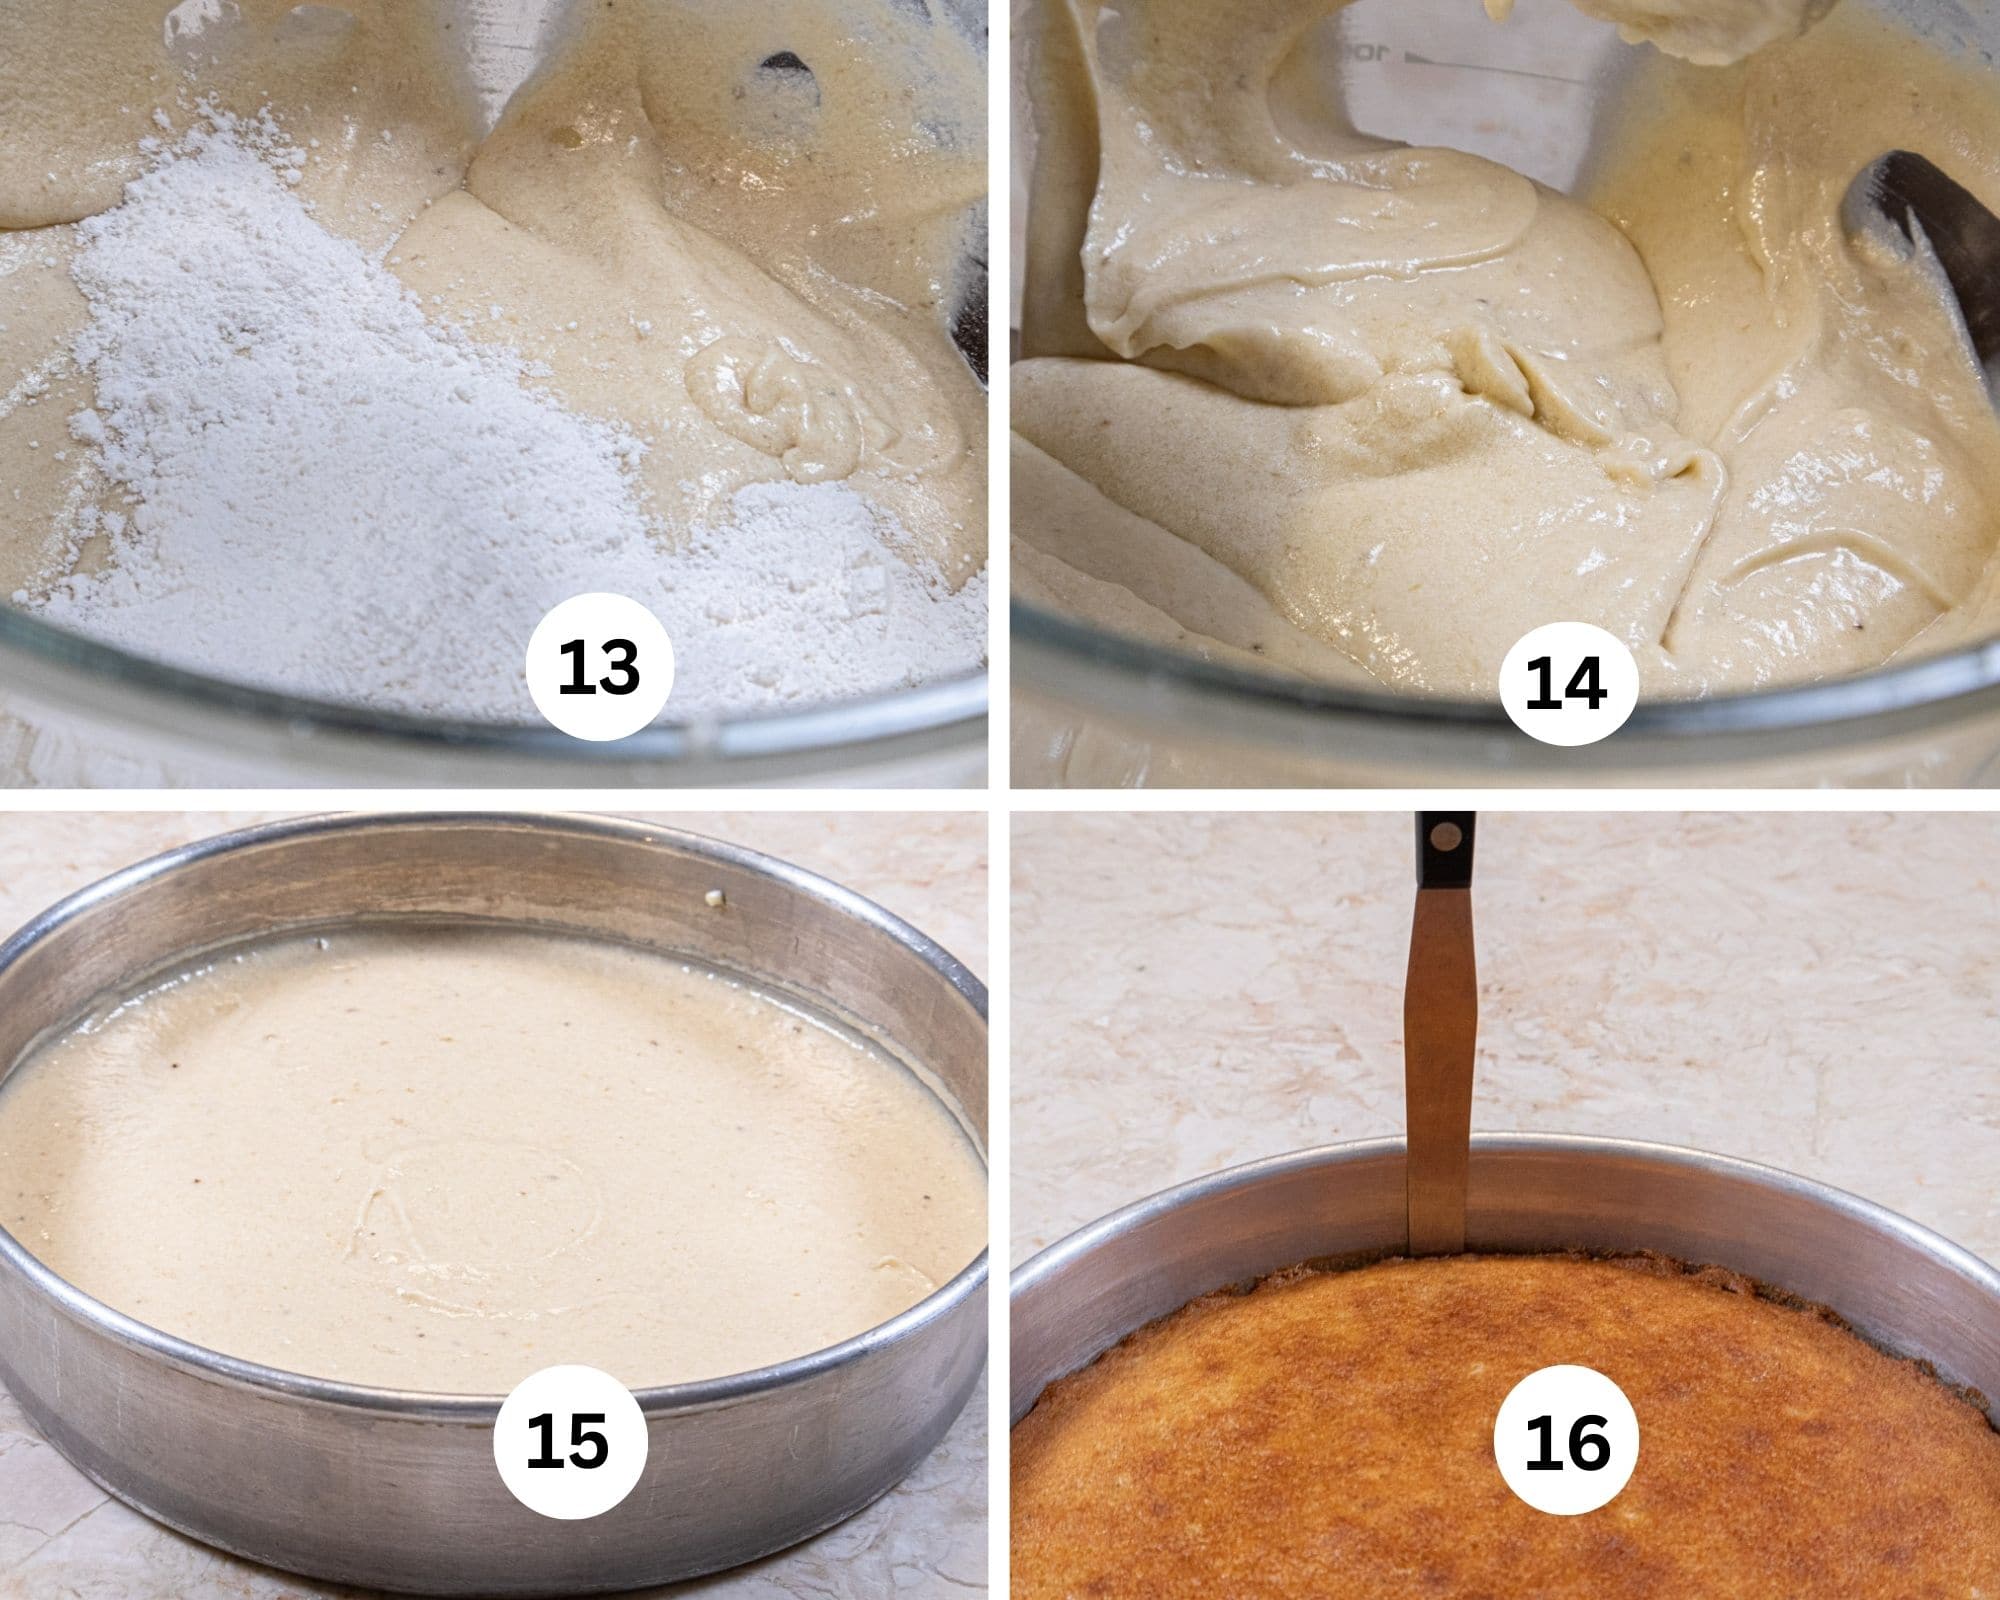
Step 13. Add the last addition of the flour mixture. Step 14. Mix on medium, scraping as necessary to make a smooth batter. Step 15. Divide between the two pans. Bake as called for. Cool. Step 16. To release the cake from the pan, place a small, flexible metal spatula between the cake and the edge of the pan. Go around the edge of the pan keeping the spatula pressed against the side of the pan and not the cake. For more information on releasing the cake please see my post, How to Bake a Flat Cake Layer or Cake Pan Prep.
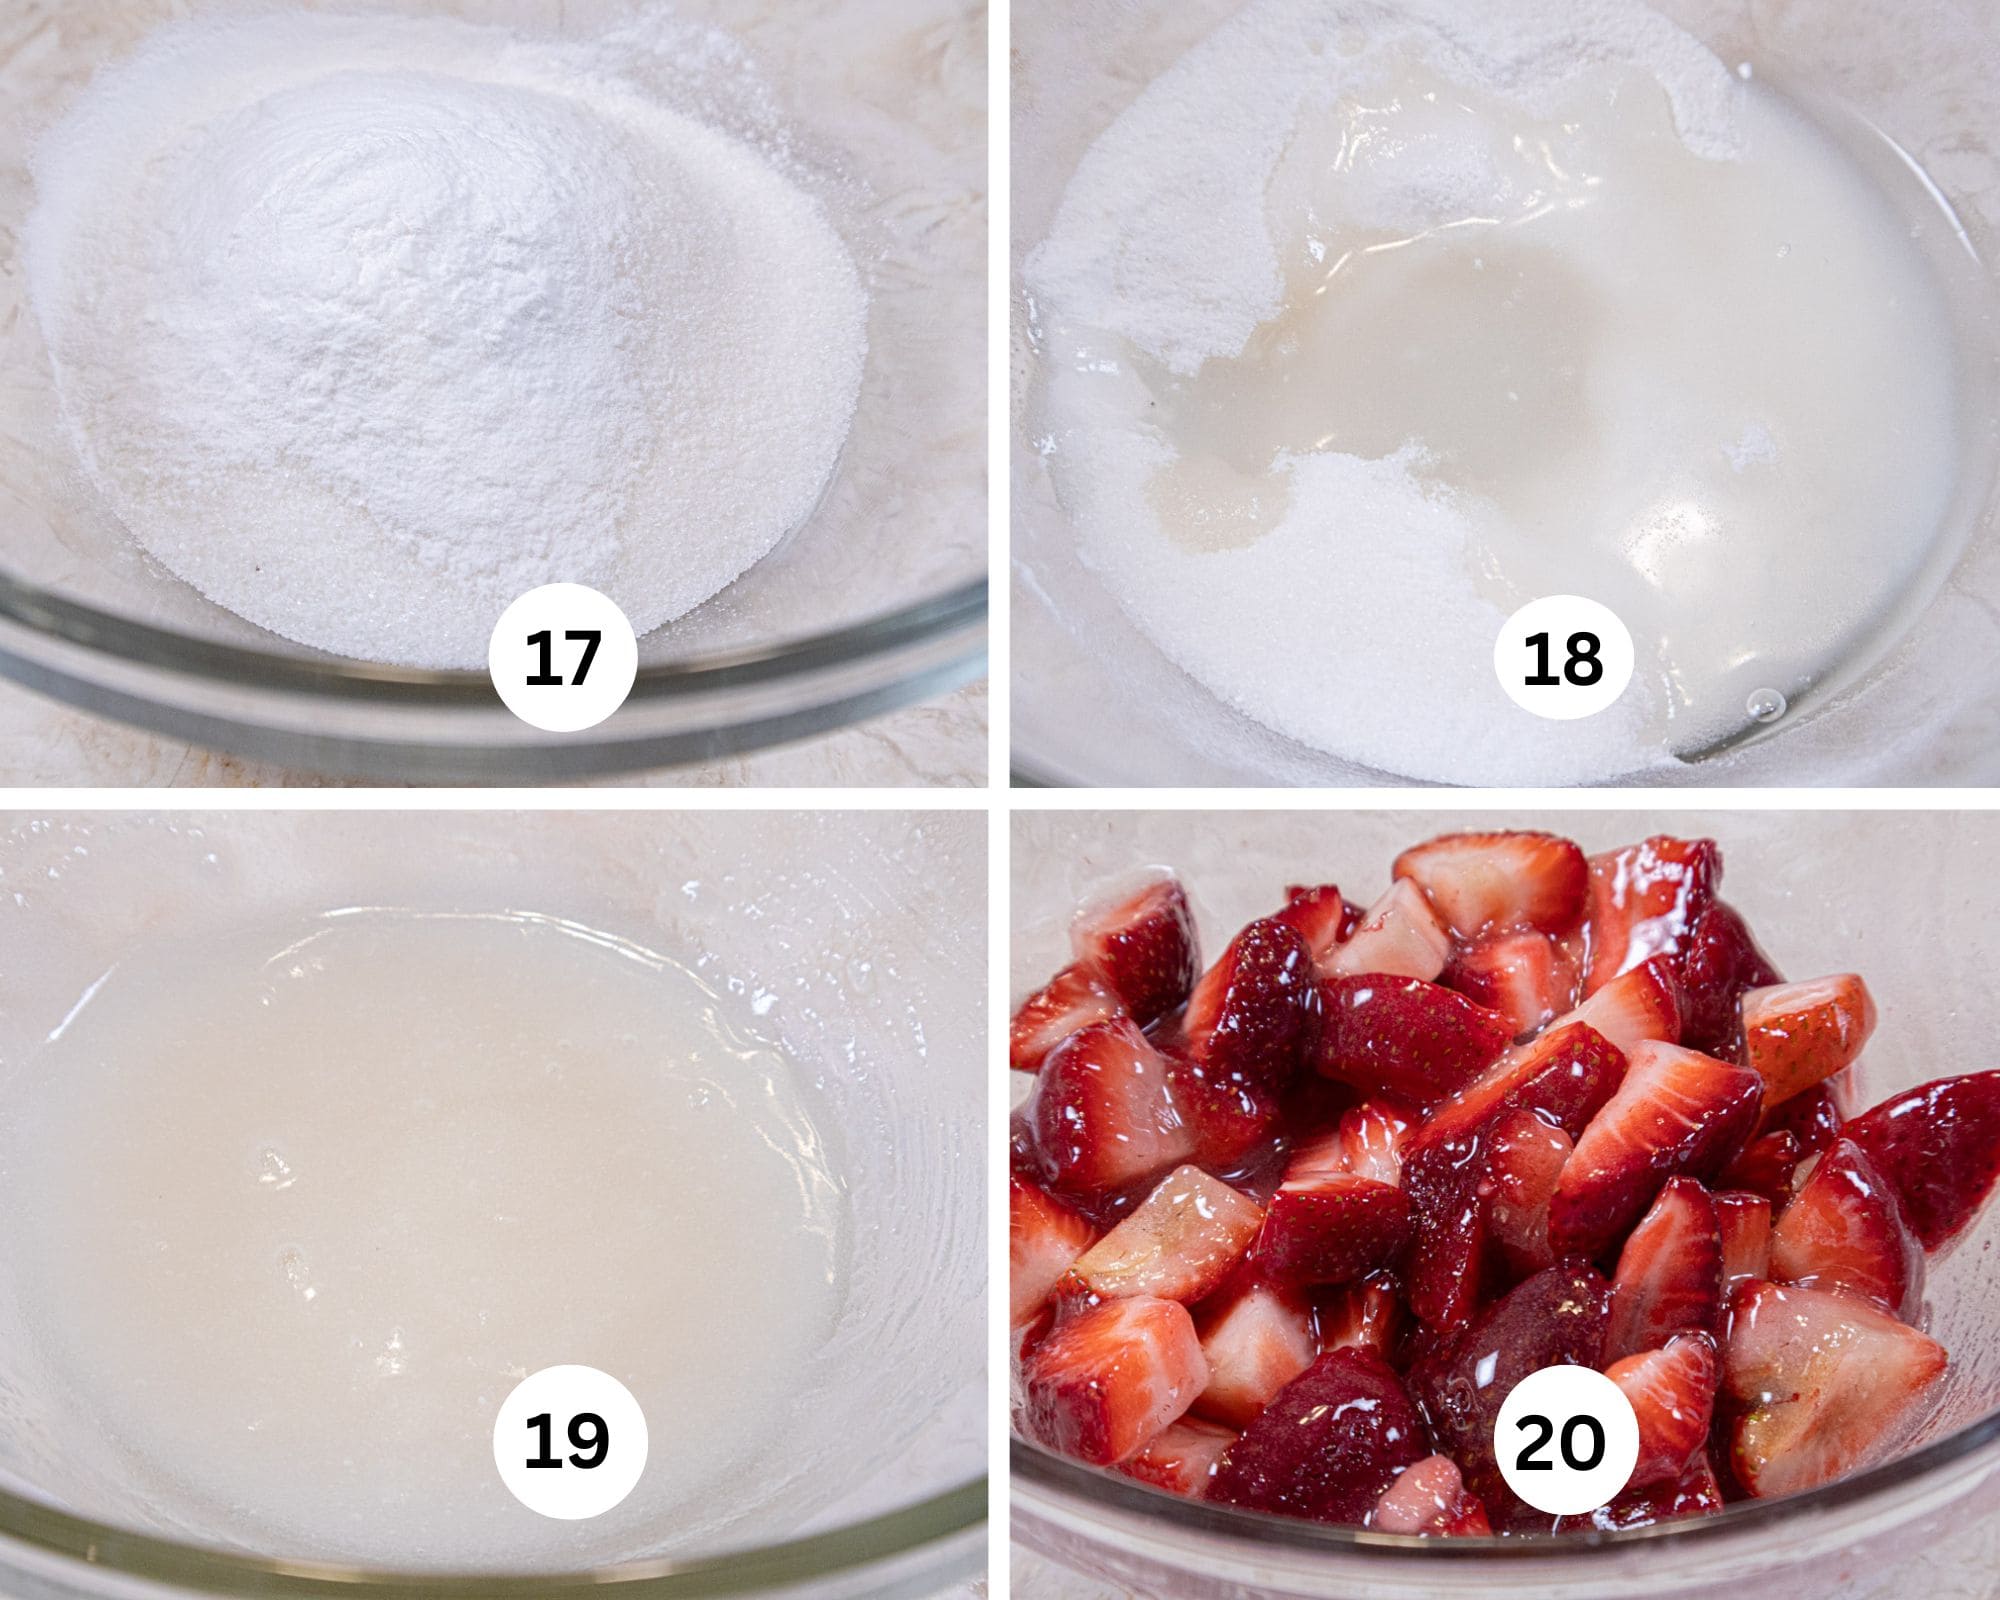
Step 17. Combine the sugar and the clear jel in a large bowl. Step 18. Add the ¼ cup water. Step 19. Stir everything together. Step 20. Add the strawberries, stirring to coat them. Set aside.
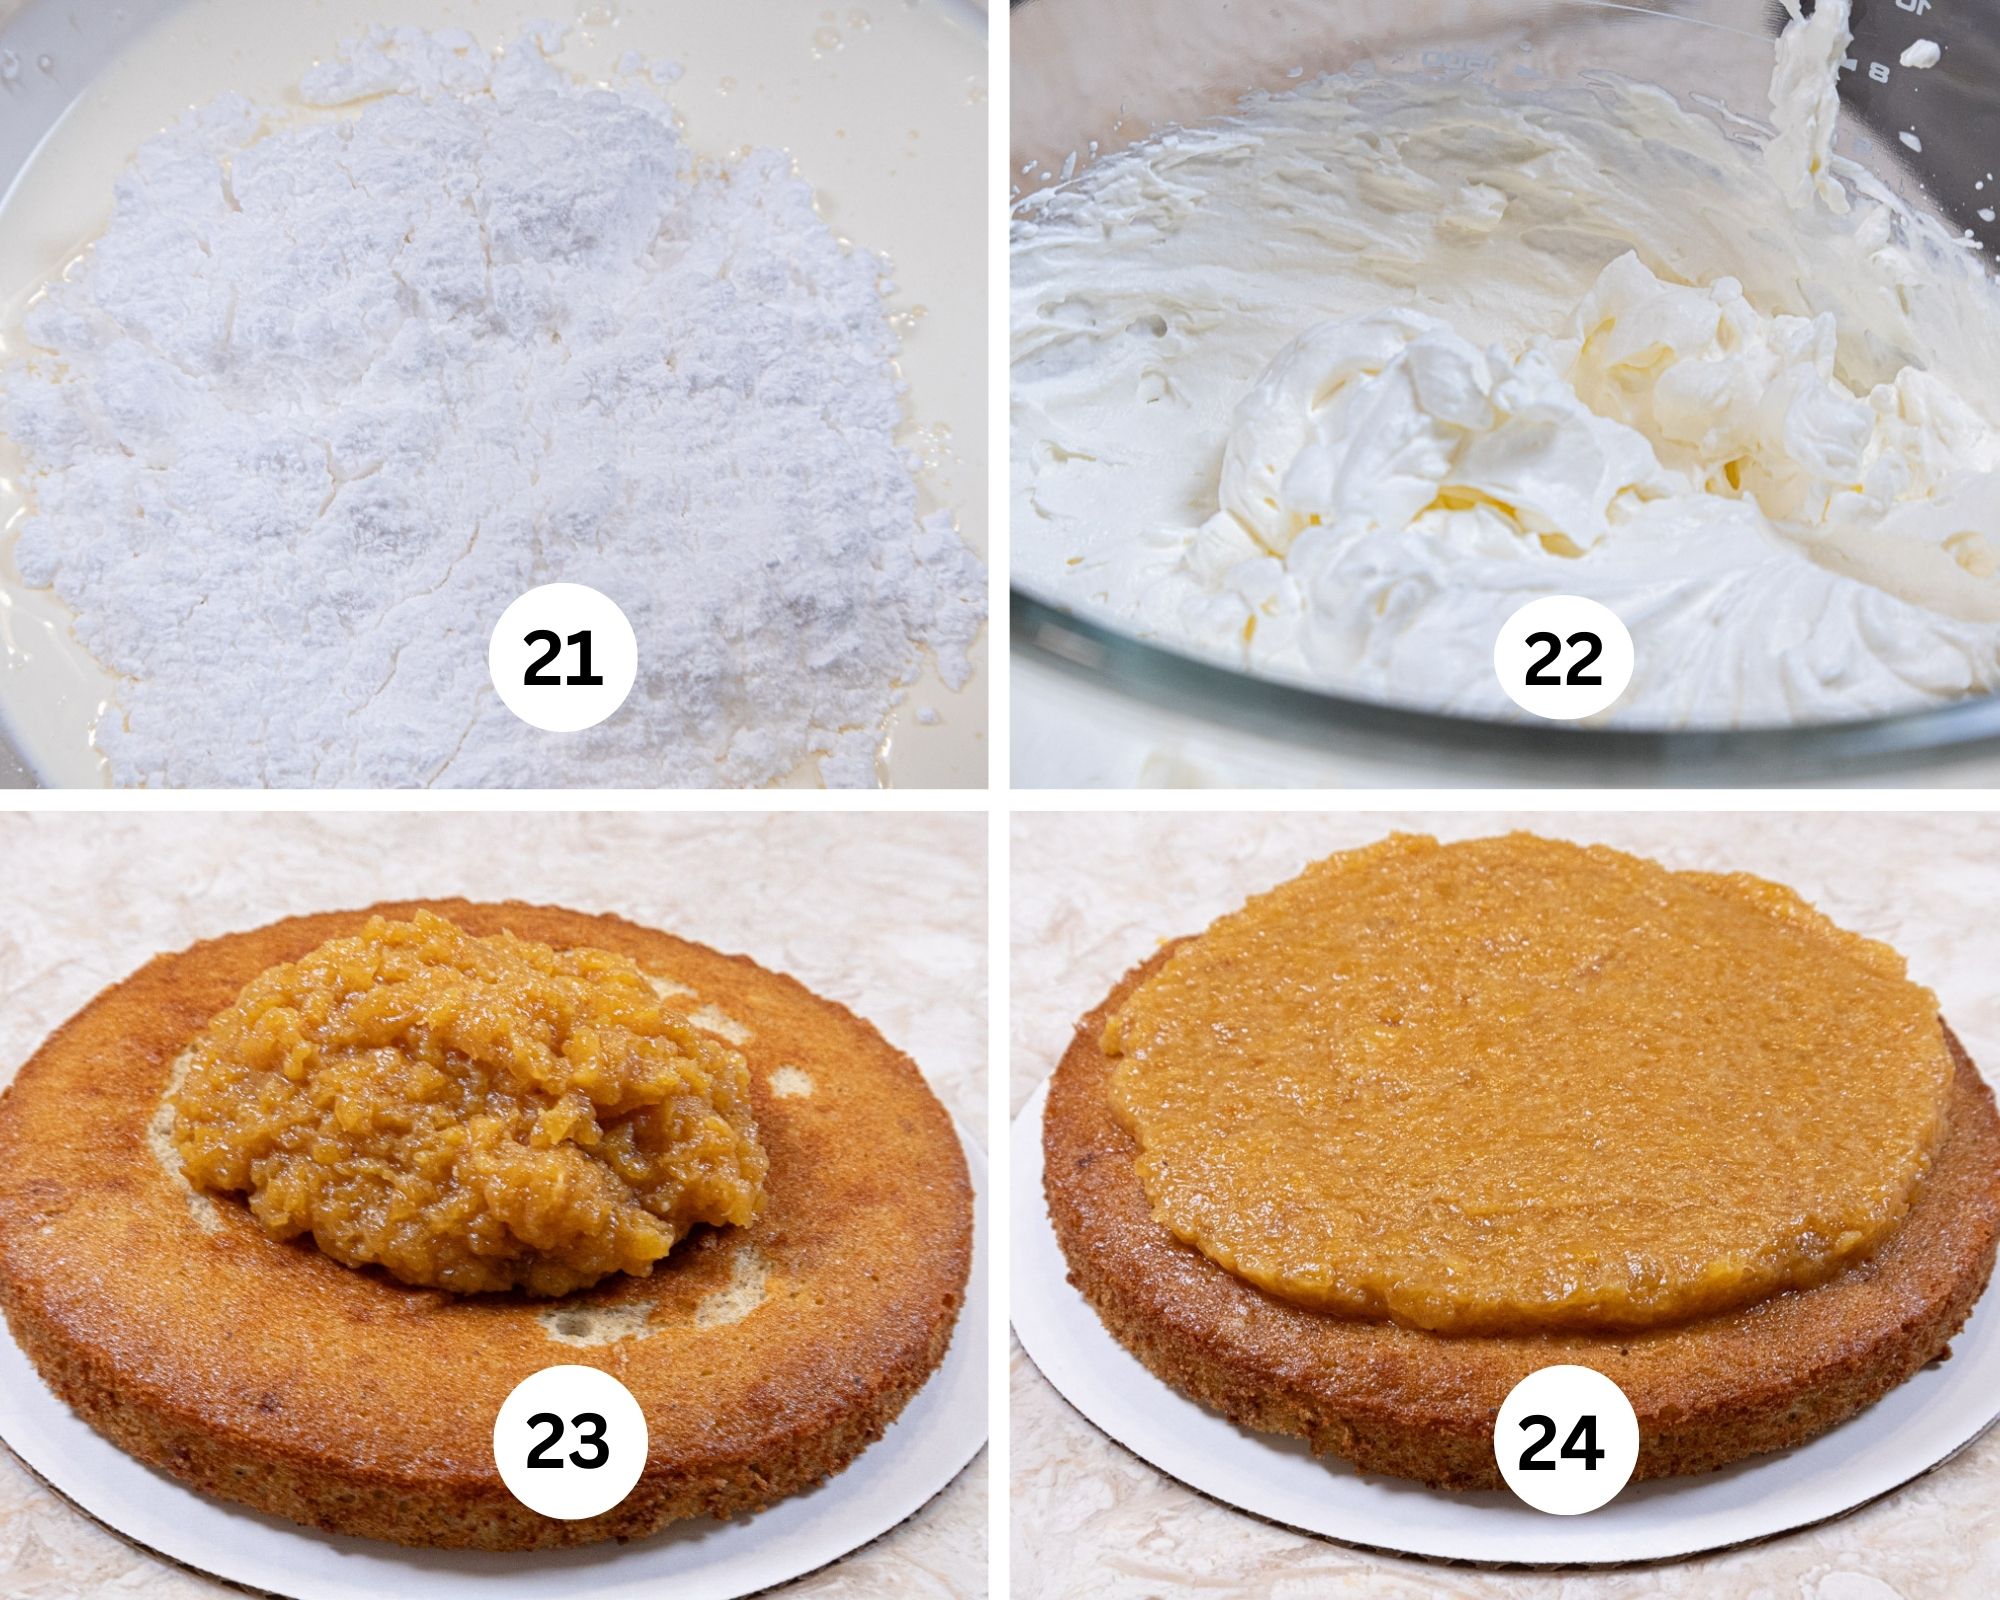
Step 21. Combine the powdered sugar and heavy cream in mixing bowl. Step 22. Whip to stiff peaks. Step 23. Place about ¾ of the caramelized pineapple on top of the bottom layer. Step 24. Spread it to within 1" of the edges of the cake.
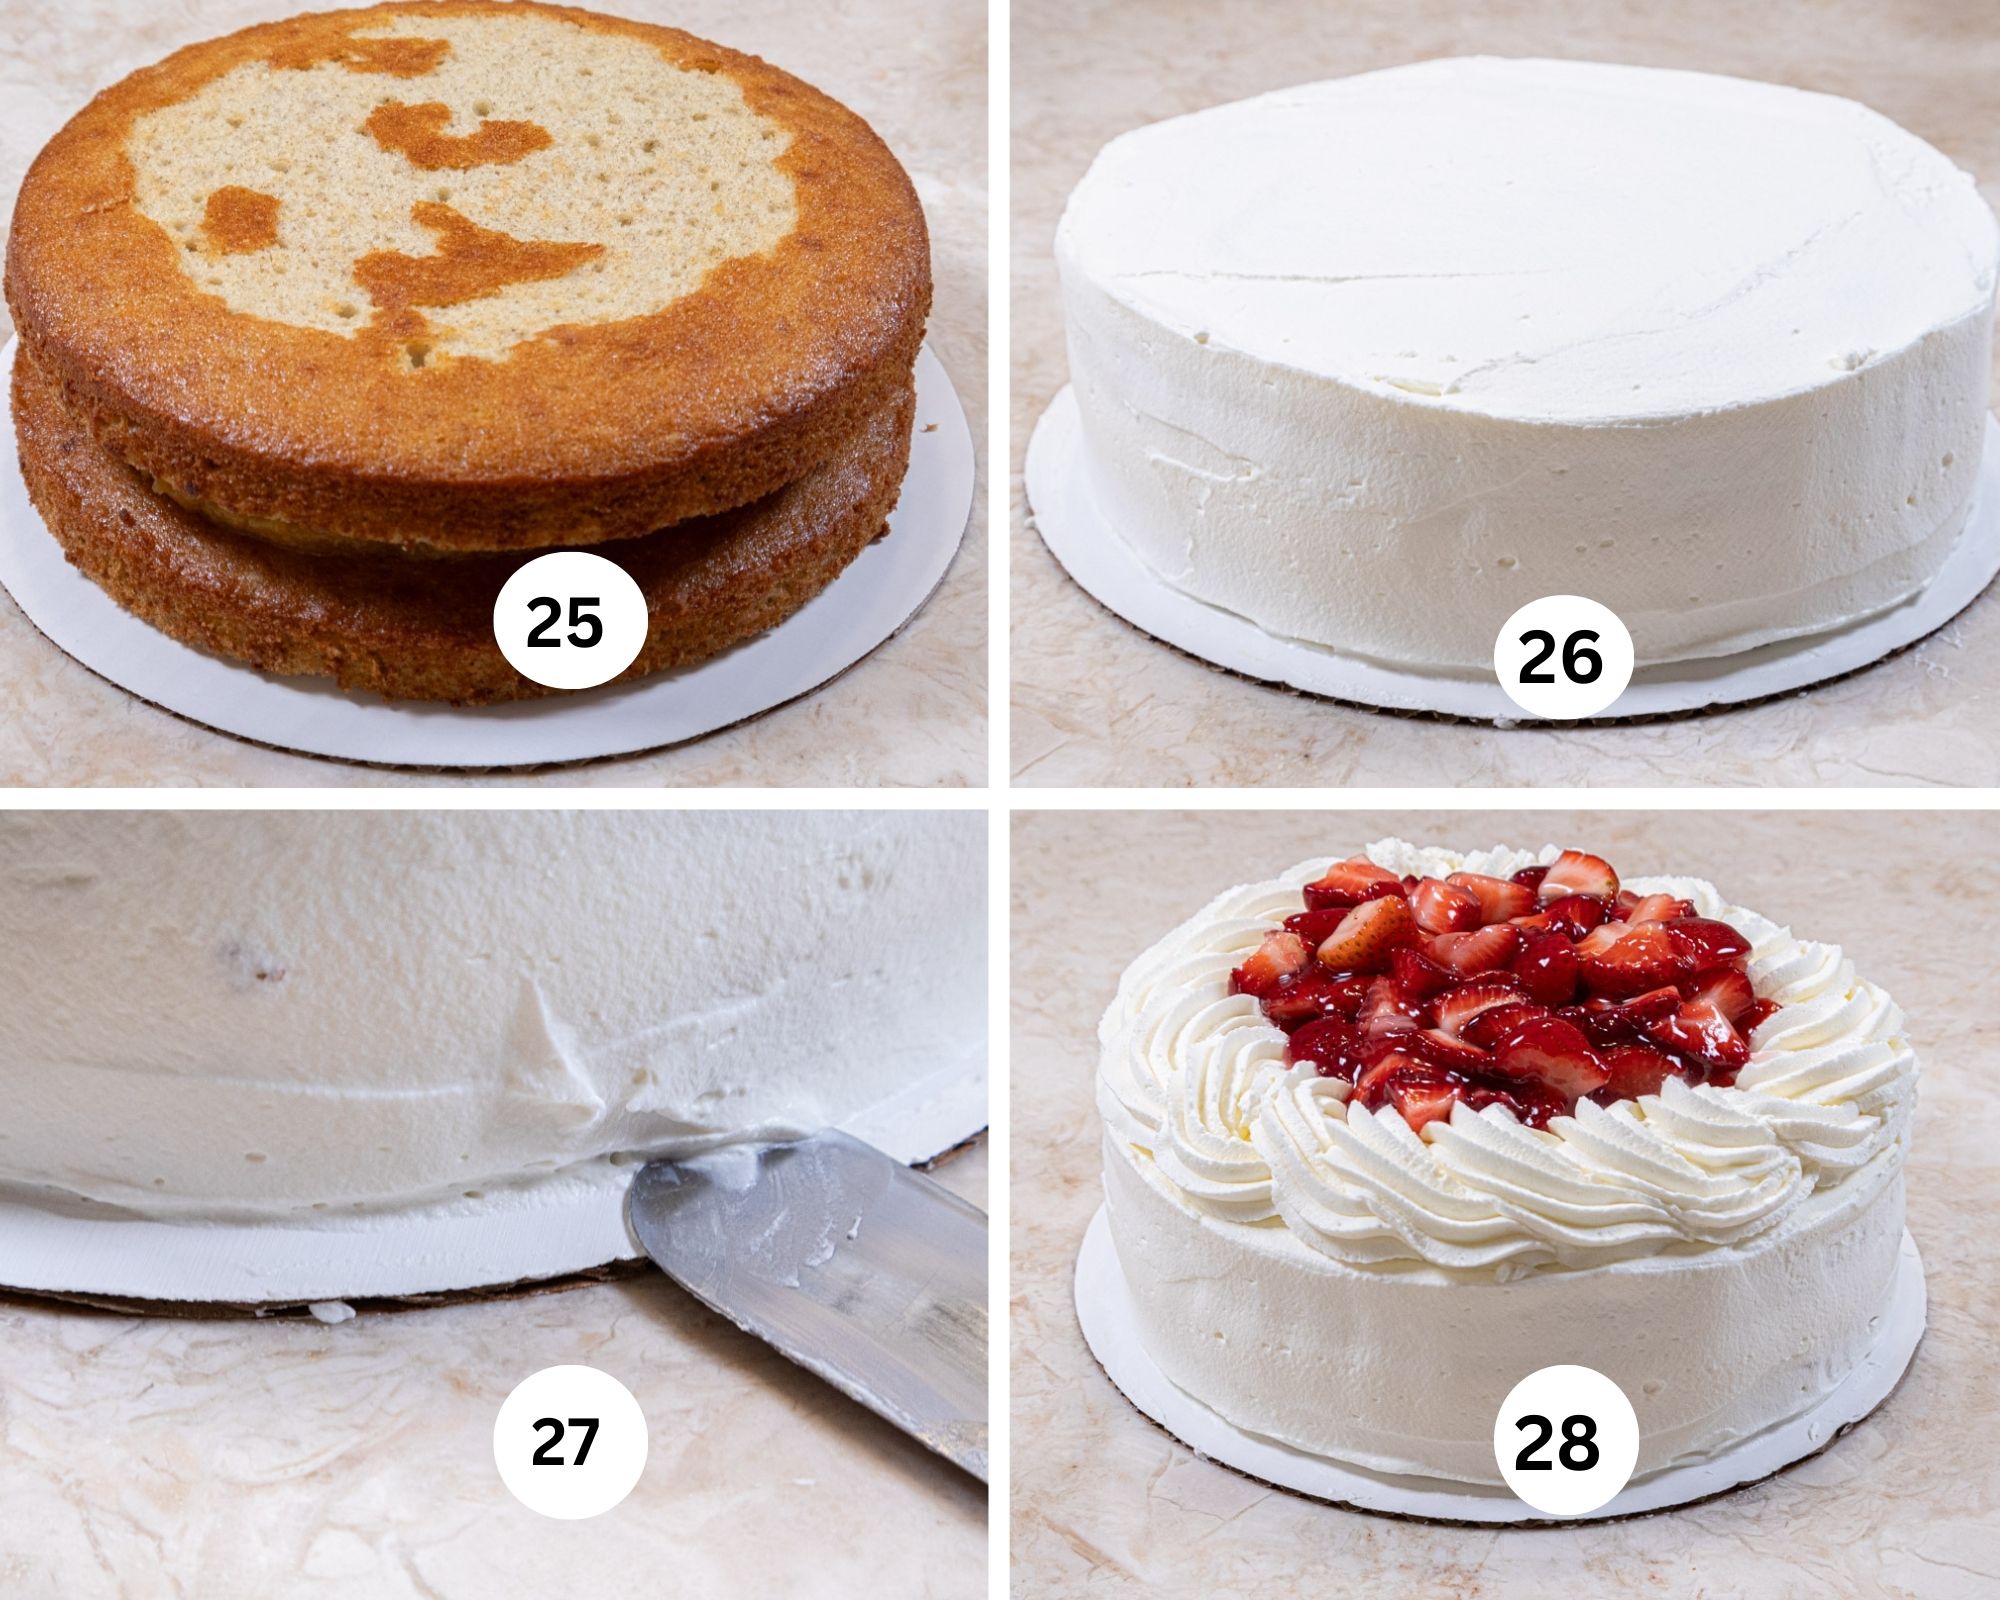
Step 25. Place the top layer on the cake. Step 26. Cover the top and sides with about ⅔ of the whipped cream. Step 27. Make a channel at the bottom of the cake by carefully removing the cream at the bottom of the cake leaving about ⅛" exposed. This will make it much easier to move the cake without damaging the finish. Use 2 pancake turners to lift the cake and place it the serving plate. Step 28. Fit a pastry bag with a #5 open star tip. Fill the bag with the remaining cream. Pipe a wreath around the edge of the cake. Fill the center with the strawberries. Refrigerate for at least 4 hours or overnight.
Recipe FAQS
1 large bananas will make ½ cup. The key is large. If in doubt buy 2.
Really ripe bananas will puree smoothly and have more flavor than under ripened bananas. If the bananas are really firm, they don't puree as smoothly or impart the same level of flavor.
The skin of the banana will be heavily speckled with brown or will be turning brown. It should not be black just really brown. At that point it's at its maximum flavor.
Expert Tips
- Have the cake pans prepped before starting so the batter doesn't sit. This banana cake is leavened with baking powder which is double acting. It starts rising as soon as liquid is added to it which is why looks airy if it the unbaked batter sits too long. The second part acts with heat.
- Follow my instructions for preparing the cake pans. They will bake into flat layers. See my post on baking flat layers and cake pan prep.
- Do not bake the layers until they pull away from the pan. At that point they are over baked. Remove them when a cake tester comes out cleanly or the center springs back when lightly touched.
- Fresh pineapple is key to the caramelized pineapple.
- Cake flour is necessary for the lightest cake layers.
- If using red food coloring, use gel colors. They won't add liquid to the recipe.
- Channneling the bottom of a cake refers to removing the frosting at the bottom of the cake on the cake board. It is easily done by slipping a metal spatula under the cream on the cake board and angling it very slightly to remove the cream leaving an open are in which to insert two pancake turners to move the cake. The channel should be unnoticeable.
More Fruit Oriented Recipes
Love this My Best Banana Cake Recipe? It would be hugely helpful and so appreciated it if you would take a moment to leave a star rating. Thank you.

My Best Banana Cake Recipe
Equipment
- 2 9 x 2" Round Cake pans
Ingredients
Caramelized Pineapple - This should be made at least the day ahead and refrigerated.
- 1 large pineapple (4 to 4 ½ cups)
- 3 tablespoons unsalted butter (45 grams)
- ⅓ cup golden syrup or corn syrup
- 3 tablespoons brown sugar, packed (25 grams)
Banana Cake Recipe
- 1 ½ cups +2 tablespoon cake flour (200 grams)
- 1 teaspoon baking soda
- ¾ teaspoon bakng powder
- ¼ teaspoon salt
- 1 cup banana puree (from 2 large bananas)
- ⅓ cup buttermilk
- ⅓ cup oil
- ½ cup butter, softened (114 grams or 1 stick)
- 1 ¼ cups granulated sugar (250 grams)
- 2 large eggs
Strawberry Topping and Whipped Cream
- 1 quart strawberries
- ½ cup granulated sugar (100 grams)
- 4 teaspoons instant clearjel
- ¼ cup water
- red food coloring, optional
- 1 cup powdered sugar, divided (130 grams)
- 2 cups heavy cream
Assembly
- Banana cake layers
- Caramelized pineapple
- Strawberry Topping
- Whipped Cream
Instructions
Caramelized Pineapple - this must be made at least a day ahead of using. See the photos visual instructions.
- If cleaning a fresh pineapple, cut the top and bottom off. Stand the pineapple up and cut the sides off to expose the flesh. Cut the flesh off on each side. Cut the pineapple into 1 to 1 /2 inch chunks.
- Place the butter, golden syrup or corn syrup and the brown sugar in a skillet large enough to hold the pineapple in a single layer. Bring the ingredients to a hard boil.
- Add the pineapple, stirring to coat all of it. Over medium heat, continue to boil the liquid ingredients to reduce them until they just coat the fruit. A spoon run through the pineapple should show the mixture separated and not coming together. Monitor the heat so the pineapple and sauce do not burn.
- Remove the caramelized pineapple from the pan and cool it. Place in the bowl of a processor and pulse 3 or 4 times. Leave little pieces of pineapple in it. Refrigerate for up to a week. There should be about 2 cups of the filling.
Banana Cake
- Preheat the oven to 350°F. Line two 9x2 inch round cake pans with parchment paper. Spray only the middle of the paper. Do not spray the sides. See my post on How to Bake a Flat Cake Layer.
- Combine the flour, baking soda, baking powder and salt. Whisk to combine. Set aside.
- Break the bananas up in and place them in the bowl of a processor. Add the buttermilk and oil. Process until smooth, scraping down if necessary.
- Cream the butter and sugar in the bowl of a mixer until light and fluffy. Add the eggs, one at a time. The mixture may curdle. It will be corrected in the next step.
- Alternate adding the flour and banana puree starting and ending with the flour. I generally use 3 additions of flour and 2 of banana puree. Mix on low completely each time.
- Divide among the two cake pans (about 475 grams per pan).
- Bake for 20 to 22 minutes until a cake tester comes out clean or the center springs back when lightly touched. The layers should not come away from the sides. They are over baked at that point. The layers will be an even medium golden brown.
- Cool completely in the pans. To release, use a small, flexible, metal spatula and go around the edge of the pan. Keep the spatula to the edge of the pan and not the cake. Turn the layers out.
- If using immediately, it will be easier to assemble if they are frozen just until firm. Do not let them freeze hard. If using from frozen, thaw jut until firm. Do not use frozen hard.
Strawberry Topping and Whipped Cream
- Wash the strawberries and dry them. Cut them into medium size pieces. Set aside.
- Whisk the Instant Clearjel and sugar together in a large bowl. Whisk in the water. If using the food coloring, add it now. Add the strawberries and stir to coat all of them. Set aside or place in a covered container and refrigerate for use the next day.
- Combine the whipped cream and powdered sugar in the bowl of a mixer. Beat until stiff peaks just start to form.
Assembly - See the photos above for additional help.
- Place about ¾ of the caramelized filling in the middle of the bottom layer of cake. Spread to about 1" in from the edge of the cake layer. The filling should be about ¾" thick. If it is thinner use the remainder of the filling.
- Place the remaining layer of cake on top. Frost the sides and top of the cake with about ⅔ of the whipped cream. Make sure to force the whipped cream into the open are of the side of the cake.
- Make a channel on the bottom of the cake by placing a metal spatula on the bottom of the cake board and removing about ⅛" of the whipped cream. This will make it easier to transfer the cake to a serving plate.
- Fit a piping bag with a #5 open star tip and pipe a wreath around the edge of the cake extending in about 2" in from the edge. Refrigerate overnight or at least 4 to 6 hours before serving.
- About 2 hours before serving, fill the center of the cake with the strawberry topping. This will keep it from bleeding into the whipped cream. Refrigerate until serving.
- This cake cuts beautifully when cold. Cut with a serrated knife run under really hot water and dried immediately. Rinse the knife and reheat for each cut.
- Leftover cake will hold in the refrigerator for a day or two. To keep the cake from drying out, fold a piece of plastic wrap a little higher than the cake and long enough to be pressed against the cut edges.
Notes
Nutrition

Leave a Reply