This Pâte Sucrée Crust is the easiest way to make a classic French sweet tart crust at home. Made with just four ingredients, this buttery pastry is light, crisp, tender and slightly sweet. Best of all, you don't even have to roll it out! My simple press-in method makes it so easy to create a beautiful tart shell without all the fuss of traditional pastry dough.
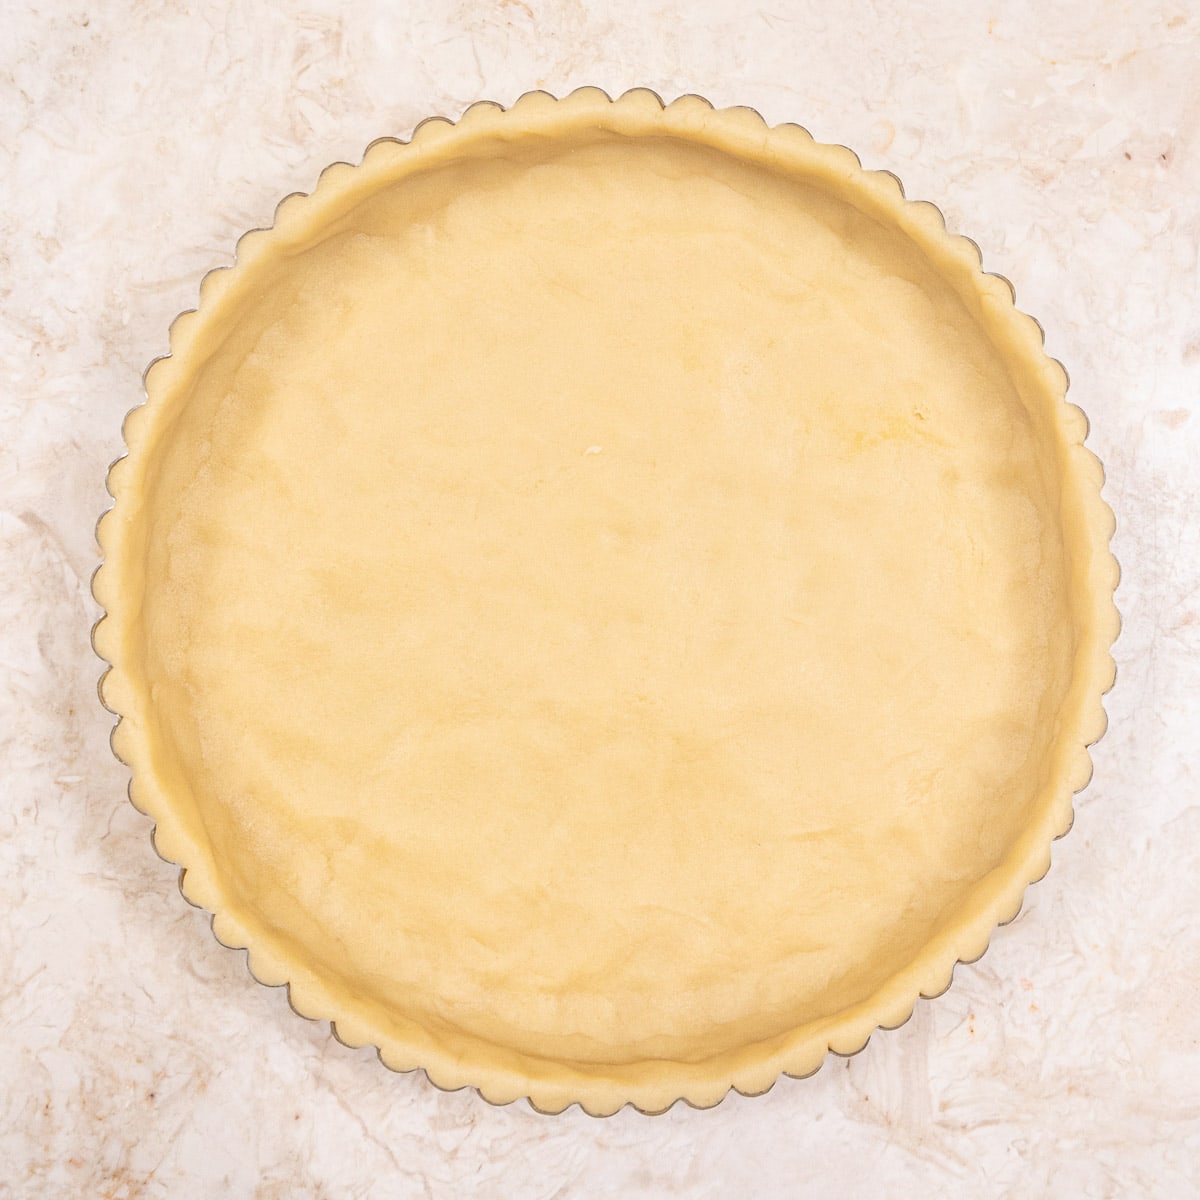
Pâte sucrée is particularly useful for sweet tarts because it can support cream fillings without getting soft. It's a great choice for pastry cream, fruit curds, chocolate ganache and frangipane. It can be used for full size tarts as well as mini tarts and is easier than most tart shells to make. Four pantry ingredients is all it takes for this fantastic French crust. The Cinnamon Whiskey Tart, Chocolate Caramel Pecan Tart, and the Peach Curd Tart are all good examples of this tart shell.
Jump to:
Pâte sucrée-One of 3 French Pastry Crusts
There are three main French pastry crusts. Each one has its own particular use. All of them use the same ingredients but the method of putting them together makes the difference.
- Pâte Sucrée means sweet dough in French. This shortcrust pastry is a light, tender, crisp, crust that can hold liquid fillings without leaking. It is made of four ingredients, flour, butter, sugar and egg yolk. With this crust the sugar and butter are creamed together, the egg yolks are added and last the flour. It lends itself to sweet fillings such as custards, creams, fruit curds, and frangipagne. This is the perfect crust when you don't want to roll the pastry as I show you below. The Cinnamon Whiskey Tart, Chocolate Caramel Pecan Tart, The Honey Thyme Tart, and the Peach Curd Tart are all good examples of this tart shell.
- Pâte Sablée is the richest of the three pastries and has a reputation for being difficult to use. Sablée means sandy or grainy and this crust has a higher percentage of sugar making a crumbly texture. Some recipes also use almond or nut flours to enhance the tender, crumbly texture of the pastry similar to shortbread. This pastry uses the creaming method also. Because it is so short, it can be difficult to roll out but using the press in method makes this much easier. This crust is generally used with sweet fillings.
- Pâte Brisée is closest to an American pie crust. Brisée means broken and refers to the butter being left in pieces in the pastry. There are two versions of this pastry. The most basic one uses all butter, flour, salt and water. The second is the Pâte Brisée a l'Oeuf which uses and egg along with the water. It is the only pastry of the three to use salt. It is also the only flaky crust among the three that leaves the butter in chunky pieces as opposed to creaming. This pastry is used for savory as well as sweet dishes. The Brie and Bacon Tart, Honey Thyme Apple Tart, and the Individual Apple Crostatas all use the this crust.
Recipe Ingredients
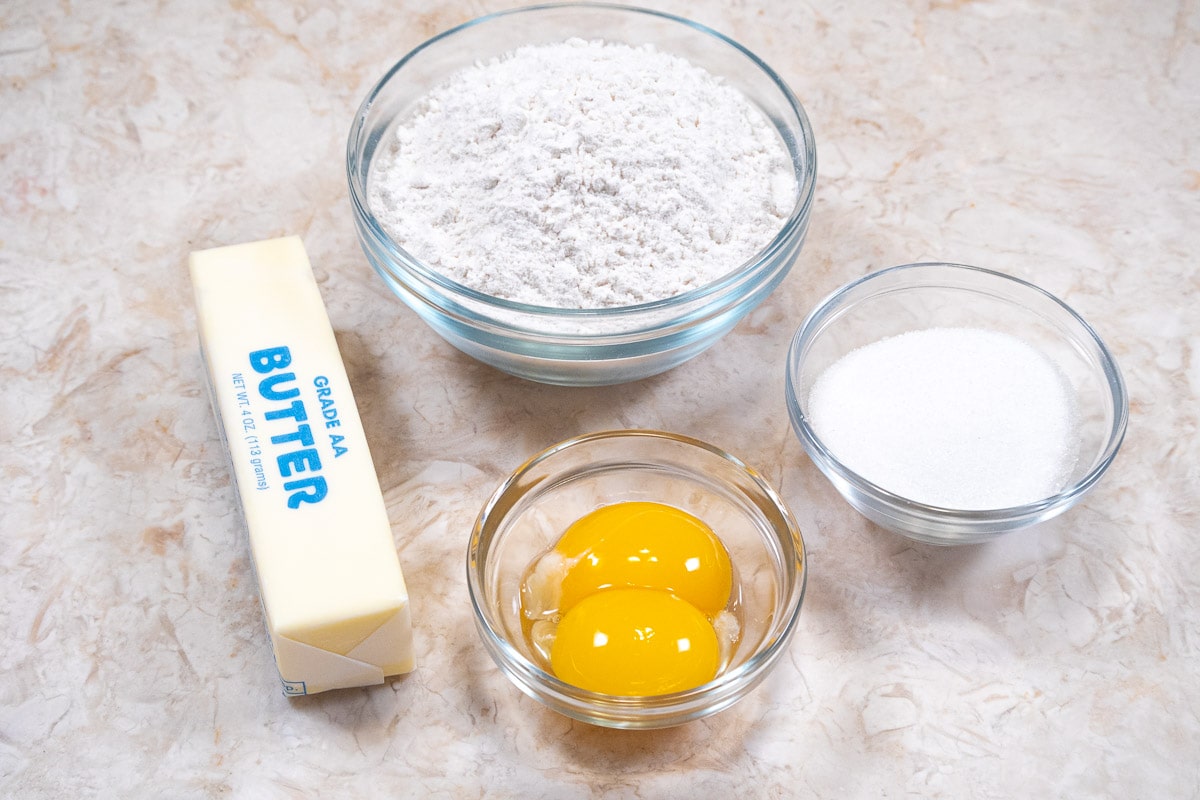
Clockwise from: Unsalted Butter, All Purpose Flour, Sugar and Egg Yolks
Key Ingredients
- All-purpose flour: All purpose flour provides the structure need to support the butter, sugar and egg yolks. Egg yolks and sugar are both tenderizers and with the large amount of butter, the flour has to be strong enough to help the baked crust retain its shape.
- Unsalted Butter - Butter gives this crust its own pronounced rich flavor and tender crust. This is a perfect place for European butter with its intense flavor.
- Granulated sugar - Besides adding sweetness, it contributes to the crisp, delicate texture of this pastry.
- Egg yolks from size large eggs are used. They are the only binder in the crust and contribute a beautiful golden color of the pastry, as well taste.
Be sure to see the recipe card below for the full ingredients and instructions.
Step by Step Instructions
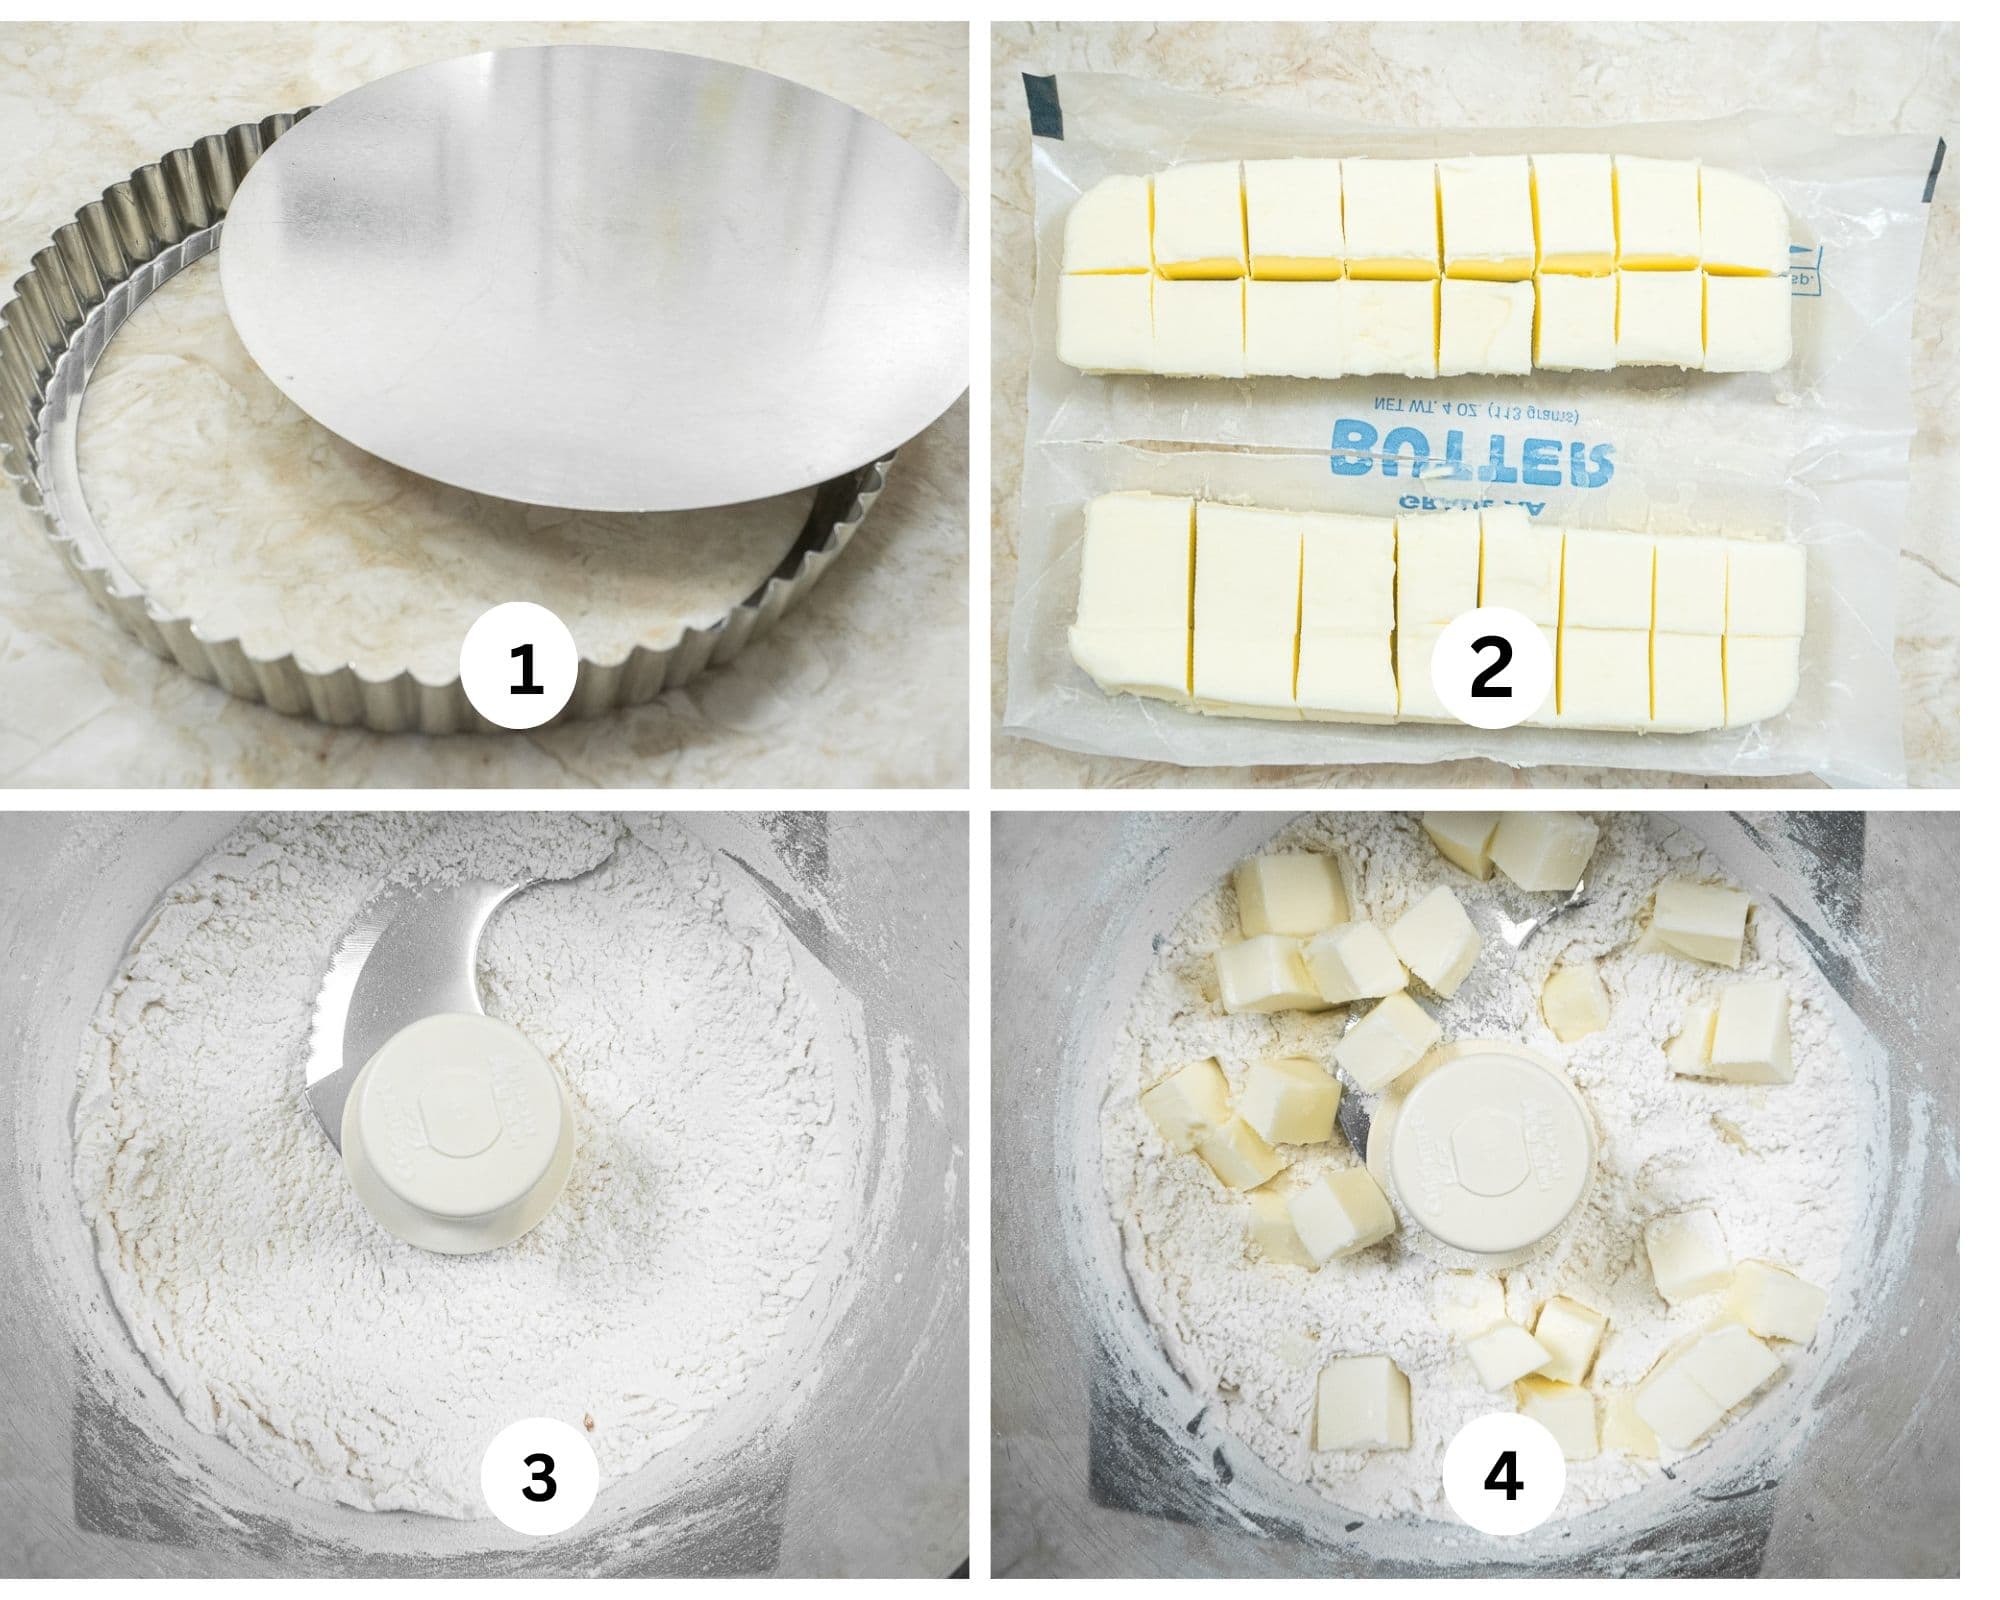
Step 1. This is a 9 x 1 inch tart pan with a removable bottom which makes removing the tart a cinch. Step 2. Cut the butter legnth-wise, then crosswise into smaller pieces. Refrigerate to keep cold. Step 3. Pulse the flour in the food processor several times. Step 4. Distribute the cold butter in a circle over the flour.
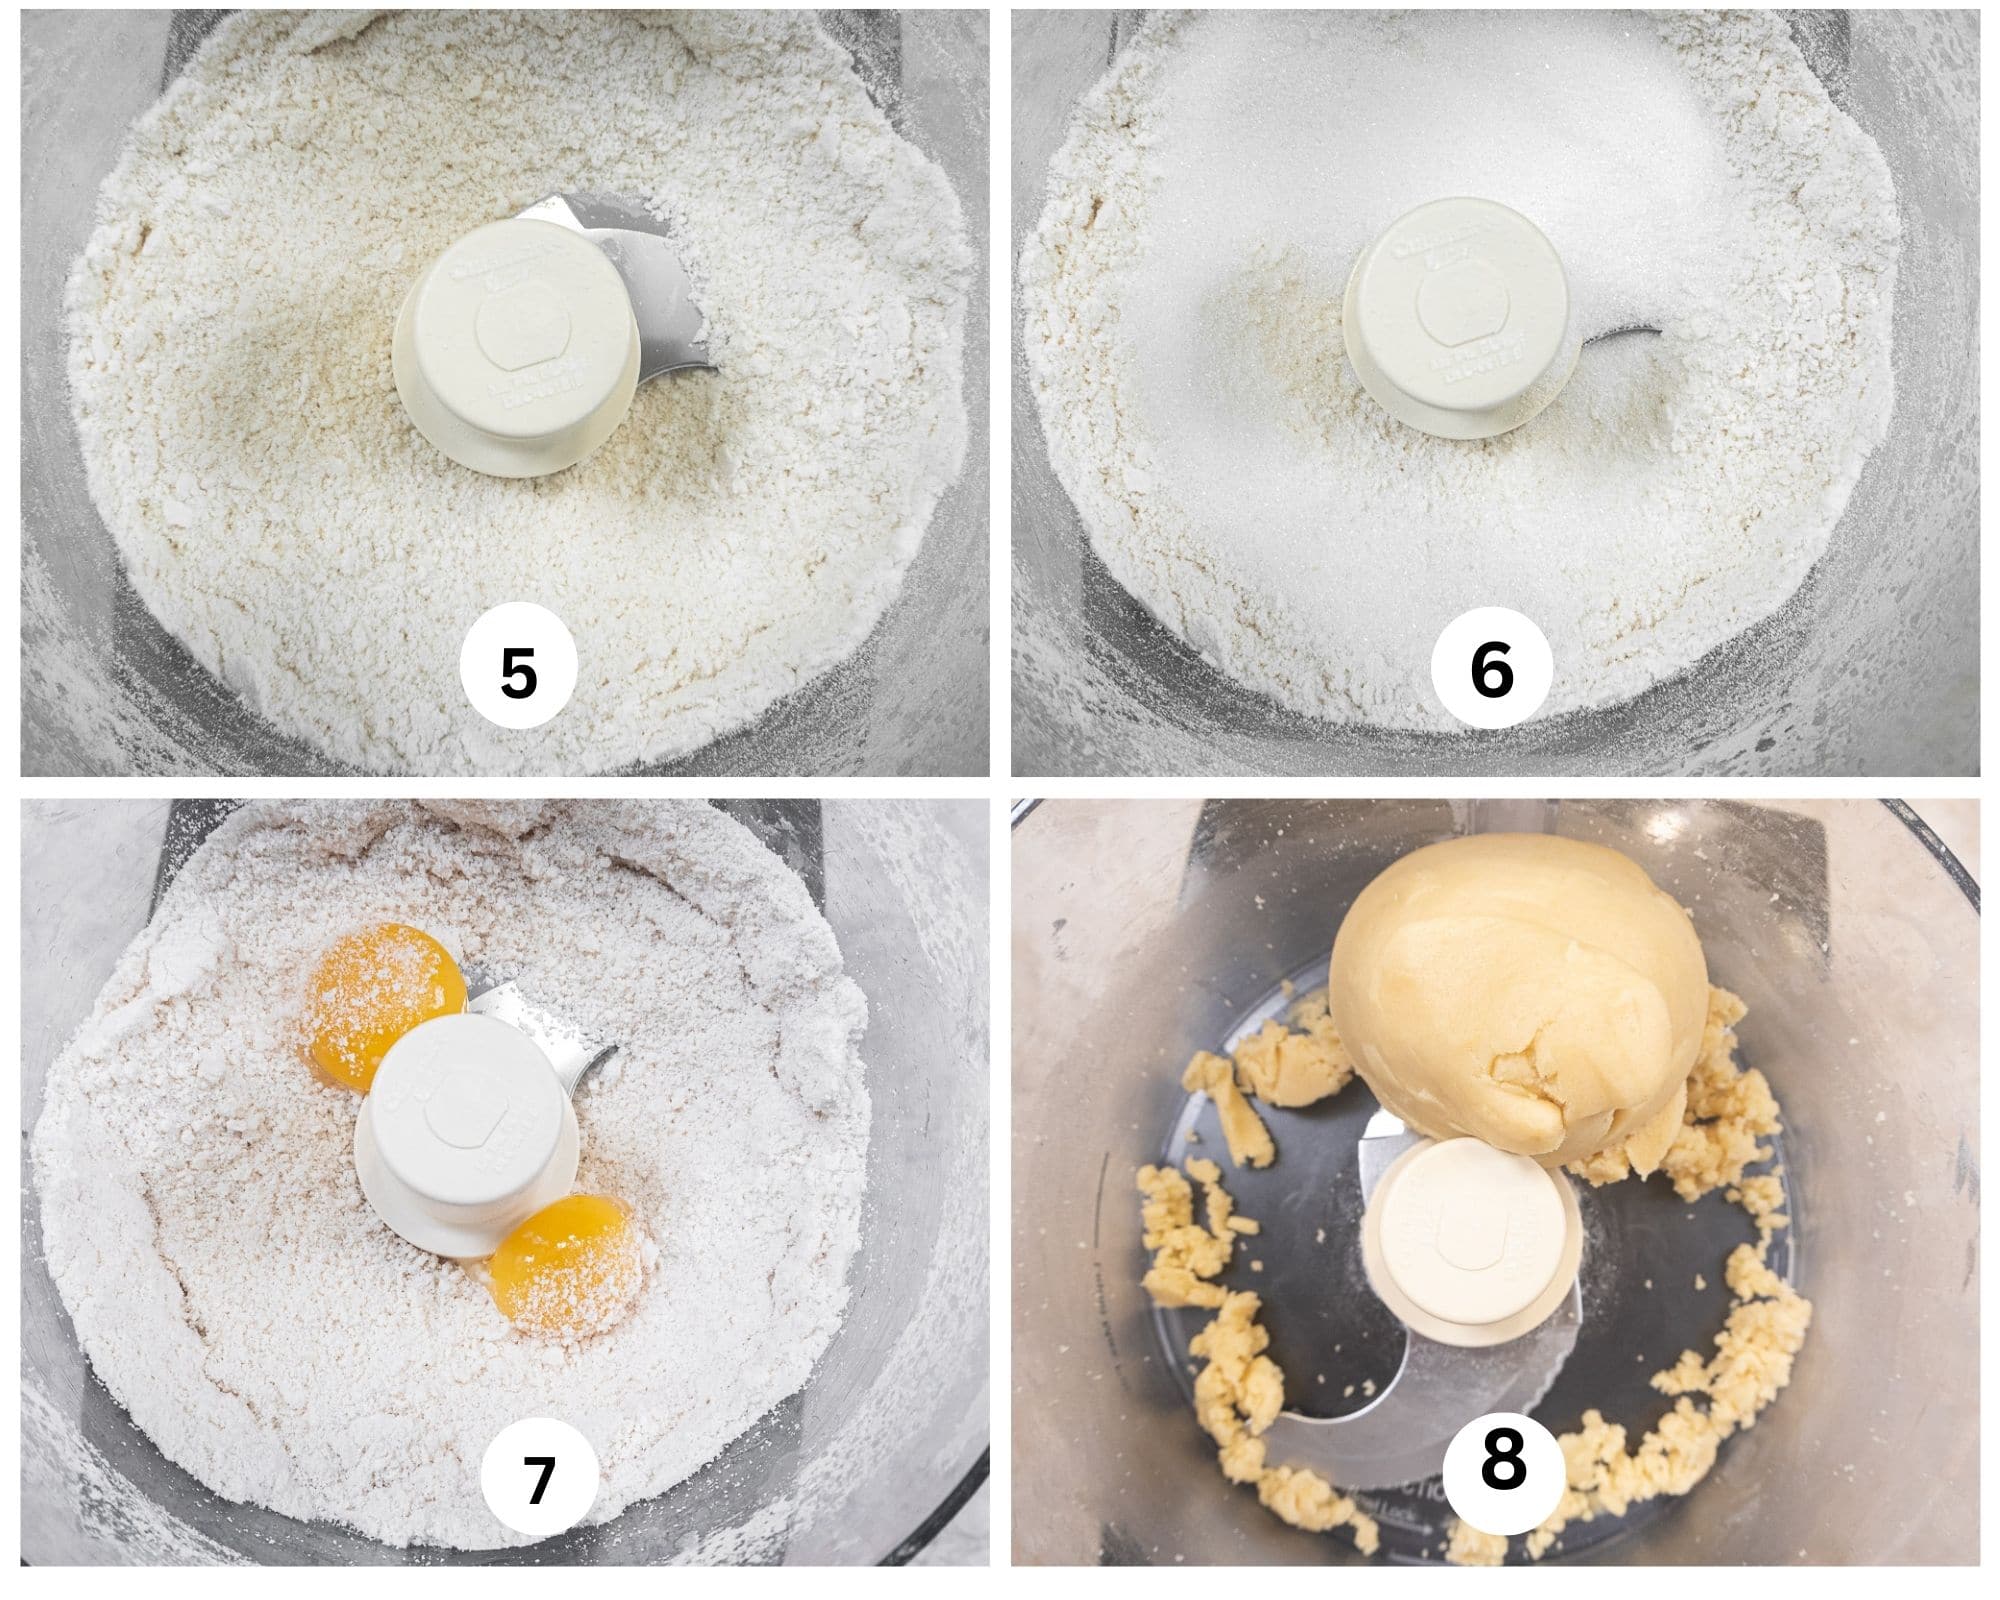
Step 5. Process to cut the butter into the flour so that it is indistinguishable. Step 6. Pour the sugar over the flour/butter mixture in the food processor. Pulse several times to mix. Step 7. Add the egg yolks to the food processor. Step 8. Process the ingredients until they form a ball. This may take a little time. If the dough isn't coming together, rearrange the dough in the processor as needed if it isn't forming a ball.
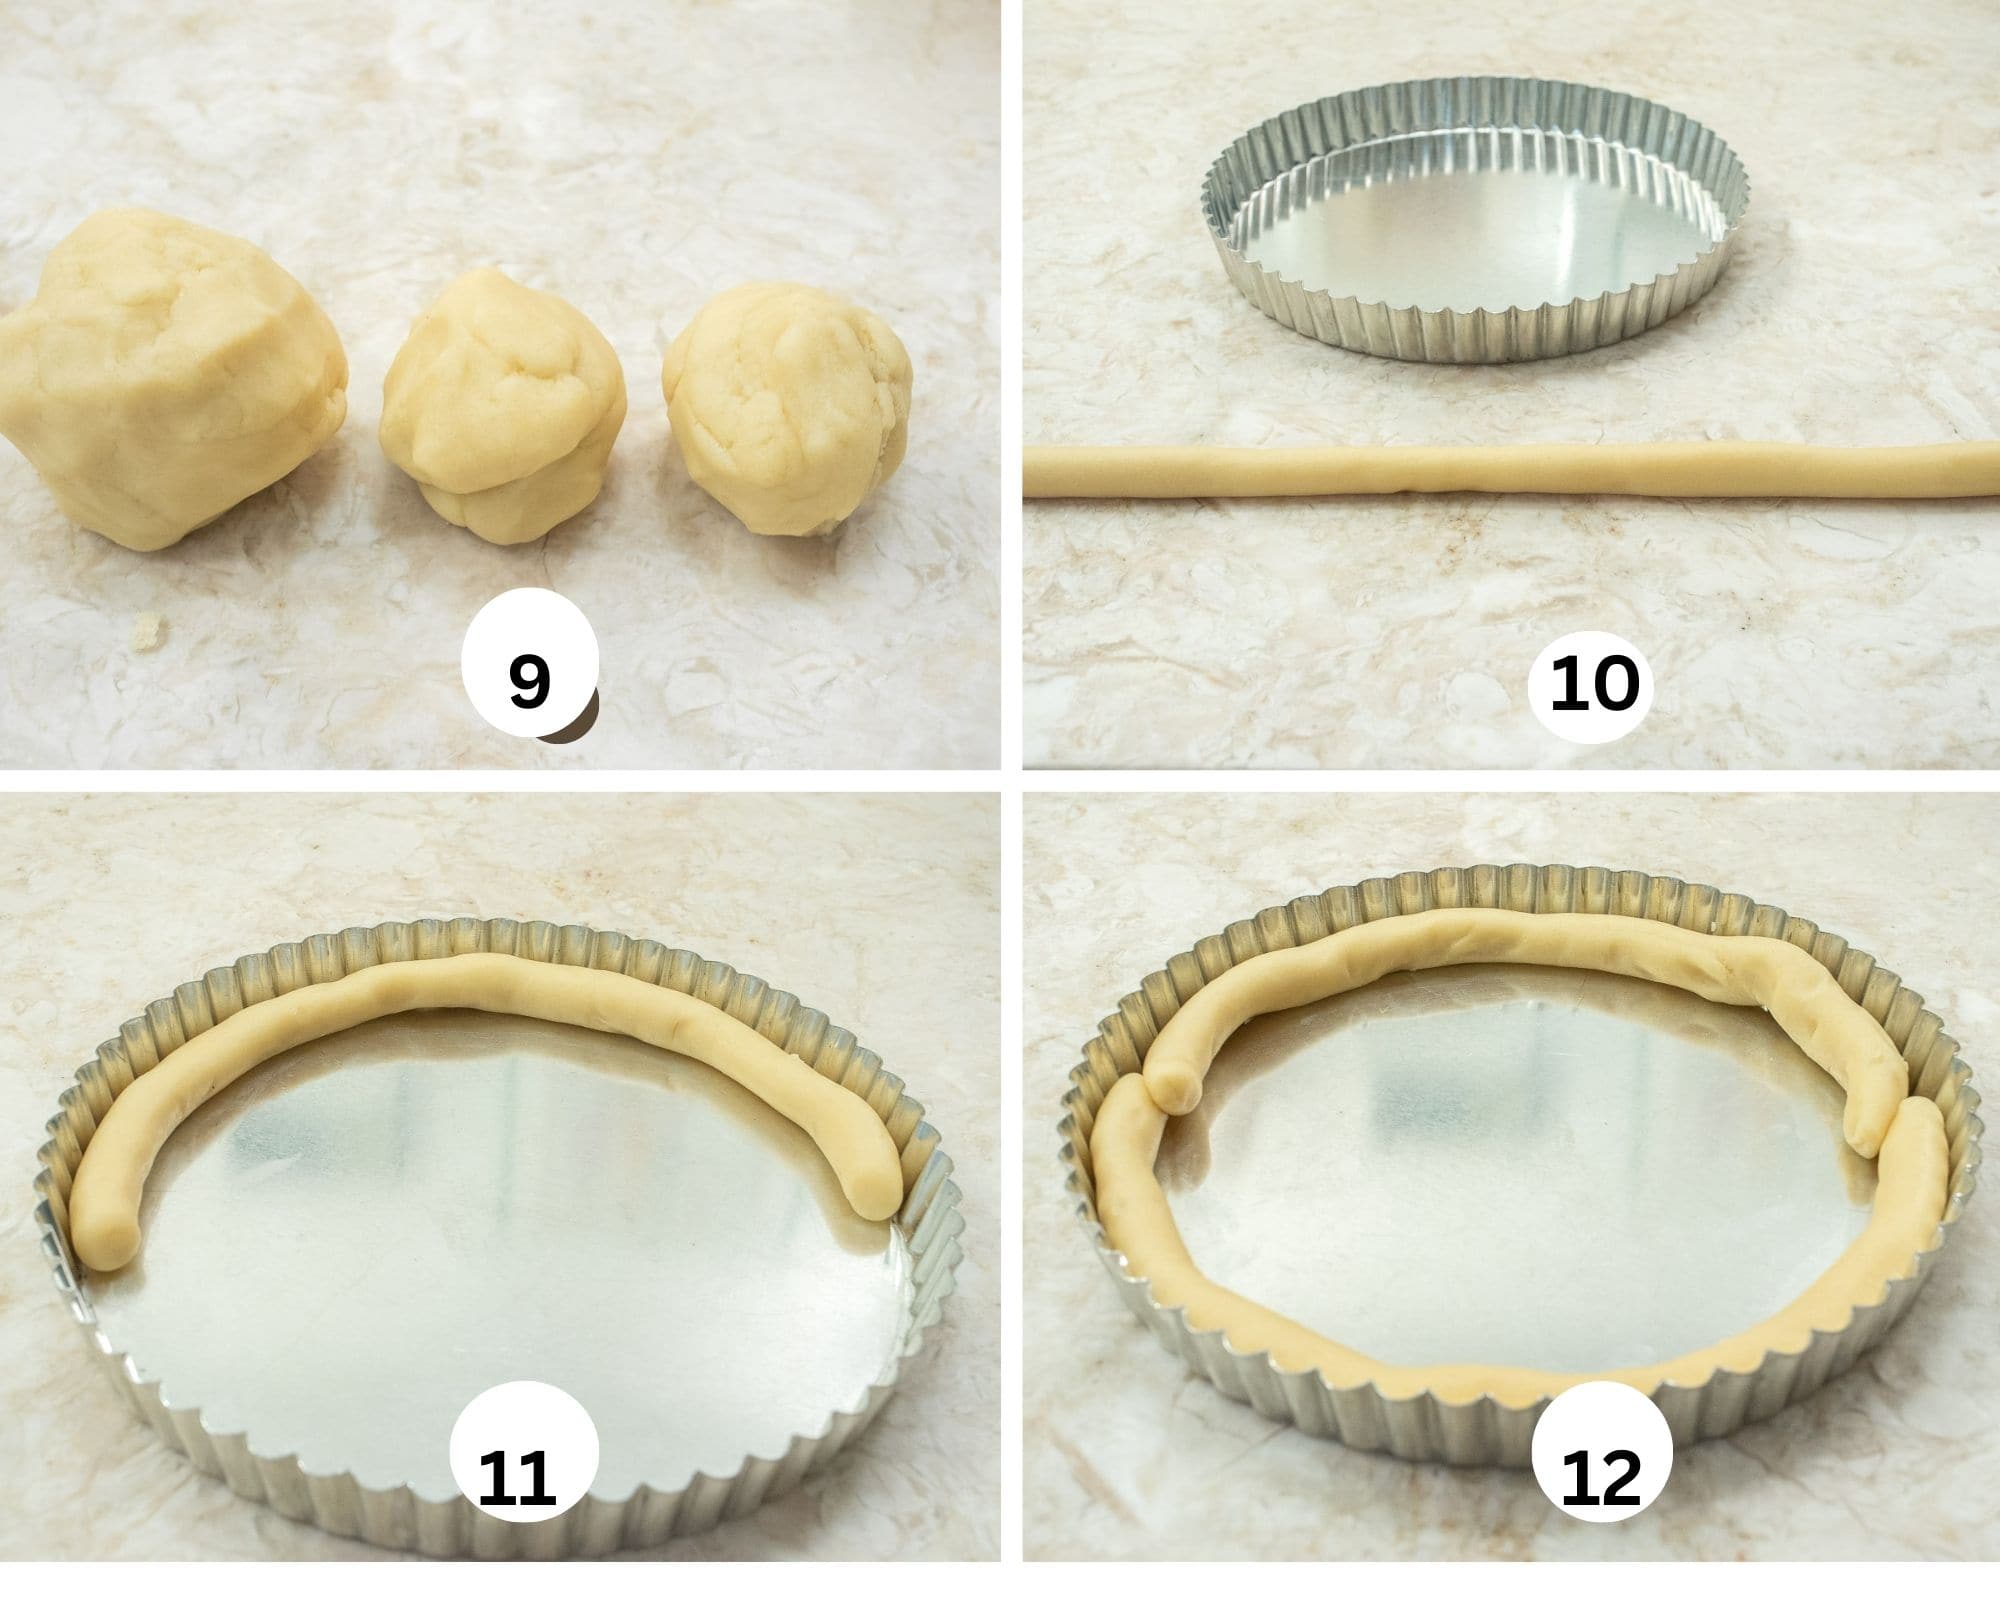
Step 9. Divide the pastry in half. Divide one half into half again making l large piece and two smaller pieces. Step 10. Spray the center of the tart pan only. Roll one piece of the smaller ball into a 14" rope. Step 11. Place the rope of pastry on one side of the tart pan going a little over halfway around the inside. Step 12. Place the second rope along the other edge making sure the ends overlap by about 1". Moisten them slightly and press them together firmly.
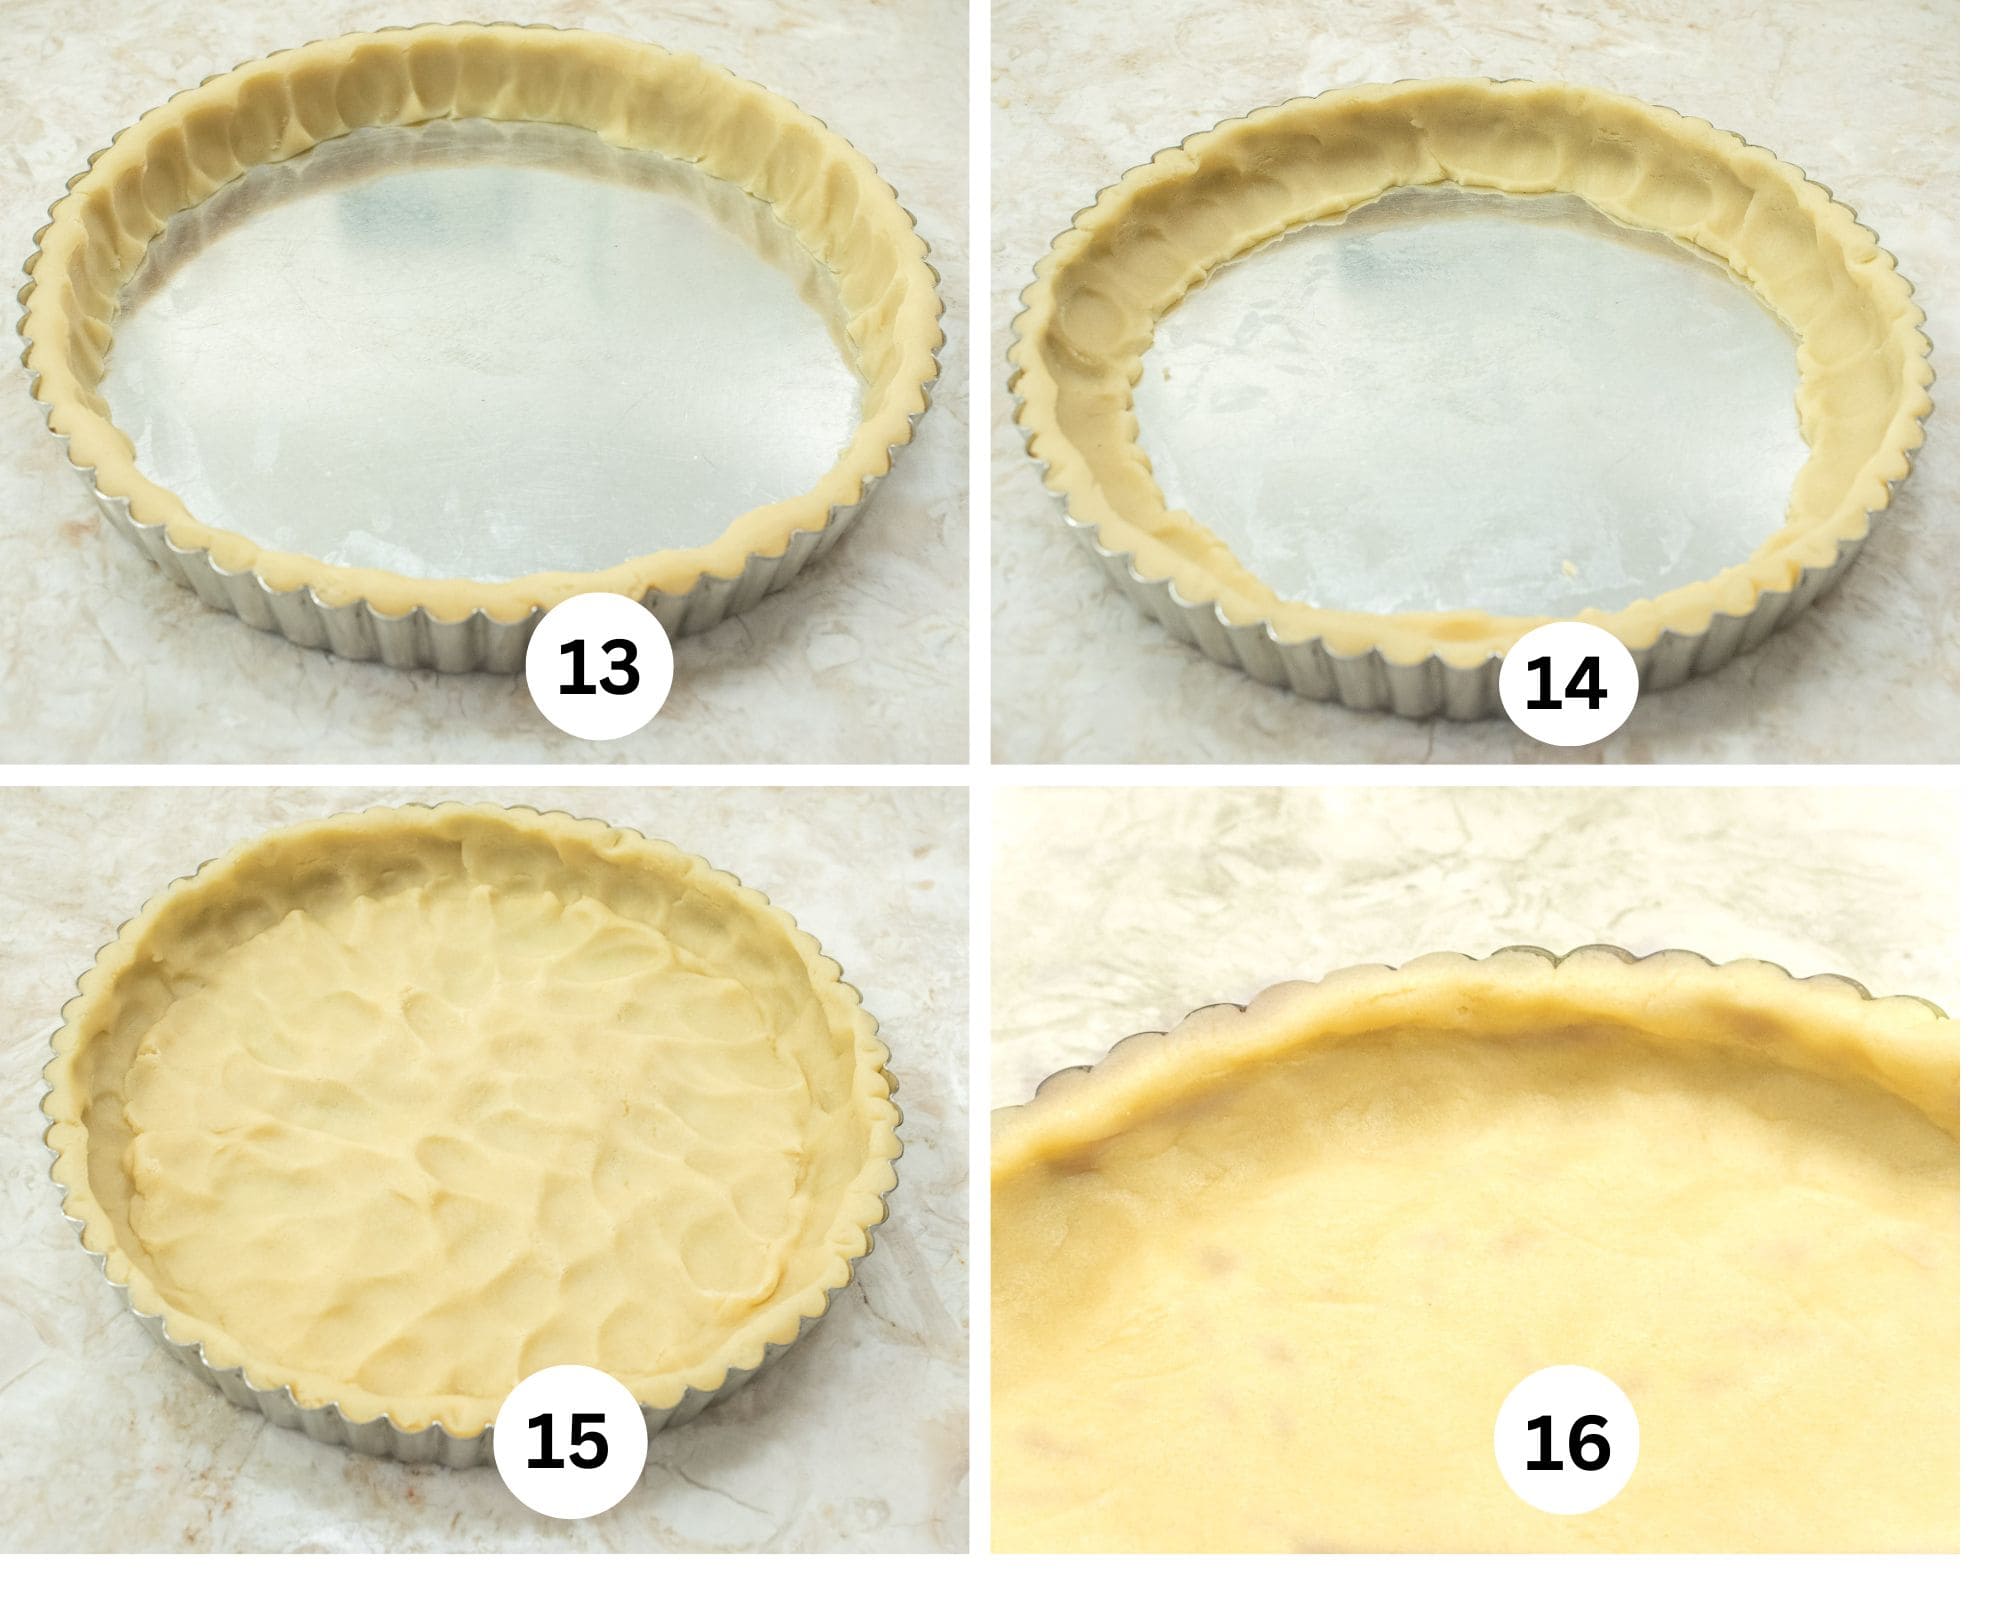
Step 13. Press the ropes along the sides of the pan working them into the fluted edges. Step 14. Press the bottom edge of the dough about an inch out towards the center of the pan. Step 15. Flatten the remaining piece of pastry and press it out to meet the pastry at the edge of the pan. Step 16. Press the side and bottom edges together so no seam shows. If the crust is to be baked with a filling, add the filling and continue as the recipe instructs.
To partially bake or blind bake the crust
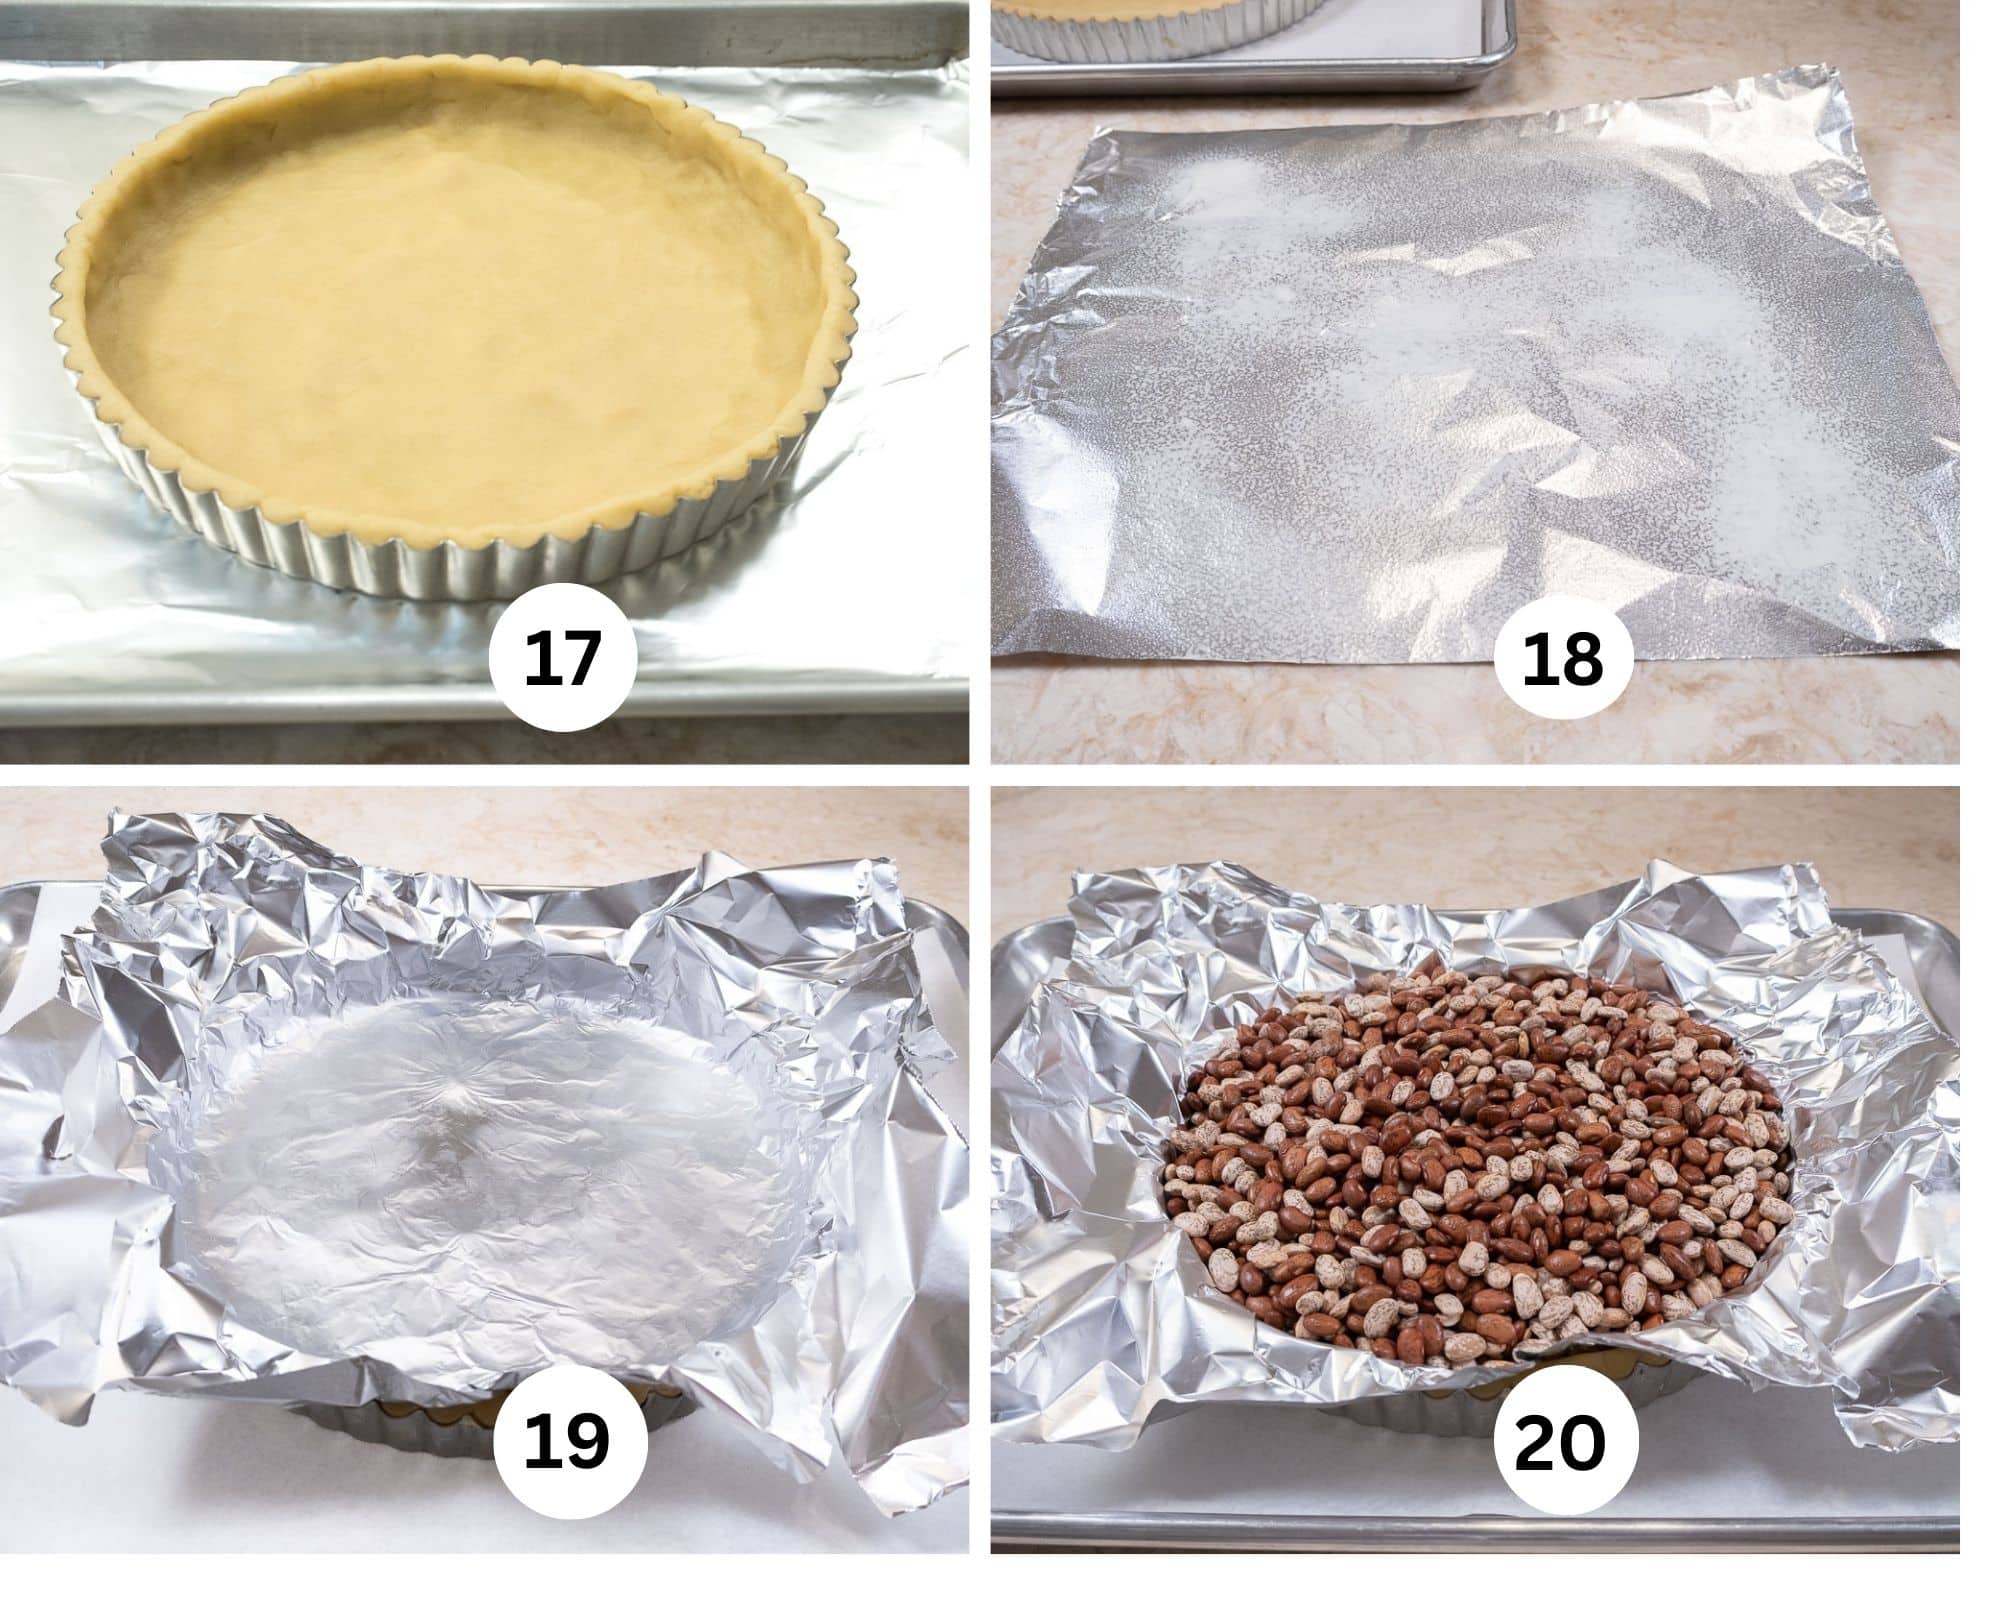
Step 17. With the heel of your hand, press the bottom crust so it is perfectly smooth. Then press down on the top edge of the pan so it is even with the pan. Chill the pastry until very cold or frozen. Place the pan on a baking sheet. Step 18. Spray a large piece of foil with a non-stick baking spray. Do not use parchment paper as the beans get heavy and they can break through the paper when removing. Step 19. Place the foil, sprayed side down into the pan. Press the edges of the foil against the pastry. Step 20. Fill the shell with pie weights or beans. For a partially baked or par baked shell, bake it with the beans for 20 minutes.
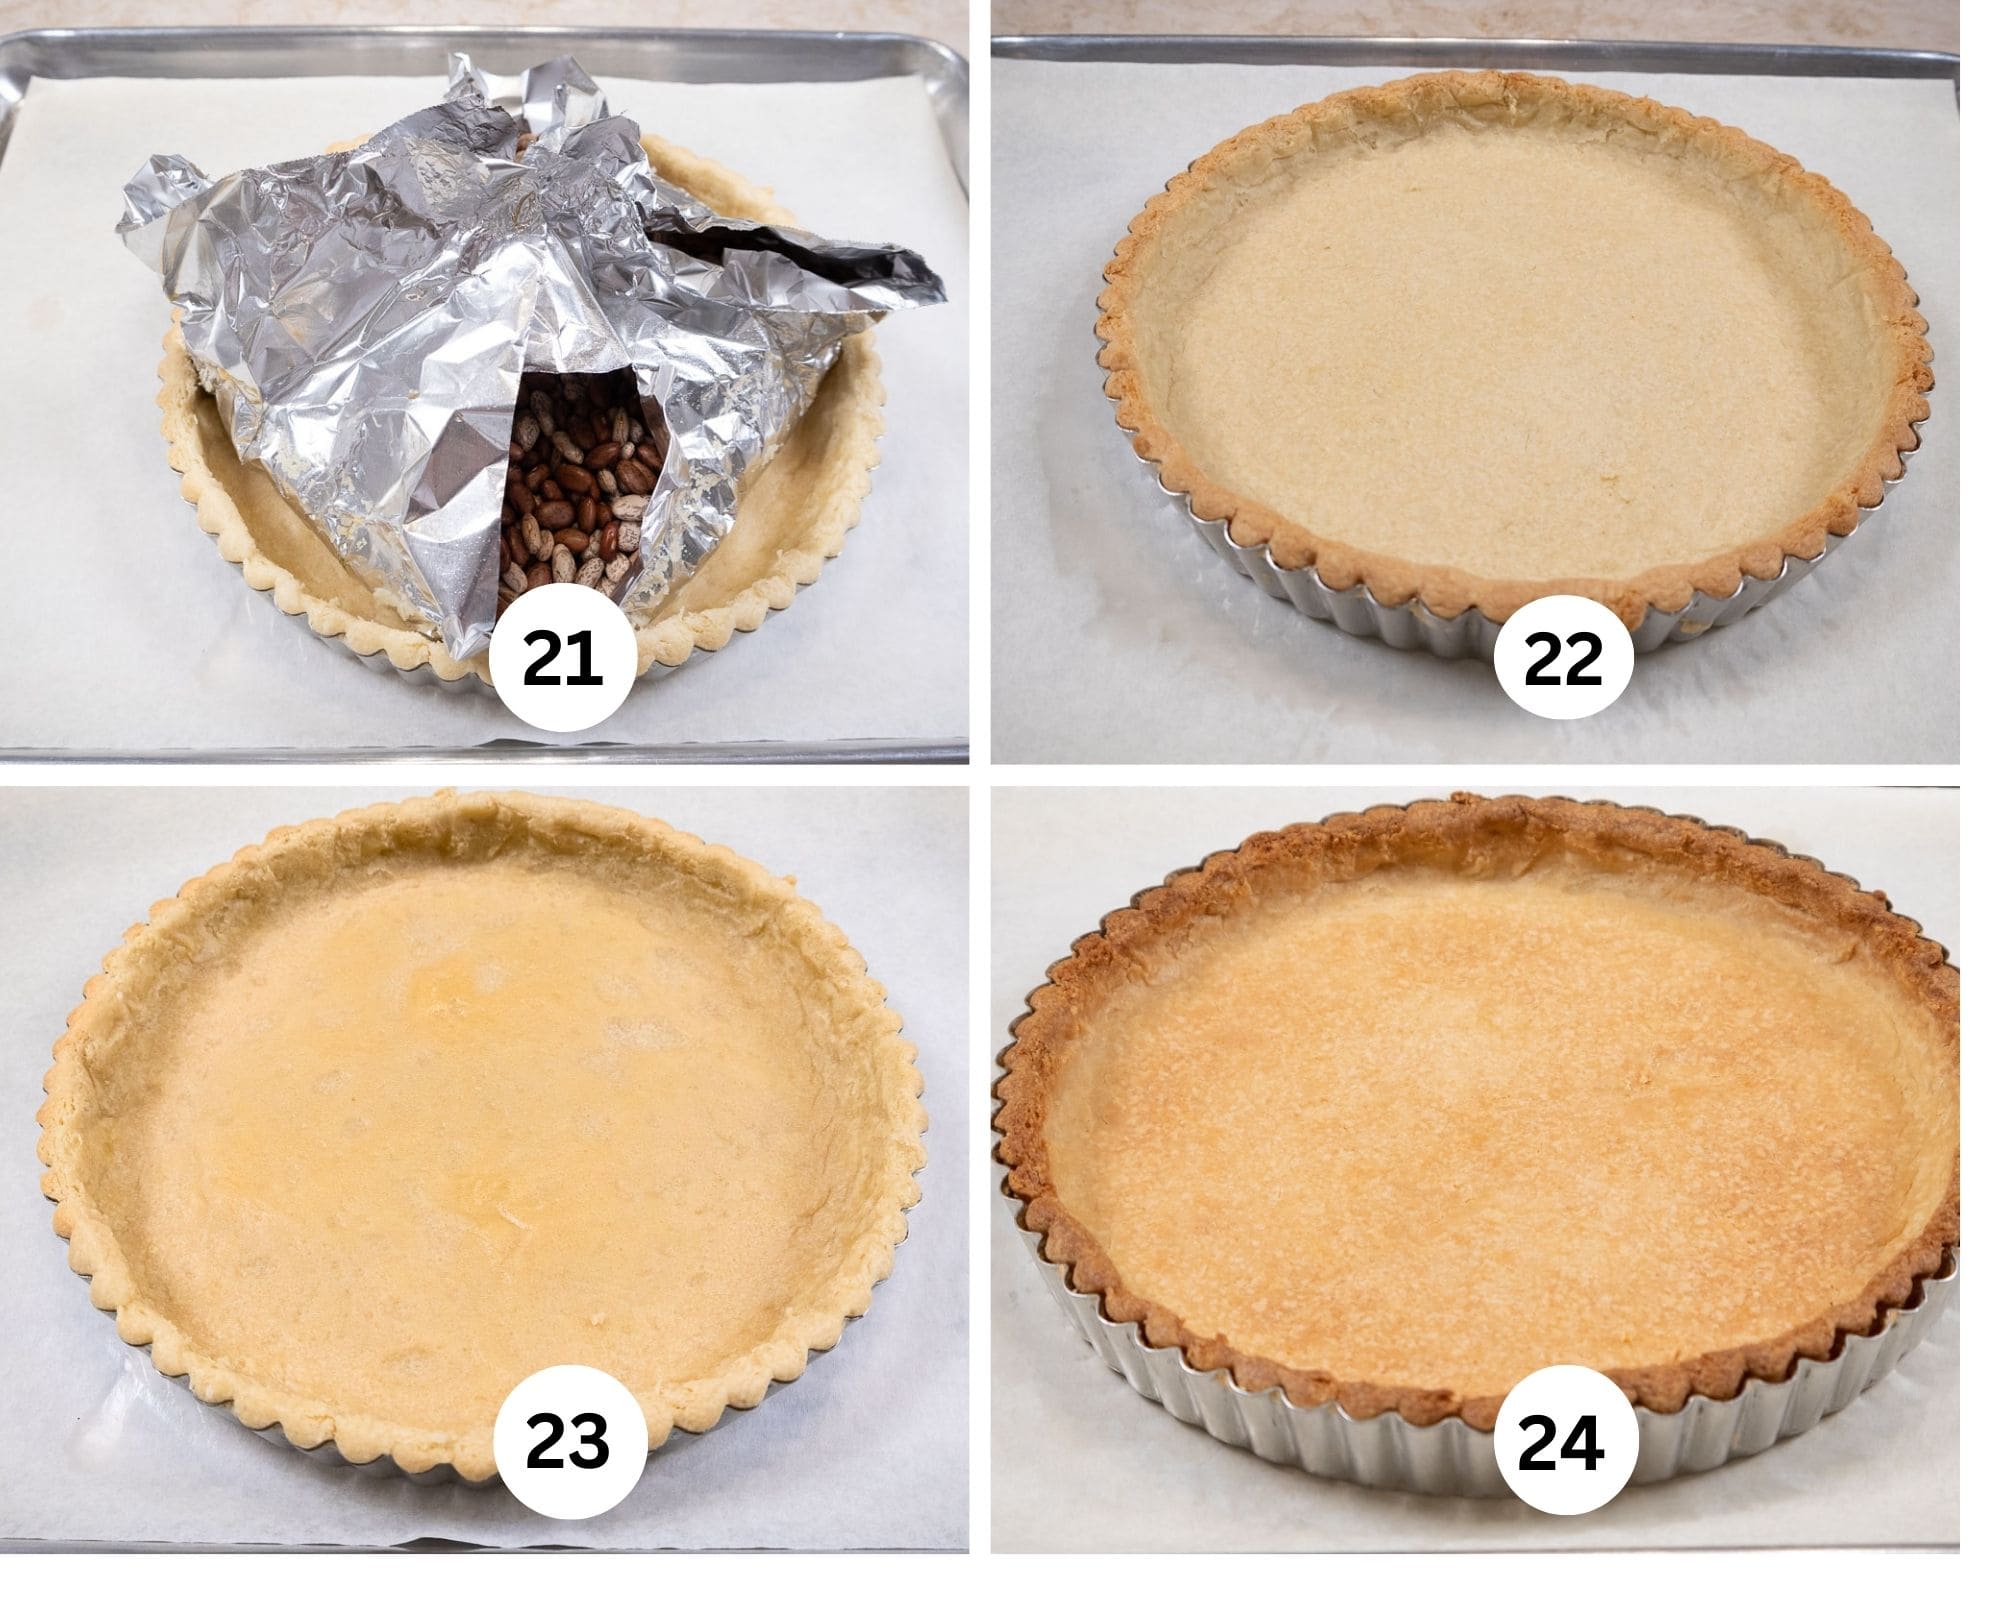
Step 21. Carefully remove the beans by lifting the 4 corners of the foil. Step 22. Remove the weights from the shell. Bake for another 5 to 8 minutes until the shell is about two-thirds baked. The shell should be firm but not completely baked. Step 23. This is a partially or par baked shell that will be filled and baked again.The shell should be firm but not completely baked. Step 24. For a fully baked or blind baked shell ready to fill, after removing the beans, continue baking the shell for another 8 to 10 minutes until the shell is completely baked, firm and golden brown. Cool the crust before adding a filling.
Recipe FAQs
Pâté Sucrée is French for "sweet dough". It is a classic French pastry crust made with flour, butter, sugar and egg yolks. It's used for sweet tarts and makes a crisp, tender, slightly sweet shell.
Yes it works well for both. The amount of dough needed will depend upon the size of the shell being used. They will require less time to bake so watch them carefully,
An American pie crust is usually made with flour, shortening, or butter with some shortening and water. It has no sugar or egg. Pea size pieces of butter and shortening are left in the finished dough making it very flaky and tender. Pâté Sucrée is made with butter and sugar which are creamed together. It is not flaky but crisp.
It is best suited to sweet fillings as it is a sweet crust. For savory tarts Pâte brisée is a better choice because it is not sweet and has is a flaky crust.
Storage
The pâté sucrée dough can be made ahead and frozen, well wrapped for several months. Bake while frozen. See instructions above.
Expert Tips for the best PÂTE SUCRÉE
- Keep the butter cold. The butter should be cold when it goes into the processor. This allows it to be cut in completely and still retain its shape after adding and processing the additional ingredients.
- Don't over process the dough. Process only until the dough forms a ball. Once it forms a ball it's finished and ready to use. A few straggling pieces may not have been incorporated but those can be added when pressing in.
- Press the dough in evenly. The same thickness throughout the bottom and sides of the tart shell helps it bake evenly.
- Make sure there are no seams. Pay particular attention to the corners where the bottom and sides meet. They must be pressed tightly together with no seam showing. A seamless crust is less likely to have weak spots.
- Don't dock the crust. Docking means to prick the crust, usually with a fork, to prevent bubbles from forming when baked. I don't dock this crust because it is not a flaky dough and is less prone to bubbling. Also, if the filling is liquid when it goes in, it can leak through the crust.
- Freeze the crust before baking. Freezing the crust will help it retain its shape.
- Use foil rather than parchment paper. The foil is stronger than parchment paper and can hold the pie weights or beans and can safely be lifted out. Parchment can tear when lifted out.
- Spray the foil. Tear a large piece of foil off and spray the center large enough to cover the bottom and sides of the crust with a non-stick baking release. Center the foil, sprayed side down and press it lightly into the crust making sure it adheres to the sides also. Then fill it with the pie weights or beans. This keeps it from sticking to the crust and damaging it when it is released.
- Be careful when removing the weights. First, remove the crust from the oven. Don't try to remove while still in the oven. Lift the foil by the four corners to keep the weights from spilling onto the crust or counter.
- Choose the correct baking stage for your filling. An unbaked shell is best when the filling is going to be baked for 50 or 60 minutes. A partially baked shell is best for fillings that will be baked again A fully baked shell is best for fillings such as passtry cream, curd or ganache that aren't baked.
Easy Fall Tarts for the Coming Season

This easy Pâte Sucrée pastry crust is one of the most useful recipes to have in your baking repertoire. With just four ingredients and a simple press-in method, you can make a crisp, tender French tart shell without the frustration of rolling it out. Whether you fill it with fruit, fruit curds, pastry cream, chocolate ganache, or frangipane, this is your foundation for beautiful homemade tarts.
Love this Pâte Sucrée Crust or any other on my site? Please leave a 5-star 🌟🌟🌟🌟🌟rating in the recipe card & consider leaving a review in the comments further down, thanks! Star ratings help people discover my recipes online. Your support means a great deal to me.

The Easiest Pâte Sucrée Crust
Equipment
- 9x1" tart pan with removable bottom
Ingredients
- 1 ¼ cup all-purpose flour (175 grams)
- 1/2 cup unsalted butter, cold and cut into small pieces (114 grams)
- 1/4 cup granulated sugar (50 grams)
- 2 large egg yolks
Instructions
- Have a 9”x1” tart pan with a removable bottom for the tart handy.
- Place the flour in the bowl of a processor. Pulse several times.
- Place the cold butter over the flour and process until the butter is indistinguishable.
- Pour the sugar over the mixture and process briefly to mix in.
- Add the yolks and process until the crust comes together in a ball. This may take a bit. Reorganizing the pastry in the processor helps. If your processor is a smaller one, divide the mixture in half and process each half separately. Join the two pieces together by kneading them a few times.
- Divide the dough in half (about 180 grams).
- Divide one half in half again (about 90 grams).
- Roll one of the smaller pieces of dough into a 14" rope that will go a little over halfway around the inside of the tart pan.
- Repeat with the second half, overlapping the edges of the dough. Press the edges together so no line appears.
- Press the pastry into the edges of the pan.
- Press the dough about 1" into the bottom of the pan towards the center.
- Flatten the remaining half of the dough and place it in the center of the pan. Press it out to join the edge dough. Join these completely so there is no line that can be seen.
- To partially bake the shell, freeze the crust until hard. Preheat the oven to 375°F. Tear a piece of foil about 13" long and spray one side of it with a non-stick baking release. Line with the crust with the foil, sprayed side down. Fill the pan to the top with pie weights or with beans.Bake for 20 minutes, remove the weights carefully by grasping all four corners of the foil and lifting out. Return the crust to the oven and bake for about 5 minutes more until about two thirds done baked. It should not be completely baked but should be firm.
- To completely bake the crust, follow the above instructions and bake until golden brown, about 8 to 10 minutes more.
Notes
Nutrition


Gale says
An easy straightforward recipe with great instructional photos. And it baked up perfectly. Useful for loads of recipes.
Helen S Fletcher says
Hi Gale - Just what I aimed for. Thanks for letting me know.
Gina says
I used this recipe to make mini tarts. I let them freeze overnight and once I got them in the oven, they turned into flat disks. I’m wondering if this recipe needs water? Completely gutted right now♀️
Helen S Fletcher says
Hi Gina, I am not sure what happened. The only thing I can think of is that you made them too thick. Mini shells must be thin no matter what recipe is used. They need to be baked quickly. If you go to the Mincemeat Tarts, there is a crust that works well in small pans.
Izabella Nagle says
I've been trying to re-create a dessert from my childhood, a poppy seed slab tart. I think this might be the crust. Helen, if you happen to get to this comment, would you be so kind and answer 2 questions? First, does it make sense to use caster or powdered sugar in this recipe? That's what I remember being used. Second, my filling has a mix of cooked and ground poppy seeds, honey, chopped hazelnuts, and candied orange peel, with stiff egg whites folded in right before the baking. Can I pour the filling into a raw sucree dough shell and bake it, or would you recommend par-baking it before filling? I don't want to overbake the dough. Thanks in advance for your wisdom on this!
Helen S Fletcher says
Hi Izabella, I know the recipe works the way I have written it. I can't speculate on if you change the ingredients because I haven't tested it that way. As to the baking, it depends upon how long the tart bakes and at what temperature. My best guess is that if it is baked for about an hour at around 375° it should be ok. If it is 30 minutes or so, par-bake. The filling sounds wonderful.
Izabella Nagle says
Thank you so much for your guidance! I ended up par-baking the crust and that worked out well. The crust was delicious but I think I'll have to experiment with other ones because this one was too tender and fragile for the filling. I will need something a little sturdier, so sablee is out too, I think. Any ideas or suggestions you might have are appreciated. Thank you very much for this website - what a wonderful way to share your gift with others!
Helen S Fletcher says
Hi Izabella, please send the recipe to my email. I can't advise until I see it. Also, did you use granulated or powdered sugar. I have used this recipe with really moist fillings like the Cinnamon Whiskey Tart and it worked perfectly.
Diane Perris says
What an easy and lovely dough to work with! Don't be tempted to chill for a long time and roll out, as is often done with tart pastry. There is a reason Helen instructs to apply the dough to the tart pan in stages; if you try to roll it out and lay it in it will break into pieces. I know because I tried this the first time. I was testing a block of marble for pastry making but this was not the dough to test with. Fortunately it was very simple to piece together in the tart pan anyway. I chilled it briefly after shaping, then par baked as instructed. It held up well for my filling of orange ricotta and chocolate, and had just the right hint of sweet. This will become my go-to for many kinds of sweet tarts.
Helen S Fletcher says
Diane, I'm not sure what recipe you were following. The Easiest Pate Sucree Pastry Crust isn't rolled out. It's a press in because it is literally foolproof. I would never try to roll it out and put in in the tart pan for the reasons you stated. Do send me the link to the crust you made. I vaguely remember one crust that I rolled out the bottom, but never did I roll out the crust and try to place it in the entire pan. And even that one, I would have chilled or frozen the rolled out bottom before placing it in the pan. Happy it worked your way.....but I can guarantee my way is easier.
Danetta says
I love the recipes like this one that show the building blocks of making pastries and then let you use your imagination.
Helen S Fletcher says
Hi Danetta, that's the fun of baking. It can be individualized by anyone.
Mark Mayer says
I’m taking the time to write a belated review. This was truly excellent and not too sweet. One further note. Tart crusts always frustrated me. How could someone who has baked a zillion cakes ( a lot more can go wrong here- chemistry is chemistry) consistently mess up tart dough? Follow Helen’s “double rope” technique for creating the crust and you will never have trouble with an ugly or malformed crust again. Thanks, Helen!
Helen S Fletcher says
Hi Mark - happy to hear from you. When I had the bakery we did everything by hand. I had to find a way to teach employees and easy way to make the many crusts we made. Happy it works for you too.
Susan says
Good morning,
This is such a game changer for me in how to line a pastry tin. Thank you so much for the method!
Helen S Fletcher says
Hi Susan - Baking and Pastry have the reputation of being difficult. I love to pass along easier, faster methods without compromising the recipe. Happy to have helped.
Hilda Willman says
Helen: Have you stopped spraying the bottom of the pan? Your European Tarts book (which is my go-to virtually every time I make dessert) calls for spraying the bottom only of the tart pan with releasing spray. Making my first of two Chocolate Caramel Pecan Tarts for gatherings next week and want to make sure I get them right. Happy Thanksgiving, Helen! And belated Happy 83rd Birthday!!
Paule-Marie Bunyan says
I've been baking since my grandmother taught me when I was 8 or 10 - 70th birthday coming up next month.
I love how you put the pate sucre in the tart pan. Much easier than I have been doing it for years.
I'm curious though, why no salt? The recipe I've been using since the mid 60's, used salted butter. When I started making it with unsalted butter, it was bland.
I will be switching to your method and recipe for this year's pumpkin cheesecake crust. Never too late to update a recipe I like.
Helen S Fletcher says
Hello Paule-Marie - I just had my 83rd. It's a great time of life!. Some recipes have salt, others don't. Some use salted butter, some don't. There is no right or wrong. It is personal taste. If you are used to salted crusts, this may well be bland. For me, I want the taste of the butter to be dominant. Do add salt if that is what you enjoy.
SallyBR says
a classic, and with your detailed explanations, I am sure anyone can do it!
I have intense dislike for blind-baking with weights (especially when making mini-tarts) - would this work in blind baking with just a little pricking with forks, or would it puff too much?
Helen S Fletcher says
Hi Sally - why don't you like blind baking. So many things can be done with a baked crust. Just curious.
SallyBR says
I don t mind in a big tart, but the mini ones it is so much hassle, get the parchment in, the whole process is kind of tedious when making say 12 of those….
Helen S Fletcher says
You're using the wrong recipe for the little ones. No parchment,no beans, just dough.